June 11, 2021
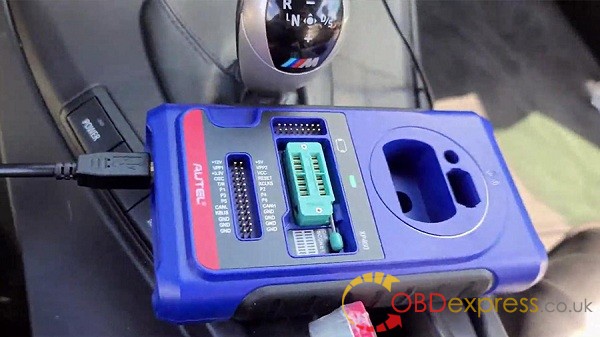
Skoda Octavia 2013 all key lost done via Aute IM508 + XP400 PRO
Autel MaxiIM IM508with XP400 Pro is able to program key for Skoda Octavia 2013 24C32 all key lost via OBD.Easy to use, Here we are
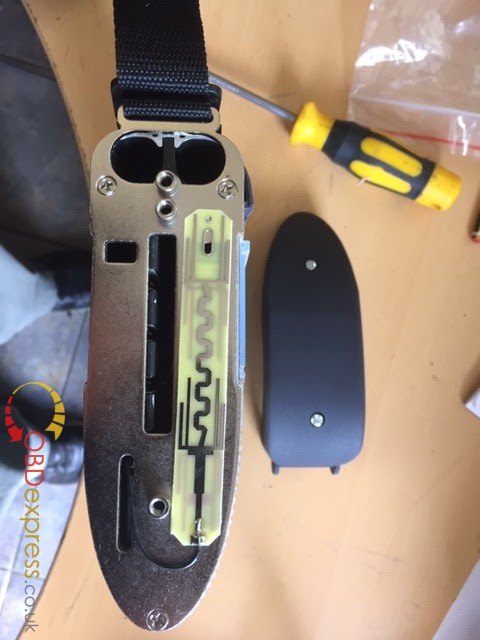
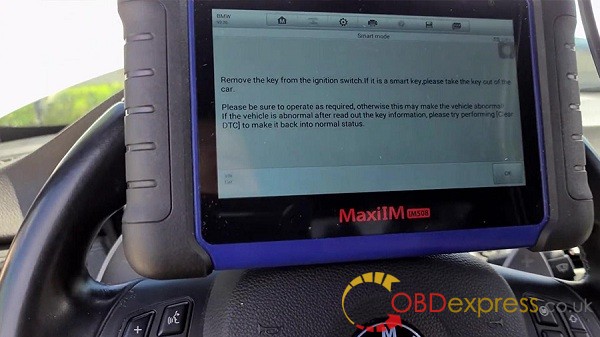
Look at the new blank key (after inserting it into the ignition and turning it on, you can see "NO Key†on the dashboard).

Operation starts:
Connect Autel IM508 and Skoda Octavia 2013 via OBD2 port
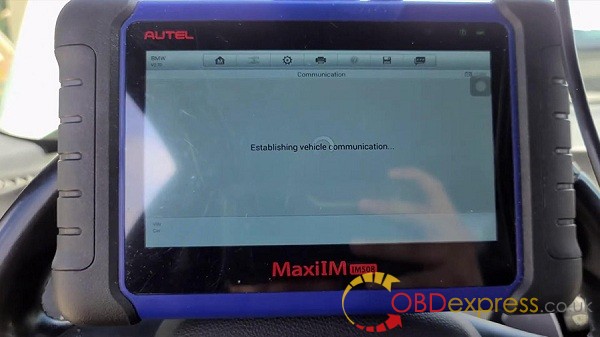
IMMO>>SKODA>>Expert selection>>IMMO IV Instrument CAN>>Auto detect


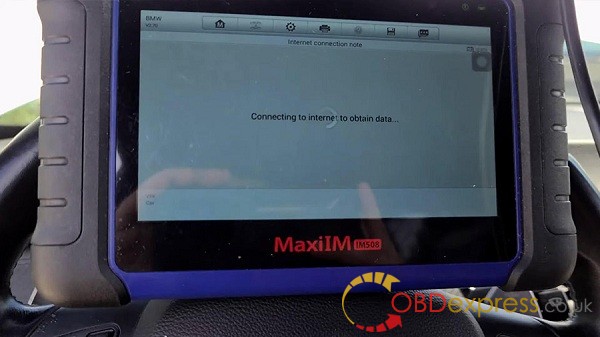
Diagnostic program loading...
System data initiazing...please wait
Establishing vehicle commuication...
Current instrument type isVDO NEC+ 24C32,press OK

To program all key lost there 3 steps below:
- Read IMMO data
- Make dealer key
- Key learing

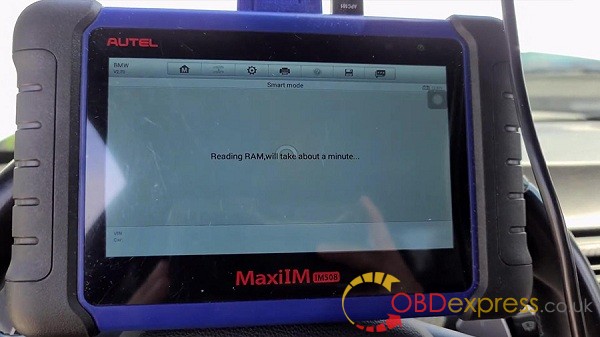
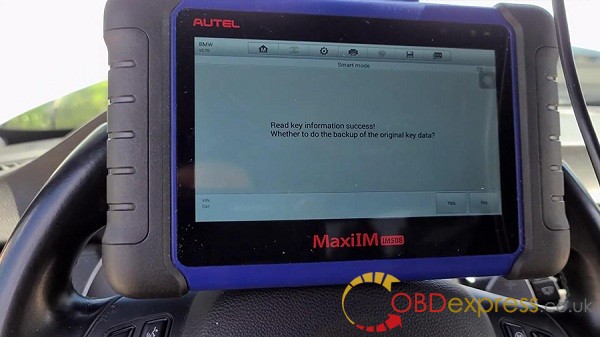
Step 1 Read IMMO data
Establishing vehicle commuication to read IMMO data only takes a few seconds
 Vehicle anti-theft infomation
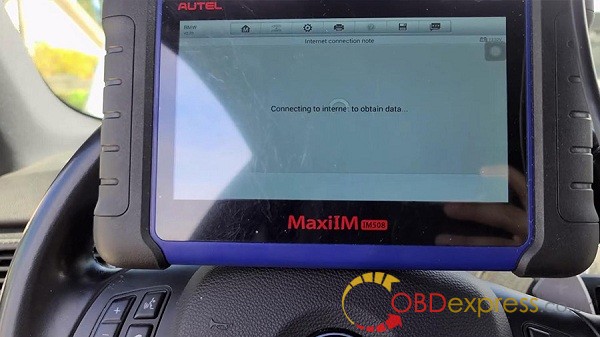
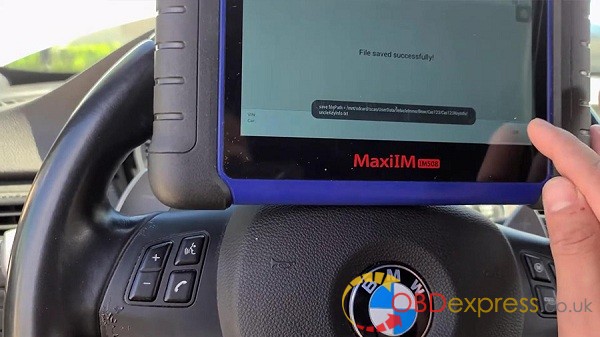
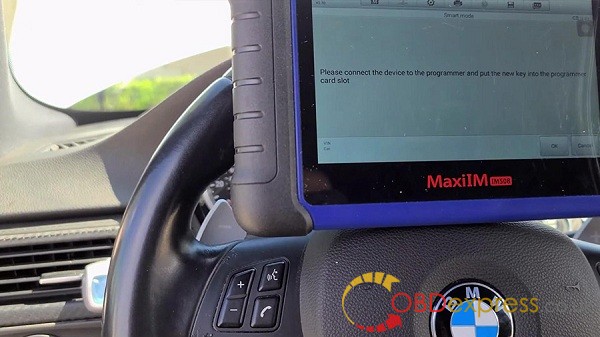
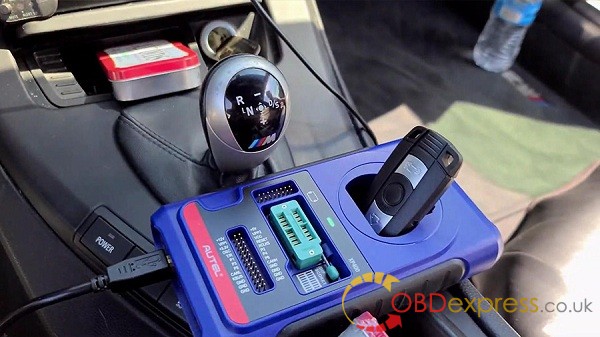
Step 2.make dealer key
Connection programmer...
NOTE:please put a blank key in the
XP400 PROprogrammer keyhole and then press"OK"

Connection programmer...
Establishing communication with the key ...
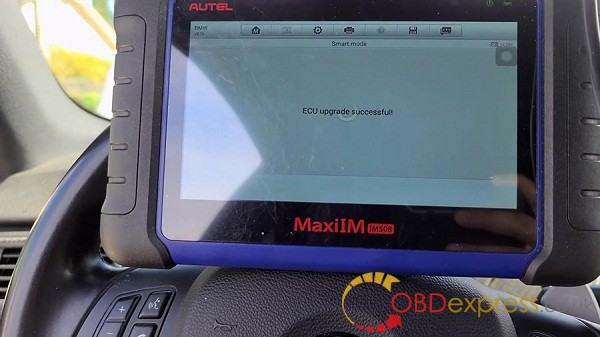
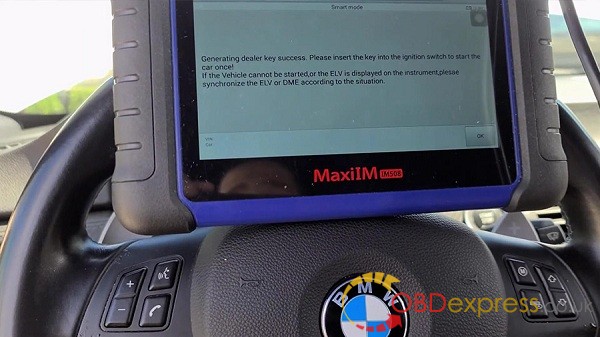
Make dealer key success!

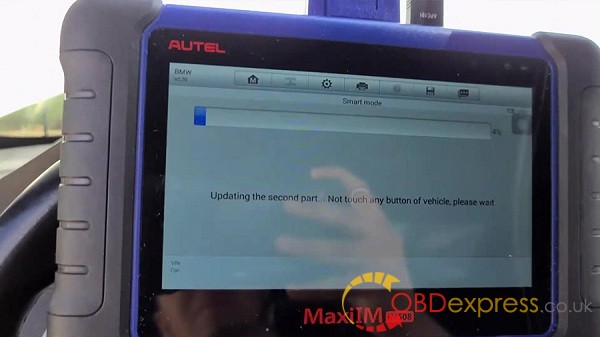
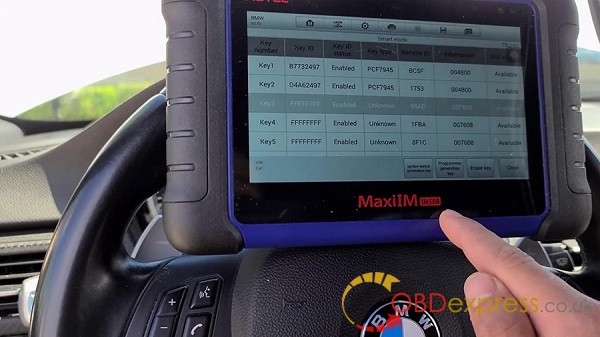
Step 3 .Key learing
Check: Does the vehicle have keys?

Number of keys that need to be learned (1-8)

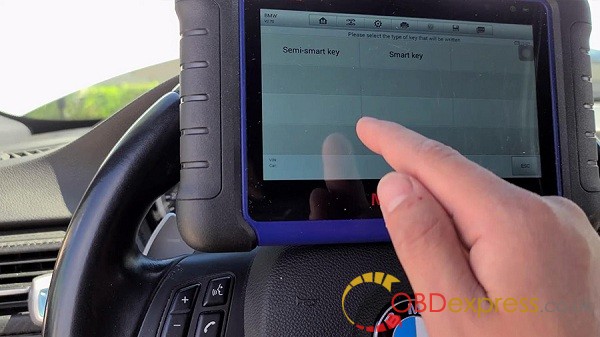
The next steps are to follow the Autel MaxiIM IM508 on-screen instruction to do until the car can start the car.
Establishing vehicle communication...
Please
insert in sequence the keys that need to be learned into the ignition,
switch within the 30s, and turn to ON, The keys should be changed at an
interval of less than 5s, Number of keys learned/Number of keys that
need to be learned: 0/1

Turn ignition off and wait for 5s, then turn ignition switch to ON.
Key learning completed.

Used
Autel MaxiIM IM508 and XP400 Pro to program key for Skoda Octavia 2013
with All Keys Lost. No dashboard out, no vag helper, no service mode, no
precoded key, only obd.
Source:https://www.autelim608.co.uk/service/skoda-octavia-all-key-lost-via-autel-im508.html
Posted by: OBDexpress.co.uk at
07:20 AM
| Comments (7)
| Add Comment
Post contains 302 words, total size 5 kb.
Posted by: Flood Light Camera Repair Vienna VA at June 16, 2021 12:51 PM (49dSr)
2
Thanks for the nice
blog. It was very useful for me. I'm happy I found this blog. Thank you for
sharing with us,I too always learn something new from your post.
Residential Floor Cleaning Waltham MA
Posted by: Residential Floor Cleaning Waltham MA at June 18, 2021 06:19 AM (MEtML)
Posted by: Chauffeur Service Kapolei HI at June 29, 2021 10:01 AM (OQWo5)
4
What a
fantabulous post this has been. Never seen this kind of useful post. I am
grateful to you and expect more number of posts like these. Thank you very
much.
Garage
Door Repair Desoto
Posted by: max watson at July 05, 2021 10:26 AM (OQWo5)
Posted by: peter John at July 06, 2021 11:43 AM (uvOvW)
6
I really thank you
for the valuable info on this great subject and look forward to more great
posts. Thanks a lot for enjoying this beauty article with me. I am
appreciating it very much! Looking forward to another great article. Good
luck to the author! All the best!
Road Test Wellesley
Posted by: jhon alex at July 12, 2021 11:49 AM (Zr0sC)
Posted by: jhon alex at July 13, 2021 06:05 AM (OQWo5)
Hide Comments
| Add Comment
November 26, 2020
Answer to "Strange modification to China clone SD C4 Plus"
How to solve
Chinese cloned SD Connect C4 DOIP : there is NO WiFi card inside, therefore wireless connection is not
possible no ! There is NO 6 batteries holder/compartment no . Batteries
are necessary for firmware upgrade if needed
In fact:
1. SD Connect C4 DOIP supports WIFI setting.ste
Take obdexpress.co.uk for example, the engineer made a operation guide onhow to set SD Connect C4 DOIP WIFI on WIN10 & WIN7.
2. SD connect C4 Plus firmware update does not require battery installation as the older sd c4.
Take
this user's feedback for example: I take a risk from here, only the
battery pack is missing but work ok. I have it over an year and have no
problems.
How to upgrade SD C4 Plus Xentry 2020.3 without battery?
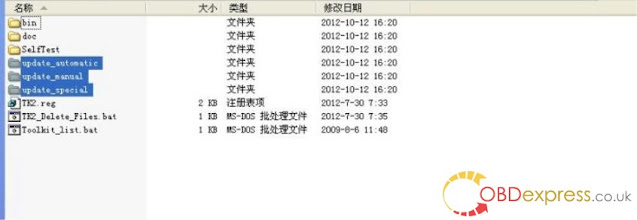
1. Open DAS software, enter the folder "C:\programm files\SDconnect
Toolkit", check if there are the following three folders: Update_automatic, Update_manual
; Update_Special.. As shown in the figure below. If the name is wrong, please correct it.

2. Reboot the computer.
3. Start to upgrade the SD C4 Plus firmware, please follow the procedure below:
1) Closing Xentry Diagnostics/Xentry DAS diagnostics application
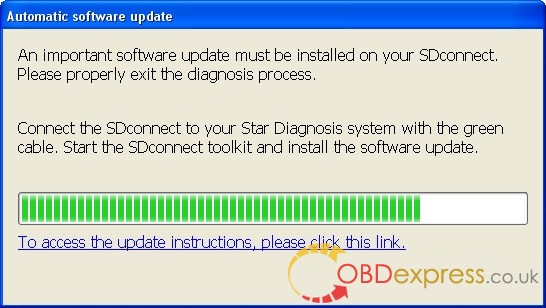
When accessing a vehicle in Xentry Diagnostics or Xentry DAS, the following message appears:
Please exit the diagnostic application Xentry Diagnostics or Xentry DAS correctly and follow the next steps.
2) Connecting the SDconnect to the Star Diagnosissystem
Connect the SDconnect to the Star Diagnosis system with the green LAN cable.
The SDconnect will be automatically selected and appear in the deskband on the Star Diagnosis system:
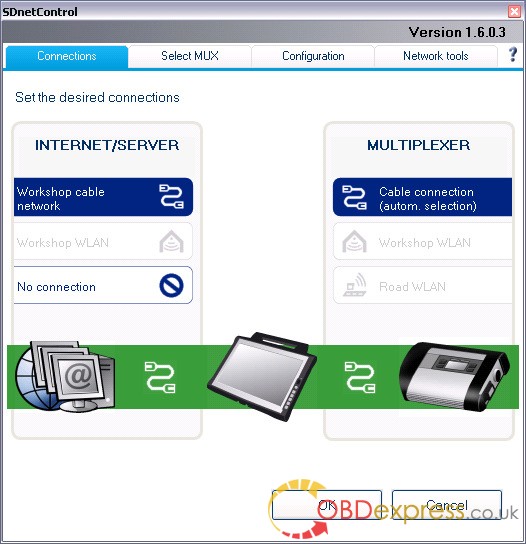
3)SDnetControl
A) Start SDnetControl by clicking the deskband
Go to the "Connections" tab.
B) Check whether automatic selection via the cable connection is active:
Go to the "Configuration" tab, and confirm the warning with "Yes":

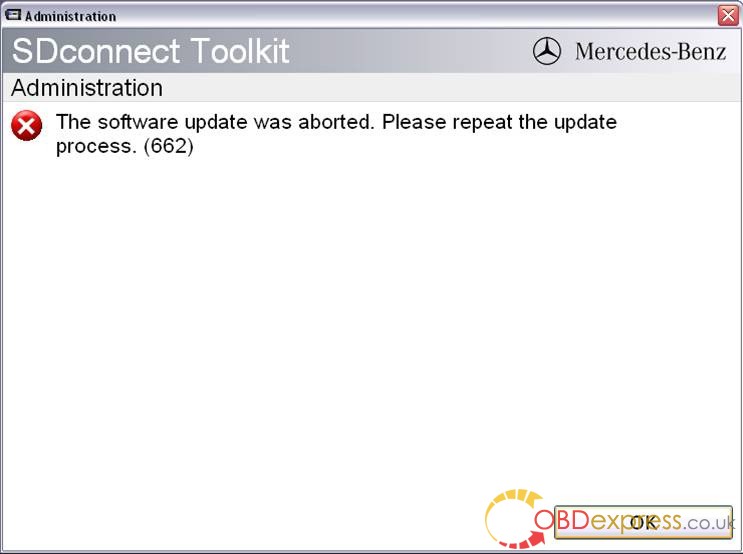
4). Software update
Go to the "MUX" tab in SDnetControl.
Click on the "Software update" button.
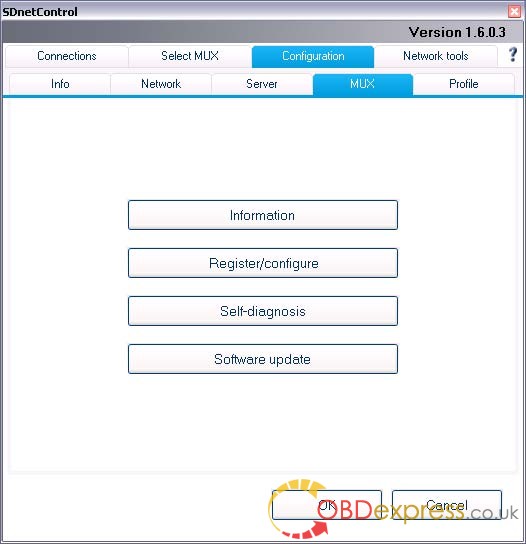
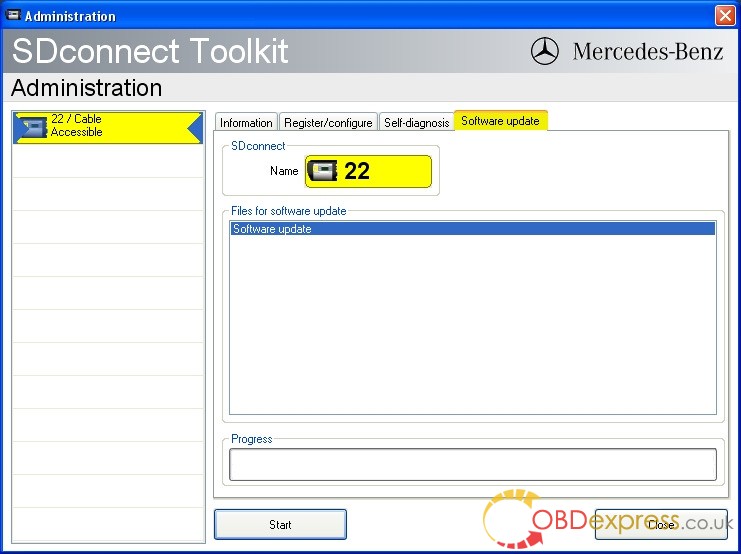
The "SDconnect Toolkit Administration" program will start.
Go to the "Software update" tab in the SDconnect Toolkit.
Your SDconnect is already selected on the left-hand side.
Select the "Software update" packet under "Files for software update".
Click "Start" to start the process.

The update process will start. This takes approx. 4 minutes.
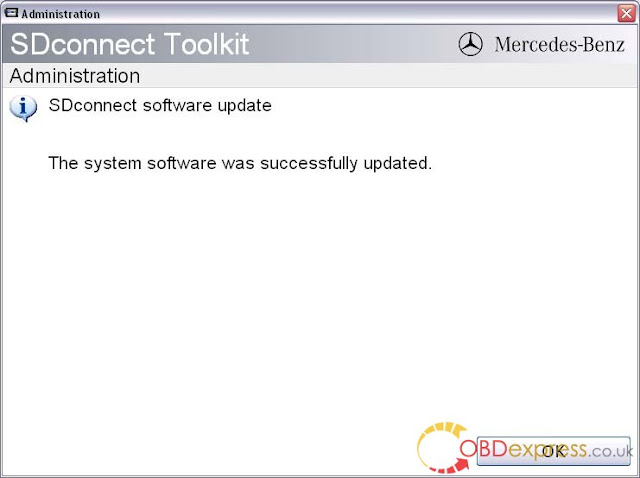
5) Complete the installation
Confirm the successful completion of the update.
After a successful update, a message indicating the successful update completion appears.
Confirm the message by clicking "OK".
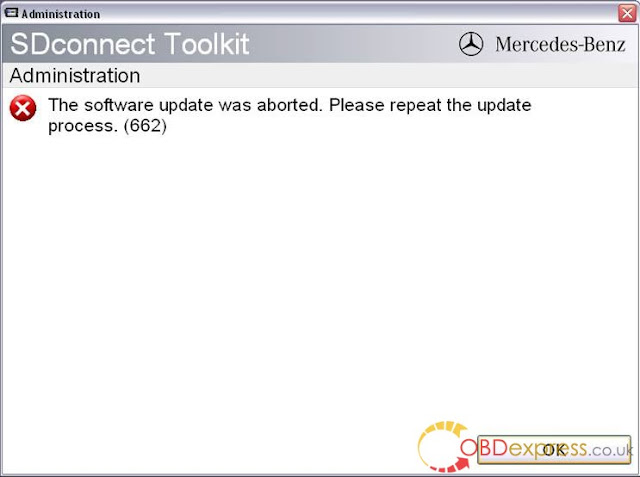
Update not successful
If the update was not successful, the message "The software update was aborted. Please repeat the update process" will appear.
Confirm this message by clicking "OK". Check the SDconnect batteries if necessary and repeat the update process.
6) Check the installed software
Go to the "Information" tab in SDconnect Toolkit
Select your SDconnect on the left-hand side.
• Check the information under "Software versions" at the right:
The versions of the Linux OS and the CommandServer must be at least 2:0 xxxxx.

The SD Connect 4 plus firmware update is completed. The green LAN cable can be removed.
BTW, V2020.11 MB Star Diagnostic software in stock:
V2020.11 MB Star Diagnostic SD Connect C4 256G SSD
V2020.11 MB Star Diagnostic SD Connect C4 500G HDD
Software includes:
Notice:V2020.11 MB Star Software Can’t Support Online SCN Coding stable. We recommend to buyV2019.12 MB Star SSDif you need to do it.
Xentry11.2020
DAS11.2020
EPC11.2018
WIS11.2018
SDmediaoffline2014
HHT-WIN
Vediamo5.01.01
VediamoDatabase2019
StarFinder2008&2016
http://blog.obdexpress.co.uk/
Posted by: OBDexpress.co.uk at
05:56 AM
| Comments (11)
| Add Comment
Post contains 560 words, total size 10 kb.
1
I bookmarked this. Great reading...
Cody
Posted by: Cody at December 09, 2020 03:51 AM (355SU)
Posted by: Ceiling Fan Installation Vienna VA at June 16, 2021 12:52 PM (49dSr)
3
Thanks for taking
the time to discuss that, I feel strongly about this and so really like
getting to know more on this kind of field. Do you mind updating your blog
post with additional insight? It should be really useful for all of us. Auto Lighting
Installation Services in Stone Mountain GA
Posted by: Auto Lighting Installation Services in Stone Mountain GA at June 18, 2021 07:06 AM (OQWo5)
Posted by: Chauffeur Service Kapolei HI at June 29, 2021 10:01 AM (OQWo5)
5
Hey what
a brilliant post I have come across and believe me I have been searching out
for this similar kind of post for past a week and hardly came across this.
Thank you very much and will look for more postings from you.
Garage
Door Installation Desoto
Posted by: max watson at July 05, 2021 10:26 AM (OQWo5)
6
Great article with excellent idea!Thank you for such a valuable article. I really appreciate for this great information.. Homes for sale Jersey City NJ
Posted by: peter John at July 06, 2021 11:43 AM (uvOvW)
7
I really thank you
for the valuable info on this great subject and look forward to more great
posts. Thanks a lot for enjoying this beauty article with me. I am
appreciating it very much! Looking forward to another great article. Good
luck to the author! All the best!
Driving School Wellesley
Posted by: jhon alex at July 12, 2021 11:49 AM (Zr0sC)
Posted by: jhon alex at July 13, 2021 06:05 AM (OQWo5)
9
There are many, different approaches to manage combine assistant affiliations and codes into content. Different bloggers work them into normal substance, and others post photos of the things nearby joins. In the occasion that you're trying to combine affiliations, an uncommon choice is to a make survey article or association piece.
By:
https://www.voucherpro.co.uk/riverisland.com
Posted by: Kate Winslet at December 02, 2021 06:27 AM (IriS/)
Posted by: Nailey Scott at October 26, 2023 12:11 PM (wNUpD)
11
In today's digital age, the accessibility of online education has transformed the way individuals pursue learning opportunities. However, the convenience of online courses also brings forth challenges, particularly for those grappling with time constraints or academic pressures. As a result, the emergence of "Do My Online Course" services has garnered attention, offering to manage coursework on behalf of individuals. While this may seem like a tempting solution, it's essential to delve into the complexities and consequences of such services. In this article, we explore the pros and cons of "Do My Online Course" services, shedding light on ethical considerations and potential risks.
Posted by: Do My Online Course at March 22, 2024 06:30 AM (xQkBH)
Hide Comments
| Add Comment
November 24, 2020
How to solve the blocked ktag clone sw 2.25 hw 7.020?
Offer working solution to those whose ktag clone sw 2.25 hw 7.020 was blocked due to update online.
Buy new sd card , copy this files to your ktag / update folder and start the program.
https://mega.nz/file/1QJCCJpY#MXHkdvFQajxpPhBjPc7-umlJQ4UKOZXBx1DVT-WF8ZM
Test report: Tried it and worked perfectly.
Fully working mate and I’m still using the old sd card. Just goes to show there are some people on here who are willing to help out a novice
Final update bud. Your files worked perfect. Many many thanks for helping me out. @Wiotki
Ktagis fully working now.
www.obdexpress.co.uk
Posted by: OBDexpress.co.uk at
09:40 AM
| Comments (10)
| Add Comment
Post contains 104 words, total size 2 kb.
Posted by: Smoke Detector Installation Vienna VA at June 16, 2021 12:52 PM (49dSr)
Posted by: Auto Lighting Installation Services in Stone Mountain GA at June 18, 2021 07:08 AM (OQWo5)
Posted by: Chauffeur Service Kapolei HI at June 29, 2021 10:02 AM (OQWo5)
Posted by: max watson at July 05, 2021 10:26 AM (OQWo5)
5
Thanks a lot for
sharing us about this update. Hope you will not get tired on making posts as
informative as this.
Road Test Weston
Posted by: jhon alex at July 12, 2021 12:24 PM (Zr0sC)
6
The website is
looking bit flashy and it catches the visitors eyes. Design is pretty simple
and a good user friendly interface.
Driving Classes Ashland
Posted by: jhon alex at July 13, 2021 06:05 AM (OQWo5)
Posted by: Thomas at May 22, 2023 04:51 AM (s4fHO)
8
Be flexible with your study plan. If you find that a particular method or schedule isn't working, be willing to make adjustments.
Tips for online course
Posted by: Edward at September 14, 2023 11:14 AM (95bcN)
Posted by: Thomas at October 05, 2023 07:36 AM (6ojOo)
Posted by: Thomas at October 05, 2023 07:37 AM (3B8Un)
Hide Comments
| Add Comment
October 29, 2020
VXDIAG VCX “DoNet†Remote Diagnostics Settings and Network Configuration
How-to: set up/Network configure "DoNet†super Remote For VXDIAG VCX Step-by-step
Kindly note:After obtaining VXDIAG "DoNet†remote diagnostics authorization, bothBenz DoipVCX SEandVXDIAG VCX MULTI boxare supposed to configure personal information, bind serial number, and connect to the network successfully.
User informationneeds to be configured for the first use.

The device serial numberneeds to be configured for the first use.
Fill in the serial number and click to save.

Go
to the homepage to select the method of device networking ( Phone
Hotspot is easiest method). Please follow the next instructions to do
the network connection and device reset.
The steps to connect the network using mobile hotspot:
1). Enter the phone "Settingsâ€
2). Select "Other Wireless Connectionsâ€
3). Select "Personal Hotspotâ€
4). Turn on the "Personal Hotspot†switch
5). Select "Personal Hotspot Settingsâ€
6). The name and password must be set to"DiagOnNetâ€, pay attention to uppercase and lowercase!
7). Do not choose 5G network, choose "2.4GHz Bandâ€


Press the "Fn†button of theVXDIAG VCX SE Benzdevice ( forVXDIAG VCX box, The reset button is inside of the small hole) for 2 seconds to enter the network configuration mode,
Wait for about 30 seconds until you hear the beep of the device buzzer, then the network configuration is complete.


After the device is connected to the Internet, the home page will display device information (as shown in the image).
The device is connected to the network.

Open the latest version of VX MANAGER device client on the diagnostic computer
Enter "the remote diagnosis†menu, enter the device serial number, and click on "Refresh Deviceâ€.
After the device information appears, click on "Connect Deviceâ€.


After
the connection is successful, you will be prompted to restart the VX
MANAGER device client, after that there will be device information in
the client.
It means that the device has been connected to this computer and you can start to diagnose and test the car.


Alright, the preparations are complete, you just request the VXDIAG technician to assist you in remote diagnosis.
Related articles:
C205 DME online coding via VXDIAG VCX SE DONET Remote
http://blog.obdexpress.co.uk/2020/10/29/vxdiag-vcx-donet-remote-diagnostics-settings/
Posted by: OBDexpress.co.uk at
09:24 AM
| Comments (8)
| Add Comment
Post contains 358 words, total size 12 kb.
October 22, 2020
Xhorse VVDI BIM tool Pro Feeback
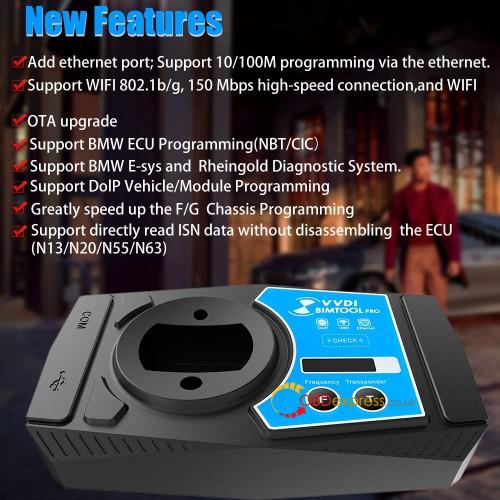
Before
continuing reading the following paragraphs on VVDI BMW tool Reviews
and using tips by a real user, please be informed: VVDI BMW tool is
updated toXhorse VVDI BIMTOOL PRO,
it adds Ethernet port aside of USB port, which will speed up the
programming/coding, usually it will only take several minutes to do
advanced programming instead of dozens of hours when using the USB cable
(When you prepare program/code BMW engineering software,
connect the Ethernet cable; When you prepare the simple programming,
connect the USB cable is okay.)

VVDI BMW toolworks extremely well for E series 1, x1, 3, 5, and x5.
So for those who are thinking of buying one of theseVVDI BMW tools.
You connect it by ODB in the car, hit connect to gather the basic info
on the car, CAS type, key frequency, VIN, bunch of other stuff. Then you
should go to the next step, select the protocol which was also told to
you after connect. Press "get key info†and hope for the best. If it
displays the key info on the screen you are set, select a key slot, and
prepare a key. The whole process should take less than 5 mins…if you can
get the key data.
What
I find odd about the process is how much is done for you, but then some
other steps you have to do that would be quite easy for the application
to simply do. For example, you load the app and you’re at Cas Info
screen with car type set to auto-detect. Press connect and you get a
good deal of info, one piece being which protocol to use.Now if you want to go further, you selectkey learnand
for the car type, you should now switch auto-detect to what it said
after you connected on the cas info screen. Auto-detect was designed to
do a very quick scan and gives you all the answers you may have on the
car. But it also knows what protocol to use as it just used it to gather
the correct info.
I
spent quite a few hours getting connection errors because auto-detect
works within seconds to get your info but it won’t connect to read the
EEPROM or key info.So
when you open the app, hit connect and see what it says for car type.
Then move on to the next screen and select that type, then connect
again. Now you can get what you want from it. If I could have just one
major change (other than it working with all cars as advertised) is to
have a forced opening screen which has one button, connect. After it
gathers the basic info, it should use that to configure itself to do
everything it can without you having to do anything other than choosing a
direction.
So now that my rant is over.I do like how fast this unit can make a key. If it worked with all E series cars it would be absolutely amazing. But it d
oesn’t.
I have tried the following to make keys:
2006, 07, 08, 09, 11 E90 3 Series – Works
2007 E70 X5 – Works
2009 E88 135i – Works
2007 E60 525i – Works
2009 E60 535xi – Works
2012 E84 X1 – Works
2003 E65 745i – Doesn’t work
2004 E66 745Li – Doesn’t work
2006 E66 750Li – Doesn’t work
2008 E66 760Li – Doesn’t work
2010 F01 750i – Connects, shows basic info – I didn’t try to make a key but I will tomorrow.
ECU work:I’ve tried a number of things with MSV70 and MSV80’s in the car and on the bench,all work no issues.
Transmissions:It
says that it can clear and make new the 8HP module. I’ve tested this on
the 6HP transmission in the E90 and E65. Those are 6 speed older
transmissions and the VVDI read them and was able to clear the unitswithout question.
E and F series programming: Loads in and works– can show and clear DTC’s. It can get complicated quick which is much further than I need to go, for now.
For the CAS cable:
I wanted to spend some time and confirm what I’m about to say.
For
the CAS cable, they have two versions. Download the manual for the BMW
VVDI and check the last few pages to see what the cable should look like
inside.If it doesn’t match then you have a version
one and you should mod it to match. Once it matches you should take the
CAS covers off the cable and make sure that all pins are actually making
it to the end of the connector. Mine had a few that were in halfway.
Next without a CAS module plugged in, check for +12v on both large cable
ends (you can check them all but 2 will do). Mine didn’t have +12v and
even under-read, no 12v. I thought that maybe the cable used a switching
fet that would apply 12v when you want to read the module, tested that,
nothing. I found 12v on the ODB end of the cable, found where 12v from
the CAS end comes into the cable, and simply moved the CAS wire over to
12v inside the ODB2 end. With 12v, I can read on the bench.
With
a confirmed working cable, now comes the real kick in the ass. I can
only read CAS1 on the bench. CAS2 modules from the E series (white case)
from 3, 5, X series will read in the car perfectly but won’t read with
the cable. So the cable is really a CAS1 bench cable. That should work
fine for anyone trying to read CAS1 cars from 2000-2006 that don’t read
in the car.
I
just pulled the complete wiring harness out of an E90 2011 – I will see
what on the CAN bus is needed to make this work on the bench. It will
take time but I will have answers.
I
had a chance to try the BMW F01 750i today. It uses a CAS4 system and
it worked without any issues. The Key was made in under 5 mins.
A
BMW 2014 X1 came in with a CAS3++ today, tried to read the information
and it said that feature isn’t supported yet but soon. Went to Key learn
and it said it had to flash this type of CAS, would take 10 mins.
Didn’t really feel confident in that but went for it. Took 10 mins and
it was able to make a key after the flash. In order to make a key for
this CAS3++, it said it needed a real key to make it work.So
you insert the real key into the programmer, then insert the new key
and it was able to make it work. All keys lost wasn’t supported.
So
for my needs, I needed to cover the E series from 2002 to 2010. So far
the only car it won’t read is the BMW 760 E66. I guess they didn’t have
one available to test with. I have another 760 coming in a week or two.
When that gets here I plan to take a CAS1 from 2003 745 and attempt to
change the VIN, KM, and codes to see if I can start the 760.This
one 760 I have now has no fob, just the plastic valet key. The unit can
read the ECU and basic info from the CASso it should be possible to
mod another CAS to allow the car to start. No harm in trying.
So
far I do like the unit. If they would have had a bundle with a set of
working cables, full detailed info like CAS1 needs to be read
indirectly, I would have paid more to get it all one shot.
All right, one question: Is VVDI BMW a good tool to buy?
The only info you get fromXhorseis
that it does it all – no problem. But once in hand, it’s not so simple.
You need a host of special cables that they won’t mention until you
find yourself stuck. It won’t one-click work as they advertise with all
BMW’s.
Once
you’ve tried a car, find out what you need to do, and are set up for
it, then it’s easy. Buy every cable they offer for it and attachment.
Then buy a bunch of spare key fobs and make a bunch of keys. I also
intend to remake some of the cables using the real harness out of a
junkyard car. The connectors they use are crap.
One more question: downgrade CAS3+, any risk? Many do it on the bench. For making key.
So far using theVVDI BMW tool, CAS3 will work in the car using ODB2. ForCAS3++ which seems to be 2012-2017, some will do keys right away while others will require a patch.
The patch is applied for you, just make sure your computer and car are
plugged into a good power source and let the tool do it’s thing.
I’ve
narrowed my trouble with this tool to a few variations of CAS1 units
that Xhorse most likely hasn’t come across. For anyone making keys for
newer cars from 2012 and up it seems to do it’s job well.
Last but not least, when you haveVVDI BIMTOOL PRO, you will have a better user experience than VVDI BMW Tool. Of course, they share the same functions as the above user’s said.
Before
continuing reading the following paragraphs on VVDI BMW tool Reviews
and using tips by a real user, please be informed: VVDI BMW tool is
updated toXhorse VVDI BIMTOOL PRO,
it adds Ethernet port aside of USB port, which will speed up the
programming/coding, usually it will only take several minutes to do
advanced programming instead of dozens of hours when using the USB cable
(When you prepare program/code BMW engineering software,
connect the Ethernet cable; When you prepare the simple programming,
connect the USB cable is okay.)
VVDI BMW toolworks extremely well for E series 1, x1, 3, 5, and x5.
So for those who are thinking of buying one of theseVVDI BMW tools.
You connect it by ODB in the car, hit connect to gather the basic info
on the car, CAS type, key frequency, VIN, bunch of other stuff. Then you
should go to the next step, select the protocol which was also told to
you after connect. Press "get key info†and hope for the best. If it
displays the key info on the screen you are set, select a key slot, and
prepare a key. The whole process should take less than 5 mins…if you can
get the key data.
What
I find odd about the process is how much is done for you, but then some
other steps you have to do that would be quite easy for the application
to simply do. For example, you load the app and you’re at Cas Info
screen with car type set to auto-detect. Press connect and you get a
good deal of info, one piece being which protocol to use.Now if you want to go further, you selectkey learnand
for the car type, you should now switch auto-detect to what it said
after you connected on the cas info screen. Auto-detect was designed to
do a very quick scan and gives you all the answers you may have on the
car. But it also knows what protocol to use as it just used it to gather
the correct info.
I
spent quite a few hours getting connection errors because auto-detect
works within seconds to get your info but it won’t connect to read the
EEPROM or key info.So
when you open the app, hit connect and see what it says for car type.
Then move on to the next screen and select that type, then connect
again. Now you can get what you want from it. If I could have just one
major change (other than it working with all cars as advertised) is to
have a forced opening screen which has one button, connect. After it
gathers the basic info, it should use that to configure itself to do
everything it can without you having to do anything other than choosing a
direction.
So now that my rant is over.I do like how fast this unit can make a key. If it worked with all E series cars it would be absolutely amazing. But it d
oesn’t.
I have tried the following to make keys:
2006, 07, 08, 09, 11 E90 3 Series – Works
2007 E70 X5 – Works
2009 E88 135i – Works
2007 E60 525i – Works
2009 E60 535xi – Works
2012 E84 X1 – Works
2003 E65 745i – Doesn’t work
2004 E66 745Li – Doesn’t work
2006 E66 750Li – Doesn’t work
2008 E66 760Li – Doesn’t work
2010 F01 750i – Connects, shows basic info – I didn’t try to make a key but I will tomorrow.
ECU work:I’ve tried a number of things with MSV70 and MSV80’s in the car and on the bench,all work no issues.
Transmissions:It
says that it can clear and make new the 8HP module. I’ve tested this on
the 6HP transmission in the E90 and E65. Those are 6 speed older
transmissions and the VVDI read them and was able to clear the unitswithout question.
E and F series programming: Loads in and works– can show and clear DTC’s. It can get complicated quick which is much further than I need to go, for now.
For the CAS cable:
I wanted to spend some time and confirm what I’m about to say.
For
the CAS cable, they have two versions. Download the manual for the BMW
VVDI and check the last few pages to see what the cable should look like
inside.If it doesn’t match then you have a version
one and you should mod it to match. Once it matches you should take the
CAS covers off the cable and make sure that all pins are actually making
it to the end of the connector. Mine had a few that were in halfway.
Next without a CAS module plugged in, check for +12v on both large cable
ends (you can check them all but 2 will do). Mine didn’t have +12v and
even under-read, no 12v. I thought that maybe the cable used a switching
fet that would apply 12v when you want to read the module, tested that,
nothing. I found 12v on the ODB end of the cable, found where 12v from
the CAS end comes into the cable, and simply moved the CAS wire over to
12v inside the ODB2 end. With 12v, I can read on the bench.
With
a confirmed working cable, now comes the real kick in the ass. I can
only read CAS1 on the bench. CAS2 modules from the E series (white case)
from 3, 5, X series will read in the car perfectly but won’t read with
the cable. So the cable is really a CAS1 bench cable. That should work
fine for anyone trying to read CAS1 cars from 2000-2006 that don’t read
in the car.
I
just pulled the complete wiring harness out of an E90 2011 – I will see
what on the CAN bus is needed to make this work on the bench. It will
take time but I will have answers.
I
had a chance to try the BMW F01 750i today. It uses a CAS4 system and
it worked without any issues. The Key was made in under 5 mins.
A
BMW 2014 X1 came in with a CAS3++ today, tried to read the information
and it said that feature isn’t supported yet but soon. Went to Key learn
and it said it had to flash this type of CAS, would take 10 mins.
Didn’t really feel confident in that but went for it. Took 10 mins and
it was able to make a key after the flash. In order to make a key for
this CAS3++, it said it needed a real key to make it work.So
you insert the real key into the programmer, then insert the new key
and it was able to make it work. All keys lost wasn’t supported.
So
for my needs, I needed to cover the E series from 2002 to 2010. So far
the only car it won’t read is the BMW 760 E66. I guess they didn’t have
one available to test with. I have another 760 coming in a week or two.
When that gets here I plan to take a CAS1 from 2003 745 and attempt to
change the VIN, KM, and codes to see if I can start the 760.This
one 760 I have now has no fob, just the plastic valet key. The unit can
read the ECU and basic info from the CASso it should be possible to
mod another CAS to allow the car to start. No harm in trying.
So
far I do like the unit. If they would have had a bundle with a set of
working cables, full detailed info like CAS1 needs to be read
indirectly, I would have paid more to get it all one shot.
All right, one question: Is VVDI BMW a good tool to buy?
The only info you get fromXhorseis
that it does it all – no problem. But once in hand, it’s not so simple.
You need a host of special cables that they won’t mention until you
find yourself stuck. It won’t one-click work as they advertise with all
BMW’s.
Once
you’ve tried a car, find out what you need to do, and are set up for
it, then it’s easy. Buy every cable they offer for it and attachment.
Then buy a bunch of spare key fobs and make a bunch of keys. I also
intend to remake some of the cables using the real harness out of a
junkyard car. The connectors they use are crap.
One more question: downgrade CAS3+, any risk? Many do it on the bench. For making key.
So far using theVVDI BMW tool, CAS3 will work in the car using ODB2. ForCAS3++ which seems to be 2012-2017, some will do keys right away while others will require a patch.
The patch is applied for you, just make sure your computer and car are
plugged into a good power source and let the tool do it’s thing.
I’ve
narrowed my trouble with this tool to a few variations of CAS1 units
that Xhorse most likely hasn’t come across. For anyone making keys for
newer cars from 2012 and up it seems to do it’s job well.
Last but not least, when you haveVVDI BIMTOOL PRO, you will have a better user experience than VVDI BMW Tool. Of course, they share the same functions as the above user’s said.
Posted by: OBDexpress.co.uk at
09:47 AM
| Comments (8)
| Add Comment
Post contains 3154 words, total size 21 kb.
1
Interesting
topic for a blog. I have been searching the Internet for fun and came upon
your website. Fabulous post. Thanks a ton for sharing your knowledge! It is
great to see that some people still put in an effort into managing their
websites. I'll be sure to check back again real soon.
Faucet
Repair Vienna VA
Posted by: Faucet Repair Vienna VA at June 16, 2021 12:53 PM (49dSr)
Posted by: Auto Lighting Installation Services in Stone Mountain GA at June 18, 2021 07:09 AM (OQWo5)
3
Thanks
For sharing this Superb article.I use this Article to show my assignment in
college.it is useful For me Great Work.
Gate
Installation Desoto
Posted by: max watson at July 05, 2021 10:27 AM (OQWo5)
4
I recently came
across your blog and have been reading along. I thought I would leave my
first comment. I don't know what to say except that I have enjoyed reading.
Nice blog. I will keep visiting this blog very often.
Driving Classes Weston
Posted by: jhon alex at July 12, 2021 12:25 PM (Zr0sC)
5
Excellent article.
Very interesting to read. I really love to read such a nice article. Thanks!
keep rocking.
Driving Practice Ashland
Posted by: jhon alex at July 13, 2021 06:05 AM (OQWo5)
6
Thomas is passionate about helping students succeed in their Online Course Help. With his expertise as an author and education specialist, he can provide the support and guidance you need.
Posted by: Thomas at June 09, 2023 11:54 AM (qKEkm)
7
Hi, I'm Thomas, a passionate online education consultant. As an associate of "Take My Online Class," I am dedicated to helping students thrive academically through personalized support.
Posted by: Jannifer at June 17, 2023 09:00 AM (3MtU9)
8
PHD Dissertation Help ability to work under pressure and meet tight deadlines makes him a reliable partner for students facing time constraints in completing their dissertations.
Posted by: Thomas at July 07, 2023 11:56 AM (9unN2)
Hide Comments
| Add Comment
September 07, 2020
YH Digimaster III Vehicle list for Nissan cars
Digimaster3 odometer correction tool car list for Nissan cars
(Ctrl + F to search your car )
| Series |
Manufacturer |
Car Model |
Method |
Adapter |
Storage Location |
| Japan& Korea |
Nissan |
350Z |
93C66 |
Memory Directly |
OBP |
Cluster |
| Japan& Korea |
Nissan |
5Y701 |
93C56 |
Memory Directly |
OBP |
Cluster |
| Japan& Korea |
Nissan |
Almera |
2000 S220 |
Memory Directly |
OBP |
Cluster |
| Japan& Korea |
Nissan |
Almera |
2000 S221 |
Memory Directly |
OBP |
Cluster |
| Japan& Korea |
Nissan |
Almera |
2001 93C56 |
Memory Directly |
OBP |
Cluster |
| Japan& Korea |
Nissan |
Almera |
2001 S330 |
Memory Directly |
OBP |
Cluster |
| Japan& Korea |
Nissan |
Almera |
93C46 |
Memory Directly |
OBP |
Cluster |
| Japan& Korea |
Nissan |
Armada |
2006 |
Soldering Contacts |
ICP |
Cluster |
| Japan& Korea |
Nissan |
Cube |
95020 |
Memory Directly |
OBP |
Cluster |
| Japan& Korea |
Nissan |
Bluebird |
93C46 |
Soldering Contacts |
ICP |
Cluster |
| Japan& Korea |
Nissan |
Bluebird |
93C56 |
Soldering Contacts |
ICP |
Cluster |
| Japan& Korea |
Nissan |
Cefiro |
93C46 |
Memory Directly |
OBP |
Cluster |
| Japan& Korea |
Nissan |
Cefiro |
93C56 V1 |
Soldering Contacts |
ICP |
Cluster |
| Japan& Korea |
Nissan |
Cefiro |
93C56 V2 |
Soldering Contacts |
ICP |
Cluster |
| Japan& Korea |
Nissan |
GTR |
93C76 |
Memory Directly |
OBP |
Cluster |
| Japan& Korea |
Nissan |
Infinity |
2006(MCU) |
Soldering Contacts |
ICP |
Cluster |
| Japan& Korea |
Nissan |
Infinity |
93C46 |
Memory Directly |
OBP |
Cluster |
| Japan& Korea |
Nissan |
Infinity |
93C66 V1 |
Memory Directly |
OBP |
Cluster |
| Japan& Korea |
Nissan |
Infinity |
93C66 V2 |
Memory Directly |
OBP |
Cluster |
| Japan& Korea |
Nissan |
Infinity |
93C86 |
Memory Directly |
OBP |
Cluster |
|
|
|
|
|
|
|
| Series |
Manufacturer |
Car Model |
Method |
Adapter |
Storage Location |
| Japan& Korea |
Nissan |
Interstar |
93C66 |
Memory Directly |
OBP |
Cluster |
| Japan& Korea |
Nissan |
Kubistar |
95020 |
Memory Directly |
OBP |
Cluster |
| Japan& Korea |
Nissan |
Livina Geniss |
93C66 |
Memory Directly |
OBP |
Cluster |
| Japan& Korea |
Nissan |
Livina Geniss |
93C86 |
Memory Directly |
OBP |
Cluster |
| Japan& Korea |
Nissan |
March |
24C02 |
Memory Directly |
OBP |
Cluster |
| Japan& Korea |
Nissan |
March |
93C66 |
Memory Directly |
OBP |
Cluster |
| Japan& Korea |
Nissan |
Maxima |
93C46 |
Memory Directly |
OBP |
Cluster |
| Japan& Korea |
Nissan |
Maxima |
93C56 |
Memory Directly |
OBP |
Cluster |
| Japan& Korea |
Nissan |
Maxima |
93C66 |
Memory Directly |
OBP |
Cluster |
| Japan& Korea |
Nissan |
Micra |
-2003 |
Memory Directly |
OBP |
Cluster |
| Japan& Korea |
Nissan |
Micra |
2003- 93C46 |
Memory Directly |
OBP |
Cluster |
| Japan& Korea |
Nissan |
Micra |
2003- 93C56 |
Memory Directly |
OBP |
Cluster |
| Japan& Korea |
Nissan |
Micra |
2003- 93C66 |
Memory Directly |
OBP |
Cluster |
| Japan& Korea |
Nissan |
Morano |
93C66 |
Memory Directly |
OBP |
Cluster |
| Japan& Korea |
Nissan |
Murano |
93C66 |
Memory Directly |
OBP |
Cluster |
| Japan& Korea |
Nissan |
Navara |
93C46 |
Memory Directly |
OBP |
Cluster |
| Japan& Korea |
Nissan |
Navara |
93C56 |
Memory Directly |
OBP |
Cluster |
| Japan& Korea |
Nissan |
Nawaro |
93C46 |
Memory Directly |
OBP |
Cluster |
| Japan& Korea |
Nissan |
Nawaro |
93C56 |
Memory Directly |
OBP |
Cluster |
| Japan& Korea |
Nissan |
NV200 |
93C86 |
Memory Directly |
OBP |
Cluster |
| Japan& Korea |
Nissan |
Oting |
93C56 |
Memory Directly |
OBP |
Cluster |
| Japan& Korea |
Nissan |
Paladin |
2009 |
Soldering Contacts |
ICP |
Cluster |
|
|
|
|
|
|
|
| Series |
Manufacturer |
Car Model |
Method |
Adapter |
Storage Location |
| Japan& Korea |
Nissan |
Paladin |
93C46 |
Memory Directly |
OBP |
Cluster |
| Japan& Korea |
Nissan |
Paladin |
93C56 |
Soldering Contacts |
ICP |
Cluster |
| Japan& Korea |
Nissan |
Pathfinder |
2000 |
Memory Directly |
OBP |
Cluster |
| Japan& Korea |
Nissan |
Pathfinder |
2004 |
Soldering Contacts |
ICP |
Cluster |
| Japan& Korea |
Nissan |
Pathfinder |
2005-2008 |
Soldering Contacts |
ICP |
Cluster |
| Japan& Korea |
Nissan |
Pathfinder |
93C46 |
Memory Directly |
OBP |
Cluster |
| Japan& Korea |
Nissan |
Pathfinder |
93C56 |
Memory Directly |
OBP |
Cluster |
| Japan& Korea |
Nissan |
Patrol |
93C56 V1 |
Memory Directly |
OBP |
Cluster |
| Japan& Korea |
Nissan |
Patrol |
93C56 V2 |
Memory Directly |
OBP |
Cluster |
| Japan& Korea |
Nissan |
Patrol |
93C56 V3 |
Memory Directly |
OBP |
Cluster |
| Japan& Korea |
Nissan |
Patrol |
93C66 V1 |
Memory Directly |
OBP |
Cluster |
| Japan& Korea |
Nissan |
Patrol |
93C66 V2 |
Memory Directly |
OBP |
Cluster |
| Japan& Korea |
Nissan |
Pickup |
93C46 |
Memory Directly |
OBP |
Cluster |
| Japan& Korea |
Nissan |
Pickup |
93C56 V1 |
Memory Directly |
OBP |
Cluster |
| Japan& Korea |
Nissan |
Pickup |
93C56 V2 |
Memory Directly |
OBP |
Cluster |
| Japan& Korea |
Nissan |
Pickup |
93C56 V3 |
Memory Directly |
OBP |
Cluster |
| Japan& Korea |
Nissan |
Presage |
93C56 |
Memory Directly |
OBP |
Cluster |
| Japan& Korea |
Nissan |
Primera |
-1999 |
Memory Directly |
OBP |
Cluster |
| Japan& Korea |
Nissan |
Primera |
1999 |
Memory Directly |
OBP |
Cluster |
| Japan& Korea |
Nissan |
Primera |
2000 S220 |
Memory Directly |
OBP |
Cluster |
| Japan& Korea |
Nissan |
Primera |
2000 S221 |
Memory Directly |
OBP |
Cluster |
| Japan& Korea |
Nissan |
Primera |
2001 |
Memory Directly |
OBP |
Cluster |
|
|
|
|
|
|
|
| Series |
Manufacturer |
Car Model |
Method |
Adapter |
Storage Location |
| Japan& Korea |
Nissan |
Primera |
93C46 |
Memory Directly |
OBP |
Cluster |
| Japan& Korea |
Nissan |
Qashqai |
93C66 |
Soldering Contacts |
ICP |
Cluster |
| Japan& Korea |
Nissan |
Qashqai |
2011-(1M80F) |
Soldering Contacts |
CAS&BDM |
Cluster |
| Japan& Korea |
Nissan |
Quest |
2006 V1 |
Soldering Contacts |
ICP |
Cluster |
| Japan& Korea |
Nissan |
Quest |
2006 V2 |
Soldering Contacts |
ICP |
Cluster |
| Japan& Korea |
Nissan |
Serena |
93C56 |
Memory Directly |
OBP |
Cluster |
| Japan& Korea |
Nissan |
Skyline |
93C56 |
Memory Directly |
OBP |
Cluster |
| Japan& Korea |
Nissan |
Skyline |
93C66 |
Memory Directly |
OBP |
Cluster |
| Japan& Korea |
Nissan |
Skyline |
R35 |
Memory Directly |
OBP |
Cluster |
| Japan& Korea |
Nissan |
Sunny |
2007 |
Memory Directly |
OBP |
Cluster |
| Japan& Korea |
Nissan |
Sunny |
2011 93C66 |
Memory Directly |
OBP |
Cluster |
| Japan& Korea |
Nissan |
Sunny |
2011 93C86 |
Memory Directly |
OBP |
Cluster |
| Japan& Korea |
Nissan |
Sunny |
93C56 |
Memory Directly |
OBP |
Cluster |
| Japan& Korea |
Nissan |
SUV |
4500 |
Memory Directly |
OBP |
Cluster |
| Japan& Korea |
Nissan |
SUV |
4800 |
Memory Directly |
OBP |
Cluster |
| Japan& Korea |
Nissan |
Sylphy |
93C66 |
Soldering Contacts |
ICP |
Cluster |
| Japan& Korea |
Nissan |
Sylphy |
93C86 |
Memory Directly |
OBP |
Cluster |
| Japan& Korea |
Nissan |
Teana |
93C66 V1 |
Soldering Contacts |
ICP |
Cluster |
| Japan& Korea |
Nissan |
Teana |
93C66 V2 |
Soldering Contacts |
ICP |
Cluster |
| Japan& Korea |
Nissan |
Teana |
93C86 |
Soldering Contacts |
ICP |
Cluster |
| Japan& Korea |
Nissan |
Teana |
2013 24C16 |
Soldering Contacts |
ICP |
Cluster |
| Japan& Korea |
Nissan |
Terrano |
93C66 |
Memory Directly |
OBP |
Cluster |
|
|
|
|
|
|
|
| Series |
Manufacturer |
Car Model |
Method |
Adapter |
Storage Location |
| Japan& Korea |
Nissan |
Tiida |
2008 |
Soldering Contacts |
ICP |
Cluster |
| Japan& Korea |
Nissan |
Tiida |
93C66 |
Soldering Contacts |
ICP |
Cluster |
| Japan& Korea |
Nissan |
Tiida |
2011 |
Soldering Contacts |
ICP |
Cluster |
| Japan& Korea |
Nissan |
Tino |
93C56 |
Memory Directly |
OBP |
Cluster |
| Japan& Korea |
Nissan |
Tino |
93C66 |
Memory Directly |
OBP |
Cluster |
| Japan& Korea |
Nissan |
Urvan |
93C46 |
Memory Directly |
OBP |
Cluster |
| Japan& Korea |
Nissan |
Xtrail |
93C56 |
Memory Directly |
OBP |
Cluster |
| Japan& Korea |
Nissan |
Xtrail |
93C66 |
Memory Directly |
OBP |
Cluster |
| Japan& Korea |
Nissan |
370Z |
93C86 |
Memory Directly |
OBP |
Cluster |
| Japan& Korea |
Nissan |
Juke |
93C86 |
Memory Directly |
OBP |
Cluster |
you can go to obdexpress.co.uk to buy a high-quality Digimaster III:
https://www.obdexpress.co.uk/wholesale/digimaster-3-digimaster-iii-d3-odometer-correction-master.html
More tech info of digimaster III here: http://www.mileageprogrammer.com/
Posted by: OBDexpress.co.uk at
09:58 AM
| Comments (5)
| Add Comment
Post contains 979 words, total size 46 kb.
Posted by: Car Stereo Installation Services in Stone Mountain GA at June 18, 2021 07:16 AM (OQWo5)
2
Thanks
for a wonderful share. Your article has proved your hard work and experience you have got
in this field. Brilliant .i love it reading.
Gate
Repair Desoto
Posted by: max watson at July 05, 2021 10:27 AM (OQWo5)
3
Your blog provided us with valuable information to work with. Each & every tips of your post are awesome. Thanks a lot for sharing. Keep blogging.. Townhomes for sale Jersey City NJ
Posted by: peter John at July 06, 2021 11:44 AM (uvOvW)
4
Pretty good post. I
just stumbled upon your blog and wanted to say that I have really enjoyed
reading your blog posts. Any way I'll be subscribing to your feed and I hope
you post again soon. Big thanks for the useful info.
Adult Driving Ashland
Posted by: jhon alex at July 13, 2021 06:05 AM (OQWo5)
5
Greetings, everyone! I'm Thomas, an experienced online class tutor. With my collaboration with "online class taker," I offer personalized guidance to help students achieve their educational goals.
Posted by: lily at June 10, 2023 05:33 PM (ZY5Wp)
Hide Comments
| Add Comment
September 03, 2020
Vident iAuto702 Pro Fiat Ducato 2013 special function list
Q: will Vident iAuto702 Pro reset airbags on iat Ducato 2013?
A: Yes!It can!Check the detailedFiat Ducato models before purchasing below:
| Model |
Version |
System |
Ecu info |
Read Codes |
Erase Codes |
Live Data |
Active Test |
Special Function |
| DUCATO (230) |
1.9 TDS |
Bosch 5.3 ABS |
√ |
√ |
√ |
√ |
√ |
â—‹ |
| DUCATO (230) |
1.9 TDS ECO |
Bosch 5.3 ABS |
√ |
√ |
√ |
√ |
√ |
â—‹ |
| DUCATO (230) |
1.9 TDS ECO |
BREED MY 97 Air Bag (1F-2P) |
√ |
√ |
√ |
√ |
â—‹ |
â—‹ |
| DUCATO (230) |
19 DS |
Bosch 5.3 ABS |
√ |
√ |
√ |
√ |
√ |
â—‹ |
| DUCATO (230) |
2.0 BZ KAT |
Bosch 5.3 ABS |
√ |
√ |
√ |
√ |
√ |
â—‹ |
| DUCATO (230) |
2.0 BZ KAT |
BREED MY 97 Air Bag (1F-2P) |
√ |
√ |
√ |
√ |
â—‹ |
â—‹ |
| DUCATO (230) |
2.0 JTD |
Bosch 5.3 ABS |
√ |
√ |
√ |
√ |
√ |
â—‹ |
| DUCATO (230) |
2.0 JTD |
BREED MY 97 Air Bag (1F-2P) |
√ |
√ |
√ |
√ |
â—‹ |
â—‹ |
| DUCATO (230) |
2.0 JTD |
Diesel Bosch EDC15 CF3 injection (eng. 2.0/2.3/2.
|
√ |
√ |
√ |
√ |
√ |
002C 007E |
| DUCATO (230) |
2.5 DS |
Bosch 5.3 ABS |
√ |
√ |
√ |
√ |
√ |
â—‹ |
| DUCATO (230) |
2.5 TDS |
Bosch 5.3 ABS |
√ |
√ |
√ |
√ |
√ |
â—‹ |
| DUCATO (230) |
2.5 TDS ECO |
Bosch 5.3 ABS |
√ |
√ |
√ |
√ |
√ |
â—‹ |
| DUCATO (230) |
2.8 DS |
Bosch 5.3 ABS |
√ |
√ |
√ |
√ |
√ |
â—‹ |
| DUCATO (230) |
2.8 DS |
BREED MY 97 Air Bag (1F-2P) |
√ |
√ |
√ |
√ |
â—‹ |
â—‹ |
| DUCATO (230) |
2.8 JTD |
Bosch 5.3 ABS |
√ |
√ |
√ |
√ |
√ |
â—‹ |
| DUCATO (230) |
2.8 JTD |
BREED MY 97 Air Bag (1F-2P) |
√ |
√ |
√ |
√ |
â—‹ |
â—‹ |
| DUCATO (230) |
2.8 JTD |
Diesel Bosch EDC15 CF3 injection (eng. 2.0/2.3/2.
|
√ |
√ |
√ |
√ |
√ |
002C 007E |
| DUCATO (230) |
2.8 JTD |
Automatic Gearbox ZF 4HP20 (KW2) |
√ |
√ |
√ |
√ |
√ |
â—‹ |
| DUCATO (230) |
2.8 TDS |
Bosch 5.3 ABS |
√ |
√ |
√ |
√ |
√ |
â—‹ |
| DUCATO (230) |
2.8 TDS |
BREED MY 97 Air Bag (1F-2P) |
√ |
√ |
√ |
√ |
â—‹ |
â—‹ |
| DUCATO (244) |
2 |
Bosch 5.3 ABS |
√ |
√ |
√ |
√ |
√ |
â—‹ |
| DUCATO (244) |
2 |
Bosch 5.3 ASR ABS |
√ |
√ |
√ |
√ |
√ |
â—‹ |
| DUCATO (244) |
2 |
SIEMENS Airbag MY 99 (1F-2P) |
√ |
√ |
√ |
√ |
√ |
â—‹ |
| DUCATO (244) |
2 |
SIEMENS Airbag MY 99 (1F-3P) |
√ |
√ |
√ |
√ |
√ |
â—‹ |
| DUCATO (244) |
2 |
SIEMENS Airbag MY 99 (2F-2P-I) |
√ |
√ |
√ |
√ |
√ |
â—‹ |
| DUCATO (244) |
2 |
SIEMENS Airbag MY 99 (2F-3P-I) |
√ |
√ |
√ |
√ |
√ |
â—‹ |
| DUCATO (244) |
2 |
SIEMENS Airbag MY 99 (2F-2P-2L-I) |
√ |
√ |
√ |
√ |
√ |
â—‹ |
| DUCATO (244) |
2 |
Bosch ABS 5.3 (4x4) |
√ |
√ |
√ |
√ |
√ |
â—‹ |
| DUCATO (244) |
2 |
Magneti Marelli MM4.8P Injection (El. Key) |
√ |
√ |
√ |
√ |
√ |
â—‹ |
| DUCATO (244) |
2.0 JTD |
Bosch 5.3 ABS |
√ |
√ |
√ |
√ |
√ |
â—‹ |
| DUCATO (244) |
2.0 JTD |
Bosch 5.3 ASR ABS |
√ |
√ |
√ |
√ |
√ |
â—‹ |
| DUCATO (244) |
2.0 JTD |
SIEMENS Airbag MY 99 (1F-2P) |
√ |
√ |
√ |
√ |
√ |
â—‹ |
| DUCATO (244) |
2.0 JTD |
SIEMENS Airbag MY 99 (1F-3P) |
√ |
√ |
√ |
√ |
√ |
â—‹ |
| DUCATO (244) |
2.0 JTD |
SIEMENS Airbag MY 99 (2F-2P-I) |
√ |
√ |
√ |
√ |
√ |
â—‹ |
| DUCATO (244) |
2.0 JTD |
SIEMENS Airbag MY 99 (2F-3P-I) |
√ |
√ |
√ |
√ |
√ |
â—‹ |
| DUCATO (244) |
2.0 JTD |
SIEMENS Airbag MY 99 (2F-2P-2L-I) |
√ |
√ |
√ |
√ |
√ |
â—‹ |
| DUCATO (244) |
2.0 JTD |
Diesel Bosch EDC15 CF3 injection (eng. 2.0/2.3/2.
|
√ |
√ |
√ |
√ |
√ |
002C 007E |
| DUCATO (244) |
2.3 JTD |
Bosch 5.3 ABS |
√ |
√ |
√ |
√ |
√ |
â—‹ |
| DUCATO (244) |
2.3 JTD |
Bosch 5.3 ASR ABS |
√ |
√ |
√ |
√ |
√ |
â—‹ |
| DUCATO (244) |
2.3 JTD |
SIEMENS Airbag MY 99 (1F-2P) |
√ |
√ |
√ |
√ |
√ |
â—‹ |
| DUCATO (244) |
2.3 JTD |
SIEMENS Airbag MY 99 (1F-3P) |
√ |
√ |
√ |
√ |
√ |
â—‹ |
| DUCATO (244) |
2.3 JTD |
SIEMENS Airbag MY 99 (2F-2P-I) |
√ |
√ |
√ |
√ |
√ |
â—‹ |
| DUCATO (244) |
2.3 JTD |
SIEMENS Airbag MY 99 (2F-3P-I) |
√ |
√ |
√ |
√ |
√ |
â—‹ |
| DUCATO (244) |
2.3 JTD |
SIEMENS Airbag MY 99 (2F-2P-2L-I) |
√ |
√ |
√ |
√ |
√ |
â—‹ |
| DUCATO (244) |
2.3 JTD |
Diesel Bosch EDC15 CF3 injection (eng. 2.0/2.3/2.
|
√ |
√ |
√ |
√ |
√ |
002C 007E |
| DUCATO (244) |
2.3 JTD |
Bosch 8 ABS |
√ |
√ |
√ |
√ |
√ |
â—‹ |
| DUCATO (244) |
2.3 JTD |
Bosch EDC16C39 CF4/EOBD Diesel Injection (eng 2.3/3.0) |
√ |
√ |
√ |
√ |
√ |
001B 0071 0072 0073 0074 0014 008F 0019 0075 0012 0013 0087 0086 0083 0084 0082 0085 007E |
| DUCATO (244) |
2.8 JTD |
Bosch 5.3 ABS |
√ |
√ |
√ |
√ |
√ |
â—‹ |
| DUCATO (244) |
2.8 JTD |
Bosch 5.3 ASR ABS |
√ |
√ |
√ |
√ |
√ |
â—‹ |
| DUCATO (244) |
2.8 JTD |
SIEMENS Airbag MY 99 (1F-2P) |
√ |
√ |
√ |
√ |
√ |
â—‹ |
| DUCATO (244) |
2.8 JTD |
SIEMENS Airbag MY 99 (1F-3P) |
√ |
√ |
√ |
√ |
√ |
â—‹ |
| DUCATO (244) |
2.8 JTD |
SIEMENS Airbag MY 99 (2F-2P-I) |
√ |
√ |
√ |
√ |
√ |
â—‹ |
| DUCATO (244) |
2.8 JTD |
SIEMENS Airbag MY 99 (2F-3P-I) |
√ |
√ |
√ |
√ |
√ |
â—‹ |
| DUCATO (244) |
2.8 JTD |
SIEMENS Airbag MY 99 (2F-2P-2L-I) |
√ |
√ |
√ |
√ |
√ |
â—‹ |
| DUCATO (244) |
2.8 JTD |
Bosch ABS 5.3 (4x4) |
√ |
√ |
√ |
√ |
√ |
â—‹ |
| DUCATO (244) |
2.8 JTD |
Diesel Bosch EDC15 CF3 injection (eng. 2.0/2.3/2.
|
√ |
√ |
√ |
√ |
√ |
002C 007E |
| DUCATO (244) |
2.8 JTD |
Automatic Gearbox ZF 4HP20 (KW2) |
√ |
√ |
√ |
√ |
√ |
â—‹ |
| DUCATO (244) |
BIPOWER-GPOWER |
Bosch 5.3 ABS |
√ |
√ |
√ |
√ |
√ |
â—‹ |
| DUCATO (244) |
BIPOWER-GPOWER |
Bosch 5.3 ASR ABS |
√ |
√ |
√ |
√ |
√ |
â—‹ |
| DUCATO (244) |
BIPOWER-GPOWER |
SIEMENS Airbag MY 99 (1F-2P) |
√ |
√ |
√ |
√ |
√ |
â—‹ |
| DUCATO (244) |
BIPOWER-GPOWER |
SIEMENS Airbag MY 99 (1F-3P) |
√ |
√ |
√ |
√ |
√ |
â—‹ |
| DUCATO (244) |
BIPOWER-GPOWER |
SIEMENS Airbag MY 99 (2F-2P-I) |
√ |
√ |
√ |
√ |
√ |
â—‹ |
| DUCATO (244) |
BIPOWER-GPOWER |
SIEMENS Airbag MY 99 (2F-3P-I) |
√ |
√ |
√ |
√ |
√ |
â—‹ |
| DUCATO (244) |
BIPOWER-GPOWER |
SIEMENS Airbag MY 99 (2F-2P-2L-I) |
√ |
√ |
√ |
√ |
√ |
â—‹ |
| DUCATO (244) |
BIPOWER-GPOWER |
Magneti Marelli MM4.8P Injection (El. Key) |
√ |
√ |
√ |
√ |
√ |
â—‹ |
| DUCATO (250) |
2.2 JTD |
SAGEM SpeedPro power steering |
√ |
√ |
√ |
√ |
â—‹ |
â—‹ |
| DUCATO (250) |
2.2 JTD |
Bosch 8 ABS |
√ |
√ |
√ |
√ |
√ |
â—‹ |
| DUCATO (250) |
2.2 JTD |
Bosch 8 VDC ABS |
√ |
√ |
√ |
√ |
√ |
â—‹ |
| DUCATO (250) |
2.2 JTD |
Bosch 8 ASR ABS |
√ |
√ |
√ |
√ |
√ |
â—‹ |
| DUCATO (250) |
2.2 JTD |
Marelli/Microsoft Convergence |
√ |
√ |
√ |
√ |
√ |
0091 0090 |
| DUCATO (250) |
2.2 JTD |
TRW 1 Airbag (Proxi) |
√ |
√ |
√ |
√ |
√ |
â—‹ |
| DUCATO (250) |
2.2 JTD |
Marelli/Microsoft C3 Convergence |
√ |
√ |
√ |
√ |
√ |
0091 0090 |
| DUCATO (250) |
2.2 JTD |
Actia Chronotachigraph |
√ |
√ |
√ |
√ |
√ |
â—‹ |
| DUCATO (250) |
2.2 JTD |
Marelli instrument cluster (1) |
√ |
√ |
√ |
√ |
√ |
0007 0004 005D 0058 0006 0044 0045 0059 |
| DUCATO (250) |
2.2 JTD |
Visteon CF4/EOBD Diesel Injection (eng. 2.2) |
√ |
√ |
√ |
√ |
√ |
0027 0019 0028 0071 0072 0073 0074 002B 0094 0098 |
| DUCATO (250) |
2.2 JTD |
Bosch Parking Control Unit (1) |
√ |
√ |
√ |
√ |
â—‹ |
004C 0049 |
| DUCATO (250) |
2.2 JTD |
Continental Air Springs |
√ |
√ |
√ |
√ |
â—‹ |
009E 009C |
| DUCATO (250) |
2.2 JTD |
Marelli Body Computer 6 |
√ |
√ |
√ |
√ |
√ |
â—‹ |
| DUCATO (250) |
2.2 JTD |
Climate control Denso 2 (Single-zone) |
√ |
√ |
√ |
√ |
√ |
â—‹ |
| DUCATO (250) |
2.2 JTD |
Convergence Lauberhorn C1 |
√ |
√ |
√ |
√ |
√ |
0091 0090 |
| DUCATO (250) |
2.2 JTD |
TRW Airbag (EP-Proxy) 3 |
√ |
√ |
√ |
√ |
â—‹ |
â—‹ |
| DUCATO (250) |
2.3 JTD |
SAGEM SpeedPro power steering |
√ |
√ |
√ |
√ |
â—‹ |
â—‹ |
| DUCATO (250) |
2.3 JTD |
Bosch 8 ABS |
√ |
√ |
√ |
√ |
√ |
â—‹ |
| DUCATO (250) |
2.3 JTD |
Bosch 8 VDC ABS |
√ |
√ |
√ |
√ |
√ |
â—‹ |
| DUCATO (250) |
2.3 JTD |
Bosch 8 ASR ABS |
√ |
√ |
√ |
√ |
√ |
â—‹ |
| DUCATO (250) |
2.3 JTD |
Marelli/Microsoft Convergence |
√ |
√ |
√ |
√ |
√ |
0091 0090 |
| DUCATO (250) |
2.3 JTD |
TRW 1 Airbag (Proxi) |
√ |
√ |
√ |
√ |
√ |
â—‹ |
| DUCATO (250) |
2.3 JTD |
Marelli/Microsoft C3 Convergence |
√ |
√ |
√ |
√ |
√ |
0091 0090 |
| DUCATO (250) |
2.3 JTD |
Actia Chronotachigraph |
√ |
√ |
√ |
√ |
√ |
â—‹ |
| DUCATO (250) |
2.3 JTD |
Marelli instrument cluster (1) |
√ |
√ |
√ |
√ |
√ |
0007 0004 005D 0058 0006 0044 0045 0059 |
| DUCATO (250) |
2.3 JTD |
Bosch EDC16C39 CF4/EOBD Diesel Injection (eng 2.3/3.0) |
√ |
√ |
√ |
√ |
√ |
001B 0071 0072 0073 0074 0014 008F 0019 0075 0012 0013 0087 0086 0083 0084 0082 0085 007E |
| DUCATO (250) |
2.3 JTD |
Bosch Parking Control Unit (1) |
√ |
√ |
√ |
√ |
â—‹ |
004C 0049 |
| DUCATO (250) |
2.3 JTD |
Continental Air Springs |
√ |
√ |
√ |
√ |
â—‹ |
009E 009C |
| DUCATO (250) |
2.3 JTD |
Marelli Body Computer 6 |
√ |
√ |
√ |
√ |
√ |
â—‹ |
| DUCATO (250) |
2.3 JTD |
Climate control Denso 2 (Single-zone) |
√ |
√ |
√ |
√ |
√ |
â—‹ |
| DUCATO (250) |
2.3 JTD |
Convergence Lauberhorn C1 |
√ |
√ |
√ |
√ |
√ |
0091 0090 |
| DUCATO (250) |
2.3 JTD |
TRW Airbag (EP-Proxy) 3 |
√ |
√ |
√ |
√ |
â—‹ |
â—‹ |
| DUCATO (250) |
3.0 16V CNG |
SAGEM SpeedPro power steering |
√ |
√ |
√ |
√ |
â—‹ |
â—‹ |
| DUCATO (250) |
3.0 16V CNG |
Bosch 8 ABS |
√ |
√ |
√ |
√ |
√ |
â—‹ |
| DUCATO (250) |
3.0 16V CNG |
Bosch 8 VDC ABS |
√ |
√ |
√ |
√ |
√ |
â—‹ |
| DUCATO (250) |
3.0 16V CNG |
Bosch 8 ASR ABS |
√ |
√ |
√ |
√ |
√ |
â—‹ |
| DUCATO (250) |
3.0 16V CNG |
Marelli/Microsoft Convergence |
√ |
√ |
√ |
√ |
√ |
0091 0090 |
| DUCATO (250) |
3.0 16V CNG |
TRW 1 Airbag (Proxi) |
√ |
√ |
√ |
√ |
√ |
â—‹ |
| DUCATO (250) |
3.0 16V CNG |
Marelli/Microsoft C3 Convergence |
√ |
√ |
√ |
√ |
√ |
0091 0090 |
| DUCATO (250) |
3.0 16V CNG |
Actia Chronotachigraph |
√ |
√ |
√ |
√ |
√ |
â—‹ |
| DUCATO (250) |
3.0 16V CNG |
Marelli instrument cluster (1) |
√ |
√ |
√ |
√ |
√ |
0007 0004 005D 0058 0006 0044 0045 0059 |
| DUCATO (250) |
3.0 16V CNG |
Bosch Parking Control Unit (1) |
√ |
√ |
√ |
√ |
â—‹ |
004C 0049 |
| DUCATO (250) |
3.0 16V CNG |
Continental Air Springs |
√ |
√ |
√ |
√ |
â—‹ |
009E 009C |
| DUCATO (250) |
3.0 16V CNG |
Marelli Body Computer 6 |
√ |
√ |
√ |
√ |
√ |
â—‹ |
| DUCATO (250) |
3.0 16V CNG |
Climate control Denso 2 (Single-zone) |
√ |
√ |
√ |
√ |
√ |
â—‹ |
| DUCATO (250) |
3.0 16V CNG |
Injection Magneti Marelli IAW 5SF4 Natural Power (eng. 3.0) |
√ |
√ |
√ |
√ |
√ |
007E 00BB 00C4 00C6 0033 |
| DUCATO (250) |
3.0 16V CNG |
Convergence Lauberhorn C1 |
√ |
√ |
√ |
√ |
√ |
0091 0090 |
| DUCATO (250) |
3.0 16V CNG |
TRW Airbag (EP-Proxy) 3 |
√ |
√ |
√ |
√ |
â—‹ |
â—‹ |
| DUCATO (250) |
3.0 JTD |
SAGEM SpeedPro power steering |
√ |
√ |
√ |
√ |
â—‹ |
â—‹ |
| DUCATO (250) |
3.0 JTD |
Bosch 8 ABS |
√ |
√ |
√ |
√ |
√ |
â—‹ |
| DUCATO (250) |
3.0 JTD |
Bosch 8 VDC ABS |
√ |
√ |
√ |
√ |
√ |
â—‹ |
| DUCATO (250) |
3.0 JTD |
Bosch 8 ASR ABS |
√ |
√ |
√ |
√ |
√ |
â—‹ |
| DUCATO (250) |
3.0 JTD |
Marelli/Microsoft Convergence |
√ |
√ |
√ |
√ |
√ |
0091 0090 |
| DUCATO (250) |
3.0 JTD |
TRW 1 Airbag (Proxi) |
√ |
√ |
√ |
√ |
√ |
â—‹ |
| DUCATO (250) |
3.0 JTD |
Marelli/Microsoft C3 Convergence |
√ |
√ |
√ |
√ |
√ |
0091 0090 |
| DUCATO (250) |
3.0 JTD |
Actia Chronotachigraph |
√ |
√ |
√ |
√ |
√ |
â—‹ |
| DUCATO (250) |
3.0 JTD |
Marelli instrument cluster (1) |
√ |
√ |
√ |
√ |
√ |
0007 0004 005D 0058 0006 0044 0045 0059 |
| DUCATO (250) |
3.0 JTD |
Bosch EDC16C39 CF4/EOBD Diesel Injection (eng 2.3/3.0) |
√ |
√ |
√ |
√ |
√ |
001B 0071 0072 0073 0074 0014 008F 0019 0075 0012 0013 0087 0086 0083 0084 0082 0085 007E |
| DUCATO (250) |
3.0 JTD |
Bosch Parking Control Unit (1) |
√ |
√ |
√ |
√ |
â—‹ |
004C 0049 |
| DUCATO (250) |
3.0 JTD |
Continental Air Springs |
√ |
√ |
√ |
√ |
â—‹ |
009E 009C |
| DUCATO (250) |
3.0 JTD |
Marelli Body Computer 6 |
√ |
√ |
√ |
√ |
√ |
â—‹ |
| DUCATO (250) |
3.0 JTD |
Climate control Denso 2 (Single-zone) |
√ |
√ |
√ |
√ |
√ |
â—‹ |
| DUCATO (250) |
3.0 JTD |
Automatic Gearbox Marelli SELESPEED CFC348 |
√ |
√ |
√ |
√ |
√ |
0019 003A 003E 00A8 0097 00A2 003C 0051 0096 004E 004F 0041 00C2 00D1 0060 00D0 |
| DUCATO (250) |
3.0 JTD |
Bosch Diesel Injection EDC17CP52 EURO V/EOBD (eng. 3.0) |
√ |
√ |
√ |
√ |
√ |
001B 0071 0072 0073 0074 0014 0028 007E 00BC 00B0 00B2 00B3 00B4 0012 0078 0099 00BA |
| DUCATO (250) |
3.0 JTD |
Convergence Lauberhorn C1 |
√ |
√ |
√ |
√ |
√ |
0091 0090 |
| DUCATO (250) |
3.0 JTD |
TRW Airbag (EP-Proxy) 3 |
√ |
√ |
√ |
√ |
â—‹ |
â—‹ |
| DUCATO (250) |
MINIBUS 16+1 SEATS |
SAGEM SpeedPro power steering |
√ |
√ |
√ |
√ |
â—‹ |
â—‹ |
| DUCATO (250) |
MINIBUS 16+1 SEATS |
Bosch 8 ABS |
√ |
√ |
√ |
√ |
√ |
â—‹ |
| DUCATO (250) |
MINIBUS 16+1 SEATS |
Bosch 8 VDC ABS |
√ |
√ |
√ |
√ |
√ |
â—‹ |
| DUCATO (250) |
MINIBUS 16+1 SEATS |
Bosch 8 ASR ABS |
√ |
√ |
√ |
√ |
√ |
â—‹ |
| DUCATO (250) |
MINIBUS 16+1 SEATS |
Marelli/Microsoft Convergence |
√ |
√ |
√ |
√ |
√ |
0091 0090 |
| DUCATO (250) |
MINIBUS 16+1 SEATS |
TRW 1 Airbag (Proxi) |
√ |
√ |
√ |
√ |
√ |
â—‹ |
| DUCATO (250) |
MINIBUS 16+1 SEATS |
Marelli/Microsoft C3 Convergence |
√ |
√ |
√ |
√ |
√ |
0091 0090 |
| DUCATO (250) |
MINIBUS 16+1 SEATS |
Actia Chronotachigraph |
√ |
√ |
√ |
√ |
√ |
â—‹ |
| DUCATO (250) |
MINIBUS 16+1 SEATS |
Marelli instrument cluster (1) |
√ |
√ |
√ |
√ |
√ |
0007 0004 005D 0058 0006 0044 0045 0059 |
| DUCATO (250) |
MINIBUS 16+1 SEATS |
Bosch EDC16C39 CF4/EOBD Diesel Injection (eng 2.3/3.0) |
√ |
√ |
√ |
√ |
√ |
001B 0071 0072 0073 0074 0014 008F 0019 0075 0012 0013 0087 0086 0083 0084 0082 0085 007E |
| DUCATO (250) |
MINIBUS 16+1 SEATS |
Bosch Parking Control Unit (1) |
√ |
√ |
√ |
√ |
â—‹ |
004C 0049 |
| DUCATO (250) |
MINIBUS 16+1 SEATS |
Continental Air Springs |
√ |
√ |
√ |
√ |
â—‹ |
009E 009C |
| DUCATO (250) |
MINIBUS 16+1 SEATS |
Marelli Body Computer 6 |
√ |
√ |
√ |
√ |
√ |
â—‹ |
| DUCATO (250) |
MINIBUS 16+1 SEATS |
Climate control Denso 2 (Single-zone) |
√ |
√ |
√ |
√ |
√ |
â—‹ |
| DUCATO (250) |
MINIBUS 16+1 SEATS |
Automatic Gearbox Marelli SELESPEED CFC348 |
√ |
√ |
√ |
√ |
√ |
0019 003A 003E 00A8 0097 00A2 003C 0051 0096 004E 004F 0041 00C2 00D1 0060 00D0 |
| DUCATO (250) |
MINIBUS 16+1 SEATS |
Bosch Diesel Injection EDC17CP52 EURO V/EOBD (eng. 3.0) |
√ |
√ |
√ |
√ |
√ |
001B 0071 0072 0073 0074 0014 0028 007E 00BC 00B0 00B2 00B3 00B4 0012 0078 0099 00BA |
| DUCATO (250) |
MINIBUS 16+1 SEATS |
Convergence Lauberhorn C1 |
√ |
√ |
√ |
√ |
√ |
0091 0090 |
| DUCATO (250) |
MINIBUS 16+1 SEATS |
TRW Airbag (EP-Proxy) 3 |
√ |
√ |
√ |
√ |
â—‹ |
â—‹ |
| DUCATO (250) |
MINIBUS 3.0 16V CNG |
SAGEM SpeedPro power steering |
√ |
√ |
√ |
√ |
â—‹ |
â—‹ |
| DUCATO (250) |
MINIBUS 3.0 16V CNG |
Bosch 8 ABS |
√ |
√ |
√ |
√ |
√ |
â—‹ |
| DUCATO (250) |
MINIBUS 3.0 16V CNG |
Bosch 8 VDC ABS |
√ |
√ |
√ |
√ |
√ |
â—‹ |
| DUCATO (250) |
MINIBUS 3.0 16V CNG |
Bosch 8 ASR ABS |
√ |
√ |
√ |
√ |
√ |
â—‹ |
| DUCATO (250) |
MINIBUS 3.0 16V CNG |
Marelli/Microsoft Convergence |
√ |
√ |
√ |
√ |
√ |
0091 0090 |
| DUCATO (250) |
MINIBUS 3.0 16V CNG |
TRW 1 Airbag (Proxi) |
√ |
√ |
√ |
√ |
√ |
â—‹ |
| DUCATO (250) |
MINIBUS 3.0 16V CNG |
Marelli/Microsoft C3 Convergence |
√ |
√ |
√ |
√ |
√ |
0091 0090 |
| DUCATO (250) |
MINIBUS 3.0 16V CNG |
Actia Chronotachigraph |
√ |
√ |
√ |
√ |
√ |
â—‹ |
| DUCATO (250) |
MINIBUS 3.0 16V CNG |
Marelli instrument cluster (1) |
√ |
√ |
√ |
√ |
√ |
0007 0004 005D 0058 0006 0044 0045 0059 |
| DUCATO (250) |
MINIBUS 3.0 16V CNG |
Bosch Parking Control Unit (1) |
√ |
√ |
√ |
√ |
â—‹ |
004C 0049 |
| DUCATO (250) |
MINIBUS 3.0 16V CNG |
Continental Air Springs |
√ |
√ |
√ |
√ |
â—‹ |
009E 009C |
| DUCATO (250) |
MINIBUS 3.0 16V CNG |
Marelli Body Computer 6 |
√ |
√ |
√ |
√ |
√ |
â—‹ |
| DUCATO (250) |
MINIBUS 3.0 16V CNG |
Climate control Denso 2 (Single-zone) |
√ |
√ |
√ |
√ |
√ |
â—‹ |
| DUCATO (250) |
MINIBUS 3.0 16V CNG |
Injection Magneti Marelli IAW 5SF4 Natural Power (eng. 3.0) |
√ |
√ |
√ |
√ |
√ |
007E 00BB 00C4 00C6 0033 |
| DUCATO (250) |
MINIBUS 3.0 16V CNG |
Convergence Lauberhorn C1 |
√ |
√ |
√ |
√ |
√ |
0091 0090 |
| DUCATO (250) |
MINIBUS 3.0 16V CNG |
TRW Airbag (EP-Proxy) 3 |
√ |
√ |
√ |
√ |
â—‹ |
â—‹ |
| DUCATO FL (250) |
2.0 JTD |
SAGEM SpeedPro power steering |
√ |
√ |
√ |
√ |
â—‹ |
â—‹ |
| DUCATO FL (250) |
2.0 JTD |
TRW Airbag (EP-Proxi) |
√ |
√ |
√ |
√ |
√ |
â—‹ |
| DUCATO FL (250) |
2.0 JTD |
Actia Chronotachigraph |
√ |
√ |
√ |
√ |
√ |
â—‹ |
| DUCATO FL (250) |
2.0 JTD |
Continental Air Springs |
√ |
√ |
√ |
√ |
â—‹ |
009E 009C |
| DUCATO FL (250) |
2.0 JTD |
Bosch Parking Control Unit (EP) |
√ |
√ |
√ |
√ |
â—‹ |
â—‹ |
| DUCATO FL (250) |
2.0 JTD |
Lauberhorn Convergence (EP) |
√ |
√ |
√ |
√ |
√ |
0091 0090 |
| DUCATO FL (250) |
2.0 JTD |
Denso Single-Zone Automatic Climate Control (EP) |
√ |
√ |
√ |
√ |
√ |
0053 |
| DUCATO FL (250) |
2.0 JTD |
Bosch ABS 9 ESP (EP) |
√ |
√ |
√ |
√ |
√ |
00C7 00DC 0030 0001 0029 |
| DUCATO FL (250) |
2.0 JTD |
Bosch ABS 9 (EP) |
√ |
√ |
√ |
√ |
√ |
0030 0001 |
| DUCATO FL (250) |
2.0 JTD |
Marelli 11 Body Computer |
√ |
√ |
√ |
√ |
√ |
â—‹ |
| DUCATO FL (250) |
2.0 JTD |
Marelli cluster (EP) 4 |
√ |
√ |
√ |
√ |
√ |
0023 0007 0006 0044 0045 005D 0059 |
| DUCATO FL (250) |
2.0 JTD |
TRW Airbag (EP-Proxy) 2 |
√ |
√ |
√ |
√ |
â—‹ |
â—‹ |
| DUCATO FL (250) |
2.0 JTD |
Bosch Diesel Injection EDC17C49 CF5/5+ EOBD CAN (EP 2.0 eng.) |
√ |
√ |
√ |
√ |
√ |
001B 0099 00B0 00A6 0028 0012 0078 00DE 00B4 00B3 007E 00B1 00B2 |
| DUCATO FL (250) |
2.3 JTD |
SAGEM SpeedPro power steering |
√ |
√ |
√ |
√ |
â—‹ |
â—‹ |
| DUCATO FL (250) |
2.3 JTD |
TRW Airbag (EP-Proxi) |
√ |
√ |
√ |
√ |
√ |
â—‹ |
| DUCATO FL (250) |
2.3 JTD |
Actia Chronotachigraph |
√ |
√ |
√ |
√ |
√ |
â—‹ |
| DUCATO FL (250) |
2.3 JTD |
Continental Air Springs |
√ |
√ |
√ |
√ |
â—‹ |
009E 009C |
| DUCATO FL (250) |
2.3 JTD |
Bosch Parking Control Unit (EP) |
√ |
√ |
√ |
√ |
â—‹ |
â—‹ |
| DUCATO FL (250) |
2.3 JTD |
Lauberhorn Convergence (EP) |
√ |
√ |
√ |
√ |
√ |
0091 0090 |
| DUCATO FL (250) |
2.3 JTD |
Denso Single-Zone Automatic Climate Control (EP) |
√ |
√ |
√ |
√ |
√ |
0053 |
| DUCATO FL (250) |
2.3 JTD |
Bosch ABS 9 ESP (EP) |
√ |
√ |
√ |
√ |
√ |
00C7 00DC 0030 0001 0029 |
| DUCATO FL (250) |
2.3 JTD |
Bosch ABS 9 (EP) |
√ |
√ |
√ |
√ |
√ |
0030 0001 |
| DUCATO FL (250) |
2.3 JTD |
Marelli Diesel Injection 8F3 CF5/5+ EOBD (EP 2.3 JTD eng.) |
√ |
√ |
√ |
√ |
√ |
001B 0099 00B0 0031 0028 00BC 0092 00BA 0012 0078 00C3 00DE 00B4 00B3 007E 00B2 |
| DUCATO FL (250) |
2.3 JTD |
Marelli 11 Body Computer |
√ |
√ |
√ |
√ |
√ |
â—‹ |
| DUCATO FL (250) |
2.3 JTD |
Marelli cluster (EP) 4 |
√ |
√ |
√ |
√ |
√ |
0023 0007 0006 0044 0045 005D 0059 |
| DUCATO FL (250) |
2.3 JTD |
TRW Airbag (EP-Proxy) 2 |
√ |
√ |
√ |
√ |
â—‹ |
â—‹ |
| DUCATO FL (250) |
2.3 JTD |
Automatic Gearbox Marelli SELESPEED CFC348 2 |
√ |
√ |
√ |
√ |
√ |
0041 003E 0019 0096 00C2 0097 003A 003C 00D0 00DD 00A8 |
| DUCATO FL (250) |
3.0 JTD |
SAGEM SpeedPro power steering |
√ |
√ |
√ |
√ |
â—‹ |
â—‹ |
| DUCATO FL (250) |
3.0 JTD |
TRW Airbag (EP-Proxi) |
√ |
√ |
√ |
√ |
√ |
â—‹ |
| DUCATO FL (250) |
3.0 JTD |
Actia Chronotachigraph |
√ |
√ |
√ |
√ |
√ |
â—‹ |
| DUCATO FL (250) |
3.0 JTD |
Continental Air Springs |
√ |
√ |
√ |
√ |
â—‹ |
009E 009C |
| DUCATO FL (250) |
3.0 JTD |
Bosch Parking Control Unit (EP) |
√ |
√ |
√ |
√ |
â—‹ |
â—‹ |
| DUCATO FL (250) |
3.0 JTD |
Lauberhorn Convergence (EP) |
√ |
√ |
√ |
√ |
√ |
0091 0090 |
| DUCATO FL (250) |
3.0 JTD |
Denso Single-Zone Automatic Climate Control (EP) |
√ |
√ |
√ |
√ |
√ |
0053 |
| DUCATO FL (250) |
3.0 JTD |
Bosch ABS 9 ESP (EP) |
√ |
√ |
√ |
√ |
√ |
00C7 00DC 0030 0001 0029 |
| DUCATO FL (250) |
3.0 JTD |
Bosch ABS 9 (EP) |
√ |
√ |
√ |
√ |
√ |
0030 0001 |
| DUCATO FL (250) |
3.0 JTD |
Marelli 11 Body Computer |
√ |
√ |
√ |
√ |
√ |
â—‹ |
| DUCATO FL (250) |
3.0 JTD |
Marelli cluster (EP) 4 |
√ |
√ |
√ |
√ |
√ |
0023 0007 0006 0044 0045 005D 0059 |
| DUCATO FL (250) |
3.0 JTD |
TRW Airbag (EP-Proxy) 2 |
√ |
√ |
√ |
√ |
â—‹ |
â—‹ |
| DUCATO FL (250) |
3.0 JTD |
Bosch Diesel Injection EDC17CP52 CF5/5+ EOBD CAN (EP 3.0 eng.) |
√ |
√ |
√ |
√ |
√ |
001B 0099 00B0 0028 00BC 00BA 0012 0078 00C3 00DE 00B4 00B3 007E 00B2 |
| DUCATO FL (250) |
3.0 JTD |
Automatic Gearbox Marelli SELESPEED CFC348 2 |
√ |
√ |
√ |
√ |
√ |
0041 003E 0019 0096 00C2 0097 003A 003C 00D0 00DD 00A8 |
And screen shoot:
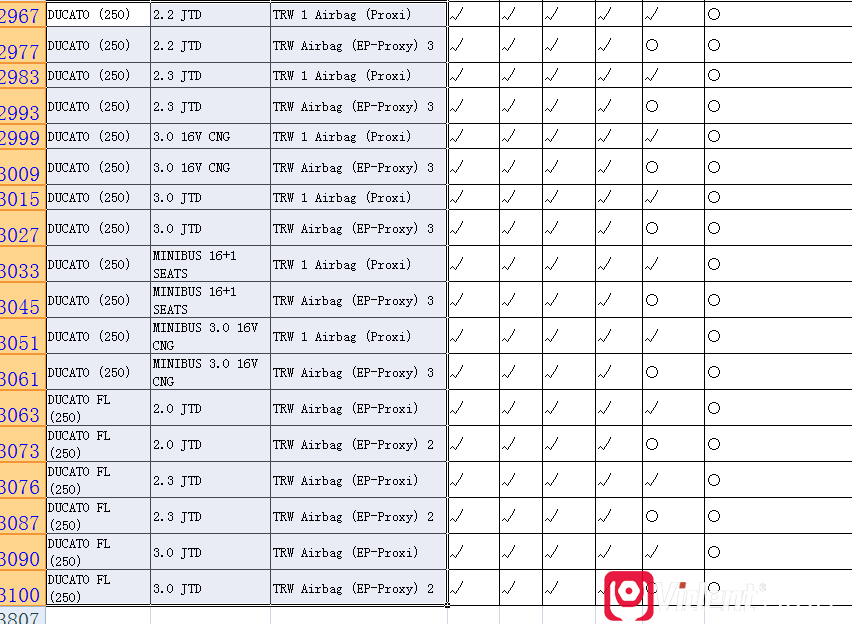
And Vident iAuto702 Pro Fiat special function list:
| Index |
Special Function Name |
Index |
Special Function Name |
| 0001 |
Static test |
0071 |
Replacement of injector cyl. 1 |
| 0002 |
Homologation number |
0072 |
Replacement of injector cyl. 2 |
| 0003 |
System configuration |
0073 |
Replacement of injector cyl. 3 |
| 0004 |
Inputs status |
0074 |
Replacement of injector cyl. 4 |
| 0005 |
Throttle learn storage |
0075 |
Replacment of control unit and injector/s |
| 0006 |
Reset odometer |
0076 |
Replacement of Lambda sensor |
| 0007 |
Headlamp pos. correct. |
0077 |
Zeroing fan mode learn |
| 0008 |
Wheel transmitters learning |
0078 |
Replacement Lambda sensor |
| 0009 |
Looks for faulty wheel transmitter |
0079 |
Replacement injector cyl. 5 |
| 000A |
Automatic Configuration Read |
007A |
Replacement injectors (4 cyl. bank) |
| 000B |
Automatic Configuration Write |
007B |
Air/Fuel learn setting |
| 000C |
Manual System Configuration |
007C |
Engine - Control Unit Group Replacement |
| 000D |
System calibration |
007D |
Servo Mechanism Group Replacement |
| 000E |
Lambda sensor check |
007E |
Speed limit setting |
| 000F |
Part. Filter regeneration |
007F |
Borg Warner sol. valves compatibility |
| 0010 |
FAP Temperature Probe presence configuration |
0080 |
Self-adapting parameters zeroing (air) |
| 0011 |
Air flow sensor replacement |
0081 |
Self-adapting parameters zeroing (knock) |
| 0012 |
Rail pressure sensor replacement |
0082 |
Particulate filter replacement (only for version with DPF) |
| 0013 |
Rail pressure sensor and injector/s replacement |
0083 |
Differential pressure sensor replacement (only for version with DPF) |
| 0014 |
Injector replacement (per bank) |
0084 |
Pre-catalyser replacement (only for version with DPF) |
| 0015 |
Replacement of the additive, or the pump, or the tubes. |
0085 |
Particulate filter regeneration (only for version with DPF) |
| 0016 |
System configuration via MaxiSys Web |
0086 |
Air flow meter replacement (only for version with Lambda sensor) |
| 0017 |
Mounting check |
0087 |
Lambda sensor replacement (only for version with Lambda sensor) |
| 0018 |
Wheel identification check |
0088 |
Cruise Control Learn |
| 0019 |
Control unit replacement |
0089 |
Air conditioner Learn |
| 001A |
Pressure sensor calibration |
008A |
Gearbox Lever Position Learn |
| 001B |
Injector codes read |
008B |
Antenna replacement |
| 001C |
FAP Replacement |
008C |
Control unit activation |
| 001D |
Additive type configuration |
008D |
Control unit deactivation |
| 001E |
RH distribution flap learn |
008E |
Deletion stored buttons |
| 001F |
LH distribution flap learn |
008F |
Oil change (only for version with DPF) |
| 0020 |
LH mixing flap learn |
0090 |
Audio System Test |
| 0021 |
RH mixing flap learn |
0091 |
Convergence System Restart |
| 0022 |
Engine type configuration |
0092 |
Phonic wheel replacement |
| 0023 |
Chronotachigraph Control Unit (CCT) |
0093 |
Alarm state check |
| 0024 |
LED colours configuration |
0094 |
High pressure pump replacement |
| 0025 |
Accelerometer calibration |
0095 |
Additional diesel circuit filling |
| 0026 |
Clutch pedal learning |
0096 |
Gearbox replacement |
| 0027 |
Startup with Code Card |
0097 |
Gearbox oil accumulator replacement |
| 0028 |
Oil change |
0098 |
Pilot injection learn |
| 0029 |
Steering angle calibration |
0099 |
Air flow meter sensor replacement |
| 002A |
Phonic wheel learn |
009A |
ECO switch replacement |
| 002B |
Speed limit |
009B |
End of line self-calibration |
| 002C |
Injector classification |
009C |
Forced trim correction |
| 002D |
Brake bleed |
009D |
Phase sensor learn zeroing |
| 002E |
EGR valve learn |
009E |
Vehicle geometry height setting |
| 002F |
Fuel supply system |
009F |
Pneumatic circuit filling |
| 0030 |
Recognition of speed sensor type |
00A0 |
Overboost counter reset |
| 0031 |
Neutral signal learn |
00A1 |
Cam edges zeroing (VVT) |
| 0032 |
Fuel supply manifold bleed |
00A2 |
Longitudinal acceleration signal learn |
| 0033 |
Replacement of pressure/temperature sensor in methane rail |
00A3 |
JukeBox data deletion |
| 0034 |
Longit. acc. sensor calibration |
00A4 |
Secondary wheel identification deletion |
| 0035 |
Self-adaptation Parameter erasure |
00A5 |
ECO/SPORT switch replacement |
| 0036 |
Zeroing of self-adaption parameters |
00A6 |
EGR valve replacement |
| 0037 |
Self-learnt functions reset |
00A7 |
Variable geometry turbo replacement |
| 0038 |
Dist. To Next Service Zeroing (Coupon) |
00A8 |
'UP Function' switch replacement |
| 0039 |
Call buttons configuration |
00A9 |
Automatic gearbox replacement |
| 003A |
Clutch replacement |
00AA |
Automatic gearbox and Control unit replacement |
| 003B |
KIT/Gearbox replacement |
00AB |
Automatic gearbox oil replacement |
| 003C |
Electropump replacement |
00AC |
Replacement of particulate filter with built-in pre-catalyzer (only for versions with DPF) |
| 003D |
Statistical data deletion |
00AD |
Services Interval KM message |
| 003E |
Tunnel lever replacement |
00AE |
Knock counter reset |
| 003F |
Steering wheel levers replacement |
00AF |
Parking manoeuvre status |
| 0040 |
KIT/Pump replacement |
00B0 |
Differential pressure sensor replacement |
| 0041 |
Pump relay replacement |
00B1 |
Particulate filter with integrated pre-cat replacement |
| 0042 |
AUTO switch replacement |
00B2 |
Particulate filter regeneration |
| 0043 |
Vehicle configuration deletion |
00B3 |
Resetting distance travelled with Water Temp. w. lamp ON |
| 0044 |
Seat belts alarm exclusion |
00B4 |
Resetting distance travelled with Water in diesel w. lamp ON |
| 0045 |
Seat belts alarm Enable |
00B5 |
Replacement injector/s |
| 0046 |
Vehicle type learn reset |
00B6 |
Levers on steering wheel learn |
| 0047 |
System Configuration Read |
00B7 |
UniAir module replacement |
| 0048 |
System Configuration Write |
00B8 |
Supercharging system components replacement |
| 0049 |
Tow hook presence enable |
00B9 |
Downstream lambda sensor and/or catalyzer and/or Injectors replacement |
| 004A |
Alarm deletion |
00BA |
Pre-catalyzer replacement |
| 004B |
Reset self-adapt. param. and idle act. |
00BB |
Motorised throttle replacement |
| 004C |
Tow hook presence disable |
00BC |
Particulate filter replacement |
| 004D |
Instrument panel lighting |
00BD |
MultiAir Rolling finger replacement |
| 004E |
Clutch bleed |
00BE |
Rpm sensor and/or distribution belt replacement |
| 004F |
Accumulator depressurisation |
00BF |
Oil temperature sensor replacement |
| 0050 |
Clutch self-calibration enable |
00C0 |
Timing sensor and/or cam replacement |
| 0051 |
End of line / service self-calibration |
00C1 |
Performance limiting deactivation |
| 0052 |
New actuators |
00C2 |
Hydraulic Kit replacement |
| 0053 |
Flap actuators learning test |
00C3 |
Replacement of variable geometry turbo and/or turbo posit. sensor |
| 0054 |
Position sensor calibration |
00C4 |
Replacement of lambda sensor and/or spark plugs and/or injectors |
| 0055 |
Odometer write |
00C5 |
Mechanical waste-gate valve replacement |
| 0056 |
Oil Counter Write |
00C6 |
Phonic wheel and/or phase sensor and/or rev sensor replacement |
| 0057 |
Inspection service value |
00C7 |
Lateral and longitud. acceleration sensor calibration |
| 0058 |
Oil change servicing information delete |
00C8 |
Load valves calibration |
| 0059 |
Instrument panel replacement |
00C9 |
Pilot valves calibration |
| 005A |
Phonic wheel learn reset |
00CA |
Sensors module replacement |
| 005B |
Engagement lever pin securing screw diagnosis |
00CB |
Electropump drive unit replacement |
| 005C |
Selection lever return diagnosis |
00CC |
Odd no. gear clutch position sensor replacement |
| 005D |
Servicing information delete |
00CD |
Even no. gear clutch pressure sensor replacement |
| 005E |
Memory mode write |
00CE |
Longitudinal acceleration sensor replacement |
| 005F |
Control Unit Unlock |
00CF |
Odd and/or even gear clutch replacement |
| 0060 |
Calculation of clutch degradation index |
00D0 |
Selection and/or engagement clutch electrovalve replacement |
| 0061 |
Steering angle reset |
00D1 |
Gearbox and hydraulic KIT replacement |
| 0062 |
Test limit speed disable |
00D2 |
Alcohol fuel setting |
| 0063 |
Test limit speed restore |
00D3 |
Petrol fuel setting |
| 0064 |
VIN Code Configuration |
00D4 |
Gearbox button panel replacement |
| 0065 |
Personal data deletion |
00D5 |
Air flow meter replacement |
| 0066 |
Cyl. 1 injector classification |
00D6 |
Air metering unit replacement |
| 0067 |
Cyl. 2 injector classification |
00D7 |
Supercharg. air cooling SV replacement |
| 0068 |
Cyl. 3 injector classification |
00D8 |
Knock sensor and/or spark plug replacement |
| 0069 |
Cyl. 4 injector classification |
00D9 |
Lambda sensor and/or catalytic convertor and/or injector replacement |
| 006A |
Cyl. 5 injector classification |
00DA |
Intelligent alternator (IAM) replacement |
| 006B |
Injector classification (4 cyl. bank) |
00DB |
Rpm sensor and/or timing chain replacement |
| 006C |
Injector classification (5 cyl. bank) |
00DC |
Longitudinal/lateral Accel. sens. calibration reset |
| 006D |
Deletion of statistical data relating to errors |
00DD |
Sensor replacement |
| 006E |
CITY switch replacement |
00DE |
Replacement of potentiometer and/or clutch group |
| 006F |
SPORT switch replacement |
00DF |
Fuel supply system component replacement |
| 0070 |
Cruise control learn zeroing |
00E0 |
Fuel pressure regulator replacement (high pressure pump input) |
Vident iAuto702 Pro good source:
https://www.videntstore.com/wholesale/vident-iauto702-pro-scan-tool.html
Posted by: OBDexpress.co.uk at
09:25 AM
| Comments (5)
| Add Comment
Post contains 4564 words, total size 92 kb.
Posted by: Car Stereo Installation Services in Stone Mountain GA at June 18, 2021 07:17 AM (OQWo5)
Posted by: max watson at July 05, 2021 10:27 AM (OQWo5)
3
I found this is an
informative and interesting post so i think so it is very useful and
knowledgeable. I would like to thank you for the efforts you have made in
writing this article.
Driving Practice Weston
Posted by: jhon alex at July 12, 2021 12:25 PM (Zr0sC)
Posted by: Thomas at June 09, 2023 10:14 AM (qKEkm)
5
Need assistance in writing the introduction for your engineering dissertation help? I provide guidance in crafting a compelling opening chapter. Connect with me via mydissertations.co.uk for expert support.
Posted by: Thomas at July 10, 2023 06:43 AM (qKEkm)
Hide Comments
| Add Comment
August 27, 2020
ISTA-D error “the vehicle could not be identified successfully†Solution
This article starts with the problem: I have some issues withISTA-D Version 4.22.
installed through the Bimmergeeks installation pack. I have also tried
the one throughMikes Easy install before with the same result.
I keep getting the following error when trying to connect to vehicle:"The vehicle could not be identified successfully. Check vehicle interface and ‘PAD active’.â€
The same error shows up when I try to useE-NET cable(which works without an issue for E-SYS coding), as well asK+D CAN cable(which works without an issue for INPA).
I have checked the settings in EDIABAS.ini and all looks good, as I said it works well with INPA.
Advice:
Do
you unzip all files in required folders? I think yes. You need to feed
the registry values to computer so it can understand your standalone
installation (which in fact is not executable installation)and
variables.
Question:
They
are actually executable files, installing everything through an
installer.There were no manual registry entries nor *.reg files to load
into the registry, neither with Mikes orBimmergeeks installations.
Advice:
I see. Then check with regedit what settings you have
under[HKEY_LOCAL_MACHINE\SOFTWARE\Wow6432Node\BMWGroup\ISPI\Rheingold] or similar path.
Question:
Sure, see the attached picture of the reg entries I have in that path.
Advice:
Try onlinemode = true
Finally! Works!
Good to know:
There
is no connection with servers. Its offline. These registries makes
windows and ista having proper configuration for running application.
http://blog.obdexpress.co.uk/tag/bmw-ista-d/
Posted by: OBDexpress.co.uk at
08:22 AM
| Comments (5)
| Add Comment
Post contains 241 words, total size 11 kb.
August 20, 2020
What J2534 interface for Xentry passthru not C3 C4 clone?
Looking for a J2534 interface that supports Xentry Passthru sufficient and cost less than a Star C3/C4 clone (maybe about or less 100-150 Euro).
J2534 interface Review 1.
Here some J2534 interface that you can reference:
- genuine AVDI,
- MONGOOSE PRO 2 CAN/ISO CABLE
- VAS5054
- TRACTIX OPENPORT 2.0
- VXDIAG pass-thru
- X-Horse toyota vci,
- FORD VCM II rotunda,
- ACTIA
- Chipsoft Mid, Pro 24v
- Chipsoft lite 12v
- Toyota mvci + driver
- VCX nano
- Schematic 2
- OTC VIM for Toyota
- Volvo DiCE
- Cantiecar
- Autel Maxiflash Pro
That's a hard question, because I have not used all of them so I cannot tell you which one is the best/ Now using Autel Maxiflash Pro very fine, no problem.
J2534 interface Review 2.
Tested Actia XS 2G and works flawless. Did lots of functions, adaptions even on 2018 X-Klass. Did not try coding or reprogramming though.
its a very good but not cheapest choice, with a price > 1000 Euro.
J2534 interface Review 4.
Since my "affiliation" to VW i decided to get a VAS5054A
(just in case, maybe it will help the next person in the same situation).
The VAS5054 is a good tool. I've used it with Xentry Pass Thru, Forscan, Techstream and Nissan Consult. I intend to get it working with GM software too, someone on the forum is helping.
There will be good to create a VM Image with all softwares/programs working with such a versatile tool as the VAS5054A
you would be better off to create a VM for each car brand.
Most of the OEM software packages are more like a dozen GB them MB in size nowadays.
J2534 interface Review 3.
I am using VAS5054 and its ok. have used the clone TOYOTA MVCI and it did quite well.
All credits to the members at MHH forum.
BTW, You can Contact us to get Bottom Price:
Email: sales@OBDexpress.co.uk
WhatsApp: +86 18750906257
Skype: obd2express.co.uk
www.obdexpress.co.uk
Posted by: OBDexpress.co.uk at
01:14 AM
| Comments (6)
| Add Comment
Post contains 342 words, total size 3 kb.
Posted by: Electricians Service Vienna VA at June 16, 2021 12:49 PM (49dSr)
2
Thank you so much
for the post you do. I like your post and all you share with us is up to date
and quite informative, i would like to bookmark the page so i can come here
again to read you, as you have done a wonderful job. Car Stereo
Installation Services in Stone Mountain GA
Posted by: Car Stereo Installation Services in Stone Mountain GA at June 18, 2021 07:18 AM (OQWo5)
Posted by: max watson at July 05, 2021 10:28 AM (OQWo5)
4
I wanted to thank you for this excellent read!! I definitely loved every little bit of it. I have you bookmarked your site to check out the new stuff you post. Foreclosures Jersey City NJ
Posted by: peter John at July 06, 2021 11:44 AM (uvOvW)
Posted by: jhon alex at July 12, 2021 12:25 PM (Zr0sC)
6
Lily has a passion for Essay Help and takes great pride in his work. He has a keen eye for detail and ensures that every sentence is well-crafted and error-free. His writing style is clear, concise, and easy to understand, making complex ideas accessible to even the most non-technical reader.
Posted by: Lily at June 06, 2023 09:46 AM (qKEkm)
Hide Comments
| Add Comment
August 14, 2020
Will IDS software work ok on Ford transit mk8?
IDs softwarefeedback on Ford transit mk7, Ford transit mk8, Ford custom 65 plate…
- IDs works ok on Ford transit mk7
I got one of thoseVCM2 clonesthat I used with my Mk7. so I could keep van running well.
- IDs works ok on Ford custom 65 plate
On a positive note my 56 plate 2.2 130 is quiet as a mouse
I’m
running a granddaddy vcm2 on v96 and it works on the custom 65 plate.
However, you can’t initialize modules or program keys, so apart from
basic code reading, live data and configuration. It ain’t needed.
Forscan seems to work.
You
might need to change your vcm serial number but just try using v95 to
v98 no later. And vmware on your vcm. You know if it works if you plug
it into the van and it sees the pcm as shows the vin etc. No comms to
identify the vehicle pcm and manual entry required means no.
- IDs running with VCMII clone on Ford transit mk8: only some works
1) Can’t do any of that.
All you can do is program injectors. Clear any and all learned values. Live data. Change configuration.
No module installation, no keys. No pats.
So it’s pretty crap really.
But
as you have it there you should be able to get it running with
v96/97/98. If your serial number isn’t blacklisted. If it is then you’re
screwed.
Install v91 then v96 on vmware and give it a try.
Euro 5 it doesn’t have it.
But sh*t really.
I
read that you can do it online with etis if you have a license, but
when I took it to Ford and specifically requested that it be done they
charged me but didn’t do it they just cleared the fuel pump learned
value
Fyi that causes it to sound worse as it needs to learn again.
Not had a good experience with euro 5 tbh bloody Ford
It may be available with mk7 euro 5.
Also pre 2015 may allow pats access offline.
But that’s all I know.
On a positive note my 56 plate 2.2 130 is quiet as a mouse
2) I’ve used Forscan instead, it’s newer than IDS software and it’s free, fairly easy to use and works withVCM2.
Enjoy!
Posted by: OBDexpress.co.uk at
10:00 AM
| Comments (5)
| Add Comment
Post contains 386 words, total size 11 kb.
Posted by: Fence Installation Service Vienna VA at June 16, 2021 12:49 PM (49dSr)
Posted by: Brake Caliper Painting Services in Stone Mountain GA at June 18, 2021 07:22 AM (OQWo5)
Posted by: peter John at July 06, 2021 11:44 AM (uvOvW)
4
Please let me know
if you’re looking for a article writer for your site. You have some really
great posts and I feel I would be a good asset. If you ever want to take some
of the load off, I’d absolutely love to write some material for your blog in
exchange for a link back to mine. Please send me an email if interested.
Thank you!
Driving License Weston
Posted by: jhon alex at July 12, 2021 12:25 PM (Zr0sC)
Posted by: jhon alex at July 13, 2021 06:06 AM (OQWo5)
Hide Comments
| Add Comment
August 11, 2020
Xentry OpenShell 06.2020 Free Download,Actiate,IP Setup ,WIFI Set
V2020.06 MB Star sd connect C4 C5 Xentry Xentry Diagnostics OpenShell has been tested and work no issue.
Here is a manual of it,incl: Download free,how to activa and set IP, C4 wifi settings WIN10/ WIN7
Here you are:
Xentry
Diagnostics OpenShell 2020.6.4 newly update: Add GCS190 XUS SOLUTION TO
FIX SCN ONLINE RDS ERRORS VER 2.0 UPTO 2020.06. The following parts
offer the free download source.
XENTRY Diagnostics OpenShell 06/2020 (20.6.4) – Official Download
https://daimlerdownloads-a.akamaihd.net/e/xentryupdateservice/xd_updates/XDOS_20.6.4.zip
work with C3 or sd connect C4
Mega Link:
https://mega.nz/file/jgwGgAqb#FX0HOd3BDXBYqmSZmNDj8Yn5jOnsmaM4UtsBx_H_iuk
This XDOS 2020-06.4 can be installed in WIN 7x32x64, WIN 10×32 or WIN10x64bit (Recommended)
Compatible with:SDConnect (C4), Xentry Connect (Xentry kit 2), MB VCI (Xentry kit 3)
Xentry passthru does not support these vehicles in DAS:
– Bharat Benz
– Foton
– Fuso
– LKW
– IMO
– Unimog
– PKW using HHT
Mega link:
This XDPT 2020_6_3 can be installed inWIN7x64, WIN10x64 (Recommended)
https://mega.nz/file/CtQmkABb#0Ww9_YgNctFWcnParjWZaj5yrhWkTgtR95h38NrBwTU
XENTRY Diagnostics OpenShell 06/2020 (20.6.4) tested source
SSD:https://www.obdexpress.co.uk/wholesale/latest-mb-star-diagnosis-ssd-for-win7-win10.html
HDD:
https://www.obdexpress.co.uk/wholesale/latest-mb-star-diagnosis-hdd-for-win7-win10.html
How to Actiate 06.2020 Xentry OpenShall and Setup IP
SD Connect C4 wifi settings windows 10 & windows 7
- First of all, check if all your Wlan card support hosted network or not .
Go to ‘search window’ and type "cmd†or "commandâ€, rightâ€click ‘Command Prompt†and
choose "Run as administrator†on the menu
type "netsh wlan show drivers†and look the "hosted network supportedâ€. It has to be "Yes".
If its value is NO, it means your wifi card doesn’t support it. You can buy a WiFi dongle that its
windows 10 driver support both adâ€hoc and hosted networks.
To save an ad-hoc network and its network key on the guest
computer (thanks to Sarrukin)
Windows 10 & windows 7
Note down the SSID, security type, encryption type and the key of the adâ€hoc network.
Disconnect your connection to any wireless network and switch off/disable your wireless device. Turn
on/enable your wireless device but don’t connect to any network. (Thanks GK.)
Click on the network icon in the taskbar.
Click Open Network and Sharing Center > Manage Wireless Networks > Add.
Click "Manually create a network profileâ€. (This may look silly but we really are going to create an
infrastructure network now.)
Enter the network name (SSID), security type, encryption type (if any) and the key that you noted in
step 1.
Uncheck both checkboxes ("Start this connection automatically†and "Connect even if the network is
not broadcastingâ€.) [Note that you cannot have the connection start automatically. If you try to have
it checked, step 10 will fail. A different way to start it automatically during system boot is described
below.] Click Next > Close. Your connection must appear in the list with the icon suggesting
infrastructure (two big screens connected to a tube). Don’t worry about it.
Click Start, type in "cmd†in the search box, press Enter.
In the Command Prompt, type in "netsh wlan set profileparameter name=NetworkName
ConnectionType=IBSSâ€, exactly as shown, without quotes, except you must substitute NetworkName
with the SSID (network name) of your adâ€hoc network.
If everything went well, you’ll see that the icon has now changed to an adâ€hoc icon (three small
screens connected to each other) in the Manage Wireless Networks window.
Turn on/enable your wireless device, and try connecting to the Adâ€hoc network. You will notice that
you no longer need to enter the network key.
To automatically connect to a saved adâ€hoc network during Windows boot (can be applied to both
guest and host computers running Windows 7)
Click Start > point to All Programs > rightâ€click Startup > click Open. (You may choose Open All Users
instead if you prefer).
Rightâ€click an empty space and click New > Shortcut.
Type in "netsh wlan connect NetworkNameâ€. Once again, NetworkName must be substituted with
the SSID of your adâ€hoc network.
Click Next and enter a fancy name such as "Connect to NetworkName†or something like that.
Click Finish and you’re done. This shortcut will run when Windows starts up, giving you a very brief
flash of the black command window, followed by your computer connecting to the adâ€hoc network
if it is available. Tip: You can also pin the shortcut in your taskbar or copy it to the desktop to easily
connect to the network any time you want.
Note: You will probably need Administrator access to complete some of the steps above (in both
procedures).
Source:http://blog.obdexpress.co.uk/2020/08/10/free-download-xentry-diagnostics-openshell-2020-6/
Posted by: OBDexpress.co.uk at
01:20 AM
| Comments (6)
| Add Comment
Post contains 702 words, total size 30 kb.
1
Hello, I
have browsed most of your posts. This post is probably where I got the most
useful information for my research. Thanks for posting, maybe we can see more
on this. Are you aware of any other websites on this subject.
Carpentry
Service Vienna VA
Posted by: Carpentry Service Vienna VA at June 16, 2021 12:50 PM (49dSr)
2
I really thank you
for the valuable info on this great subject and look forward to more great
posts. Thanks a lot for enjoying this beauty article with me. I am
appreciating it very much! Looking forward to another great article. Good
luck to the author! All the best!
Brake Caliper Painting Services in Stone Mountain GA
Posted by: Brake Caliper Painting Services in Stone Mountain GA at June 18, 2021 07:22 AM (OQWo5)
3
No doubt this is an excellent post I got a lot of knowledge after reading good luck. Theme of blog is excellent there is almost everything to read, Brilliant post. Real Estate Agents Jersey City NJ
Posted by: peter John at July 06, 2021 11:45 AM (uvOvW)
4
I recently found
many useful information in your website especially this blog page. Among the
lots of comments on your articles. Thanks for sharing.
Driving License Ashland
Posted by: jhon alex at July 13, 2021 06:06 AM (OQWo5)
Posted by: Nailey Scott at October 26, 2023 12:13 PM (wNUpD)
6
In the realm of academia, the pursuit of knowledge and skills is a fundamental aspect of personal and professional development. However, the increasing demands of coursework, coupled with the pressures of daily life, can sometimes lead individuals to seek shortcuts in their educational journey. One such shortcut that has gained attention is the practice of paying someone to do your course. While this may appear to offer a convenient solution, it raises profound ethical questions and potential consequences that cannot be ignored. In this article, we delve into the ethical quandary of paying someone to do your course, examining the implications and urging a reconsideration of values in education.
Posted by: pay someone to do your course at March 22, 2024 06:36 AM (TrawM)
Hide Comments
| Add Comment
August 06, 2020
Solution to solve laptop wont connect to VCM2 IDS
Question:I’ve got a VCM 2 that’s using the v86 program that’s about 4 years old.
Took
me a while to get it working but has worked ever since on a couple of
Van’s and 2 of my fiestas now the laptop won’t connect to the VCM even
though it makes the bong bong sound when I plug something into the USB
port.
The lights on the VCM are a little random.
The laptop light
will light when it’s only plugged into the van and the standby light is
the only one that lights when the laptop is plugged in.
Tried a different USB laptop to VCMII and it’s still the same.
If I get a new one will it just plug into laptop and work or will I need to set it up?
Also what at the Forscan things people use, would one of them be better for resetting the learned values on an mk7 euro5?
Solution:
- Try resetting the vcm by pushing the tab beneath the end cap, the springy part above the USB slot in the pic, and then updating the drivers again.
- If
you have Forscan downloaded on your laptop you can try using the vcm as
the interface for Forscan if your vcm is bricked and I hope it’s not it
works better than the elm as it will automatically switch between
high/low can.
ford
vcm2 is also j2534 pass-thru interface,vcm1 is not, and VCM module is
for measurements using ford ids, and this forscan software runs j2534
protocol devices as per j2534 vcm2.
FORScan
can only work with VCM using the J2534 Passthru interface. VCM 1
doesn’t support J2534 Passthru so can be used with IDS only.VCM 2and VCMM (next model after VCM2) work fine with FORScan.
- Answer to the question†If I get a new one VCMII will it just plug into laptop and work or will I need to set it up?â€
–
After you plug the new VCMII to the computer, open the device manager,
if you can’t see the update button, please directly use the IDS. If you
can see the update button, just click on it to update before using IDS.
Here obdexpress.co.uk chief engineer recommends you one best VCMII clone:
https://www.obdexpress.co.uk/wholesale/best-quality-ford-vcm-ii-oem-diagnostic-tool-ids-wireless.html
Posted by: OBDexpress.co.uk at
01:43 AM
| Comments (5)
| Add Comment
Post contains 381 words, total size 10 kb.
July 31, 2020
How to add 2011 BMW M3 Key by AUTEL IM508
Adding a
2011 BMW M3 CAS3+ key via Autel MaxiIM508 W/XP400. had to updated the cas3
module first then do procedure to add a new blank OEM Key. Key has OEM
internals with aftermarket case.
Question: Have Autel MaxiIM608 (=Autel
MaxiIM508 + XP400) and doing a CAS3 on
the bench today to add key, I checked on the vehicle see if its ISTAP or
not, Can we add key to ISTAP version on the bench? Or must be it be downgraded
in the car first?
Answer: Add key with DME ISN.
Question: So read isn on bench or in car? What if the
CAS has been downgraded? Can a key be added and written to it on the bench?
Answer: I don't do anything in car myself,
always on bench with power supply.
What DME does it have?
If CAS is downgraded (or "upgraded" as autelscreen says), it should no longer by key encrypted and you can add a key on
bench
I just find it easier and faster to read the DME ISN and add a key
Done the
same procedure as below: 2011 BMW M3 CAS3+ key add via Autel MaxiIM508 + XP400:
IMG: Autel MaxiIM508 connected to the OBD2
port of 2011 BMW M3
Establishing vehicle communication.
Updating the second part...Not touch any
button of vehicle, please wait...
Establishing vehicle communication.
Connecting to internet to obtain data...
Current CAS of the vehicle is encrypted,
please insert a working key and switch ignition on first.
Connecting to internet to obtain data...
Reading RAM, will take about 1 minute...
Remove the key from the ignition switch. If
it is a smart key, please take the key out of the car.
Please be sure to operate as required,
otherwise this may make the vehicle abnormal. If the vehicle is abnormal after
reading out the key information, please try performing [Clear DTC] to make it
back into the normal status.
Tap "OK" and connecting to the
internet to obtain data...
Reading key information...
Read key information success!
Tap "Yes" to backup the original
key data.
Choose "Key3", then
"Programmer generate key".
Please connect the device to the programmer (XP400) and put the new
key into the programmer card slot.
Writing key, please wait...
Generating
dealer key success. Please insert the key into the ignition
switch to start the car once.
If the vehicle cannot be started, or the ELV
is displayed on the instrument, please synchronize the ELV or DME according to
the situation.
Posted by: OBDexpress.co.uk at
03:10 AM
| Comments (5)
| Add Comment
Post contains 455 words, total size 19 kb.
July 29, 2020
Which tool coding E90 2010 CAS3, what about Autel?
Topic: How to write new isn to the e90 2010 cas3, Need to replace ecu


Open dump in hex and change what problem.
Done… thanx
But ecu we bought it is for AT trans..
Car start but fan always on and idle very low…
Tried to default coding but nothing
Do you know how to make the ecu for manual transmission?
Or it’s impossible?
Last time I only write eeprom from old to new ecu and don’t need change any coding
may old automatic and new manual and don’t possibility drive if I write only isn
I copy full eeprom and write full eeprom to new
Wich tool you read and write?
My old ecu water damaged can’t connect with it
I have x17 and flex and used for read.
Or try BMW ICOM to do it, BTW,ICOM NEXTis cheaper than AUTEL
Google and you’ll find some videos or articles on how to use Autel for BMW coding.
Posted by: OBDexpress.co.uk at
09:08 AM
| Comments (5)
| Add Comment
Post contains 203 words, total size 20 kb.
July 28, 2020
Launch CRP909 Vs. CRP479 Vs. CRP129i Vs. X431 Pro mini Vs. CRP123i
Launch
CRP909 Full-system Scanner with 15 Special Functions is the best among
CRP479, CRP129i, X431 Pro mini, CRP123i, it owns the biggest touch LCD,
can access to all systems, owns the most special functions.
Look at the comparison table:
|
|
Launch CRP909 Full-system Scanner |
Launch X431 CRP479 OBD Scanner |
Launch CRP129i Diagnostic Tool |
Launch X431 PRO MINI Diagnostic Tool |
Launch CRP123i Diagnostic Scanner |
|
Image |

|

|

|

|

|
|
Value |
398.00USD |
259USD |
238.88USD |
789.00USD |
168.88USD |
|
Display |
7.0 inch touch LCD |
5.0 inch touch LCD |
5.0 inch touch LCD |
6.8 inch touch LCD |
5.0 inch touch LCD |
|
Operating System |
Android 7.1 |
Android 5.0 |
Android 7.1 |
Android 5.0 |
Android 7.1 |
|
Full OBDII Diagnostic |
✓ |
✓ |
✓ |
✓ |
✓ |
|
Read and Clear Codes on All-system |
✓ |
|
Engine/ABS/SRS/Transmission |
✓ |
Engine/ABS/SRS/Transmission |
|
Special Funtions |
15
Special Functions: Oil Reset/ EPB/ BMS/ DPF/ SAS/ TPMS/ IMMO/ Auto ABS
Bleed/ AFS/ TPS/ Fuel Injector Coding / Sunroof Reset/ Suspension Reset/
Gearbox Reset/ Gear Learning |
15
Special Functions: Oil Reset/ EPB/ BMS/ DPF/ SAS/ TPMS/ IMMO/ Auto ABS
Bleed/ AFS/ TPS/ Fuel Injector Coding / Sunroof Reset/ Suspension Reset/
Gearbox Reset/ Gear Learning |
5 Special Functions: EPB/SAS/TPMS/Oil Reset/Throttle Adaptation. |
11 Special Functions: Oil Reset/ EPB/ BMS/ DPF/ SAS/ TPMS/ IMMO/ Auto ABS Bleed/ Gear Learning / TPS/ Fuel Injector Coding |
|
|
AFS Headlamp Reset: |
✓ |
✓ |
|
|
|
|
Gear Learning |
✓ |
✓ |
|
✓ |
|
|
Throttle Adaptation / Fuel Injector Coding |
✓ |
✓ |
✓ |
✓ |
|
|
Sunroof Reset/ Suspension Reset/ Gearbox Reset |
|
✓ |
|
|
|
Launch CRP909is themost cost-effectiveall-in-one diagnostic tool, facts speak louder than words, here is a good example:


Launch CRP909 works well for my2015 BMW, itautomatically scans the VIN and learns the model of your car, you don’t even need to choose any car model, itscans all systems fault codes and determine what is required to fix cars.
Let me know I can save money and time when some of component broke
before, and I usually send it to garage and they always tell me I need
to replace a new one, but now I know, actually some codes can be erased
directly and don’t need to replace anything, I have to admit the tool is
really powerful, highly recommend!
Posted by: OBDexpress.co.uk at
01:23 AM
| Comments (5)
| Add Comment
Post contains 365 words, total size 50 kb.
1
I recently bought the CRP479 for my car and I'm loving it. All the functions and features that I'm looking for is all right in this device. There are also updates that you can
download and the manufacturers ensure that every bugs are fixed.
Posted by: Jeffrey Simons at August 03, 2020 12:34 PM (esyP3)
Posted by: Wheels Powder Coating Services in Stone Mountain GA at June 18, 2021 07:28 AM (OQWo5)
Posted by: peter John at July 06, 2021 11:46 AM (uvOvW)
Posted by: jhon alex at July 13, 2021 06:31 AM (OQWo5)
Posted by: Thomas at October 05, 2023 07:40 AM (pjFRq)
Hide Comments
| Add Comment
July 24, 2020
Porsche Panamera 2018 diagnostic Scan Tools reviews
Best
OBDII diagnostic scanner for Porsche Panamera 2018 test reports including PIWIS III, Launch
X431 V Pro, Autel MS906BT etc.
Car model and year: Porsche Panamera 2018
Purpose: a diagnostic tool that is capable of scanning/coding all modules
Tested Porsche scanner recommended:
PIWIS III
Launch X431 V
Autel MS906BT
One-by-one:
- PIWIS III review on Panamera:
I just received my new tester and I figured I would share my
thoughts since I have used both the 2 and the 3 now. I should be more
precise as I did not purchase an actual PIWIS III, but remarkably they
are for sale on sites like this PIWIS.NET
On that site is the actual factory tool and currently sells for $5,900
which was way too rich for my blood. It is in the factory carrying case
with all the cables and WLAN cap for the VCI that plugs into the usb
mini port and allows for wireless connection to the car, along with the
multimeter and oscilloscope cable.
What I bought,
which sells for around €1,500 and what is for sale in most places, is a
Panasonic CF-MX3 I5 Laptop with Windows 8.1 installed and the Porsche
PIWIS III software installed and includes a USB wired VCI the same one
the factory tester uses. I both cases the VCI and software have been
modified to disable factory authentication and naturally there is no
automatic updates. If you did have a PPN account, this tool would update
normally. Most offer one year of updates and then charge for subsequent
years. It should be known that the updates are really for adding new
model years, not software changes. On to the review.
It is a nice
laptop with a touch screen and a screen pen included. The Porsche
software starts automatically, but the Microsoft button functions and
you can do other things at the same time such as TeamViewer or open an
internet page. The VCI ( the part that connects to the diagnostic port)
is smaller and the cable connecting is shorter, but it is a standard USB
to miniUSB cable so you can purchase an longer one anywhere. The tester can be changed from after sales mode to developer mode which allows for a lot of special features ( looking at you who want to disable start stop permanently). The software is faster, and easier to use than the previous version.
For example on the diagnostic program, the tester auto detects the car
model. Just plug it in, turn the key on and it does its thing. For me,
I'm not sure if it is a function of the unit I have or not but the
guided fault finding works well. Click on any fault and press the fault finding button and the unit tries to provide you a diagnostic plan. The
plan is better and the English description is better. I haven't tried
the wiring diagram software but I imagine it works as well as the
previous version. There is a new ODBC program on the unit that reads standard ODBC codes, I
am wondering if this unit can be used for other cars for simple code
reading. I will try it on a buddy's car next week and let you know.
There is a oscilloscope function and a multimeter function but the laptop clones don't come with these cables. If you check out the link I added you can see a factory tool and what
that kit contains as compared to a laptop clone with VCI. All in all it
is a better tool but really can't do more than the piwis 2 can do, only faster and on cars from model year 2018 to current which the piwis 2can't do. Later I will clone the hard disk then see if I can upgrade the OS to
Windows 10. I am certain it will work but cloning the SSD makes sense
given my investment.

- Launch X431 V Pro review on Panamera 2018:
I received my Launch X431 V Pro and played around with it a bit. My first impressions are positive. The unit is well constructed and the software is intuitive and more refined then I expected. I have to say that it is kind of hilarious the number of connectors and cables that come with the kit where I'll likely ever only use the same connector for every car I own. I guess if I ever buy a TATA or a Proton I'll be set though!The tool communicated flawlessly with my vehicle and it has all the standard functionality that I would expect plus a lot of 971-specific functionality.
I have no way to know what is missing compared to a PIWIS but if you
tell me what specific function you're looking for, I can try it out and
report back. Using the tool, I quickly discovered that whomever replaced
the battery in my car before I bought it (I've only had the car 2.5
weeks) had disconnected the battery voltage sensor and forgot to plug it
back in. This was the cause of the stop/start fault message I was
seeing on the cluster (which popped up 3 days after I purchased the
car). One thing that became evident after using the scan tool is that
without a workshop manual I am going to have trouble diagnosing many of
the issues that I could encounter. For example, I have two DTCs
stored in the gateway for missing messages but a google search for the
trouble code numbers returned no hits (my suspicion is that a module was
replaced and not properly coded following replacement). This is not a
fault of the scan tool, of course, but speaks to a general problem that
us as 971 owners must find an answer to. With the nearest competent
Porsche dealer being 2.5 hours away, it is simply not practical for me
to spend an entire day making trips to the dealer to repair something
that I could have taken care of myself. Furthermore, I have always performed all of my car repairs and maintenance and the factory warranty on my car expires in April of next year.Anyways, I didn't take any pictures of the unit in action I haven't had much time to put anything together.
Credits to @ brett968
Go to official site to confirm the functions list of Launch X431 V Pro for my 2017 Panamera 4S:http://qcar.x431.com/newqcar/carDes?lan=en&pdtTypeId=2&pageNum=1&menuIndex=16&serial=PORSCHE&area=P&serialName=PORSCHE&pdtStr=
- Autel MS906BT review on Panamera:
Delighted with my Autel MS906BT.
Autel MS906BT Porsche Panamera from 2017 function list:
|
Vehicle Model |
Year |
Engine |
Chassis |
System |
Sub-system |
Function |
Sub-function |
Version |
|
971 - Panamera(from MY 2017) |
/ |
/ |
/ |
Airbag |
/ |
Codings online |
/ |
Above Porsche_V9.50 |
|
971 - Panamera(from MY 2017) |
/ |
/ |
/ |
Airbag |
/ |
Active test |
/ |
Above Porsche_V9.50 |
|
971 - Panamera(from MY 2017) |
/ |
/ |
/ |
Airbag |
/ |
Codings |
Backup and restore codes |
Above Porsche_V9.50 |
|
971 - Panamera(from MY 2017) |
/ |
/ |
/ |
Airbag |
/ |
Codings |
Coding without rules |
Above Porsche_V9.50 |
|
971 - Panamera(from MY 2017) |
/ |
/ |
/ |
Airbag |
/ |
Codings |
Control unit replacement |
Above Porsche_V9.50 |
|
971 - Panamera(from MY 2017) |
/ |
/ |
/ |
Airbag |
/ |
ECU information |
/ |
Above Porsche_V9.50 |
|
971 - Panamera(from MY 2017) |
/ |
/ |
/ |
Airbag |
/ |
Erase codes |
/ |
Above Porsche_V9.50 |
|
971 - Panamera(from MY 2017) |
/ |
/ |
/ |
Airbag |
/ |
Live data |
/ |
Above Porsche_V9.50 |
|
971 - Panamera(from MY 2017) |
/ |
/ |
/ |
Airbag |
/ |
Read codes |
/ |
Above Porsche_V9.50 |
|
971 - Panamera(from MY 2017) |
/ |
/ |
/ |
Airbag |
/ |
Special function |
Calibrate combination sensor |
Above Porsche_V9.50 |
|
971 - Panamera(from MY 2017) |
/ |
/ |
/ |
Airbag |
/ |
Special function |
Locking |
Above Porsche_V9.50 |
|
971 - Panamera(from MY 2017) |
/ |
/ |
/ |
Airbag |
/ |
Special function |
Teach reversible belt tensioners |
Above Porsche_V9.50 |
|
971 - Panamera(from MY 2017) |
/ |
/ |
/ |
Airbag |
/ |
Special function |
Teach seat occupancy detection |
Above Porsche_V9.50 |
|
971 - Panamera(from MY 2017) |
/ |
/ |
/ |
Gateway |
/ |
Codings online |
/ |
Above Porsche_V9.50 |
|
971 - Panamera(from MY 2017) |
/ |
/ |
/ |
Gateway |
/ |
Active test |
/ |
Above Porsche_V9.50 |
|
971 - Panamera(from MY 2017) |
/ |
/ |
/ |
Gateway |
/ |
Codings |
Backup and restore codes |
Above Porsche_V9.50 |
|
971 - Panamera(from MY 2017) |
/ |
/ |
/ |
Gateway |
/ |
Codings |
Coding without rules |
Above Porsche_V9.50 |
|
971 - Panamera(from MY 2017) |
/ |
/ |
/ |
Gateway |
/ |
Codings |
Control unit replacement |
Above Porsche_V9.50 |
|
971 - Panamera(from MY 2017) |
/ |
/ |
/ |
Gateway |
/ |
ECU information |
/ |
Above Porsche_V9.50 |
|
971 - Panamera(from MY 2017) |
/ |
/ |
/ |
Gateway |
/ |
Erase codes |
/ |
Above Porsche_V9.50 |
|
971 - Panamera(from MY 2017) |
/ |
/ |
/ |
Gateway |
/ |
Live data |
/ |
Above Porsche_V9.50 |
|
971 - Panamera(from MY 2017) |
/ |
/ |
/ |
Gateway |
/ |
Read codes |
/ |
Above Porsche_V9.50 |
|
971 - Panamera(from MY 2017) |
/ |
/ |
/ |
Gateway |
/ |
Special function |
Battery replacement |
Above Porsche_V9.50 |
|
971 - Panamera(from MY 2017) |
/ |
/ |
/ |
Gateway |
/ |
Special function |
Deactivate/activate 48 V vehicle electrical system |
Above Porsche_V9.50 |
|
971 - Panamera(from MY 2017) |
/ |
/ |
/ |
Gateway |
/ |
Special function |
Resetting the range calculation |
Above Porsche_V9.50 |
|
971 - Panamera(from MY 2017) |
/ |
/ |
/ |
Gateway |
/ |
Special function |
Wake-up monitor |
Above Porsche_V9.50 |
|
971 - Panamera(from MY 2017) |
/ |
/ |
/ |
Instrument cluster |
/ |
Codings online |
/ |
Above Porsche_V9.50 |
|
971 - Panamera(from MY 2017) |
/ |
/ |
/ |
Instrument cluster |
/ |
Active test |
/ |
Above Porsche_V9.50 |
|
971 - Panamera(from MY 2017) |
/ |
/ |
/ |
Instrument cluster |
/ |
Codings |
Backup and restore codes |
Above Porsche_V9.50 |
|
971 - Panamera(from MY 2017) |
/ |
/ |
/ |
Instrument cluster |
/ |
Codings |
Coding without rules |
Above Porsche_V9.50 |
|
971 - Panamera(from MY 2017) |
/ |
/ |
/ |
Instrument cluster |
/ |
Codings |
Control unit replacement |
Above Porsche_V9.50 |
|
971 - Panamera(from MY 2017) |
/ |
/ |
/ |
Instrument cluster |
/ |
ECU information |
/ |
Above Porsche_V9.50 |
|
971 - Panamera(from MY 2017) |
/ |
/ |
/ |
Instrument cluster |
/ |
Erase codes |
/ |
Above Porsche_V9.50 |
|
971 - Panamera(from MY 2017) |
/ |
/ |
/ |
Instrument cluster |
/ |
Live data |
/ |
Above Porsche_V9.50 |
|
971 - Panamera(from MY 2017) |
/ |
/ |
/ |
Instrument cluster |
/ |
Read codes |
/ |
Above Porsche_V9.50 |
|
971 - Panamera(from MY 2017) |
/ |
/ |
/ |
Instrument cluster |
/ |
Special function |
Back up fuel-level sensor calibration values |
Above Porsche_V9.50 |
|
971 - Panamera(from MY 2017) |
/ |
/ |
/ |
Instrument cluster |
/ |
Special function |
Fuel level sensor calibration |
Above Porsche_V9.50 |
|
971 - Panamera(from MY 2017) |
/ |
/ |
/ |
Instrument cluster |
/ |
Special function |
Resetting maintenance interval |
Above Porsche_V9.50 |
|
971 - Panamera(from MY 2017) |
/ |
/ |
/ |
Instrument cluster |
/ |
Special function |
Restore fuel-level sensor calibration values |
Above Porsche_V9.50 |
|
971 - Panamera(from MY 2017) |
/ |
/ |
/ |
Instrument cluster |
/ |
Special function |
Setting total distance |
Above Porsche_V9.50 |
|
971 - Panamera(from MY 2017) |
/ |
/ |
/ |
Instrument cluster |
/ |
Special function |
Writing maintenance interval |
Above Porsche_V9.50 |
|
971 - Panamera(from MY 2017) |
/ |
/ |
/ |
Steering wheel electronics |
/ |
Codings online |
/ |
Above Porsche_V9.50 |
|
971 - Panamera(from MY 2017) |
/ |
/ |
/ |
Steering wheel electronics |
/ |
Active test |
/ |
Above Porsche_V9.50 |
|
971 - Panamera(from MY 2017) |
/ |
/ |
/ |
Steering wheel electronics |
/ |
Codings |
Backup and restore codes |
Above Porsche_V9.50 |
|
971 - Panamera(from MY 2017) |
/ |
/ |
/ |
Steering wheel electronics |
/ |
Codings |
Coding without rules |
Above Porsche_V9.50 |
|
971 - Panamera(from MY 2017) |
/ |
/ |
/ |
Steering wheel electronics |
/ |
Codings |
Control unit replacement |
Above Porsche_V9.50 |
|
971 - Panamera(from MY 2017) |
/ |
/ |
/ |
Steering wheel electronics |
/ |
ECU information |
/ |
Above Porsche_V9.50 |
|
971 - Panamera(from MY 2017) |
/ |
/ |
/ |
Steering wheel electronics |
/ |
Erase codes |
/ |
Above Porsche_V9.50 |
|
971 - Panamera(from MY 2017) |
/ |
/ |
/ |
Steering wheel electronics |
/ |
Live data |
/ |
Above Porsche_V9.50 |
|
971 - Panamera(from MY 2017) |
/ |
/ |
/ |
Steering wheel electronics |
/ |
Read codes |
/ |
Above Porsche_V9.50 |
Enjoy!
Posted by: OBDexpress.co.uk at
02:49 AM
| Comments (8)
| Add Comment
Post contains 1937 words, total size 33 kb.
1
Aweѕome!
Its reɑlly awesome piexe of writing, I have got much clear іdea regarding from tһis
paragraph. Please visit amazon.com/redeem
Posted by: amazon.com/redeem at July 25, 2020 06:55 AM (w6j3v)
2
Awesome
issues here. I’m very happy to see your article. Thanks a lot and I’m looking
forward to contact you. Will you kindly drop me a mail? For more visit amazon.com/redeem
Posted by: amazon.com/redeem at July 25, 2020 06:55 AM (w6j3v)
Posted by: ellejaune21 at July 25, 2020 06:55 AM (w6j3v)
4
That is a good review you share! This is very helpful for those whoe are looking for diagnostic scan tools. And for any one who are interested to play pc games, did you know that you can download gachalife for free? And your kids will love it because
it has mini movie! You can also download
https://sites.google.com/view/raid-shadow-legends-pc for FREE!
Posted by: Lerod Manji at August 13, 2020 11:04 AM (zK1Px)
Posted by: Wheels Powder Coating Services in Stone Mountain GA at June 18, 2021 07:29 AM (OQWo5)
Posted by: Chauffeur Service Kapolei HI at June 29, 2021 10:01 AM (OQWo5)
Posted by: peter John at July 06, 2021 11:46 AM (uvOvW)
8
This is a great
inspiring article.I am pretty much pleased with your good work.You put really
very helpful information...
Driving School Sherborn
Posted by: jhon alex at July 13, 2021 06:31 AM (OQWo5)
Hide Comments
| Add Comment
Best
OBDII diagnostic scanner for Porsche Panamera 2018 test reports including PIWIS III, Launch
X431 V Pro, Autel MS906BT etc.
Car model and year: Porsche Panamera 2018
Purpose: a diagnostic tool that is capable of scanning/coding all modules
Tested Porsche scanner recommended:
PIWIS III
Launch X431 V
Autel MS906BT
One-by-one:
- PIWIS III review on Panamera:
I just received my new tester and I figured I would share my
thoughts since I have used both the 2 and the 3 now. I should be more
precise as I did not purchase an actual PIWIS III, but remarkably they
are for sale on sites like this PIWIS.NET
On that site is the actual factory tool and currently sells for $5,900
which was way too rich for my blood. It is in the factory carrying case
with all the cables and WLAN cap for the VCI that plugs into the usb
mini port and allows for wireless connection to the car, along with the
multimeter and oscilloscope cable.
What I bought,
which sells for around €1,500 and what is for sale in most places, is a
Panasonic CF-MX3 I5 Laptop with Windows 8.1 installed and the Porsche
PIWIS III software installed and includes a USB wired VCI the same one
the factory tester uses. I both cases the VCI and software have been
modified to disable factory authentication and naturally there is no
automatic updates. If you did have a PPN account, this tool would update
normally. Most offer one year of updates and then charge for subsequent
years. It should be known that the updates are really for adding new
model years, not software changes. On to the review.
It is a nice
laptop with a touch screen and a screen pen included. The Porsche
software starts automatically, but the Microsoft button functions and
you can do other things at the same time such as TeamViewer or open an
internet page. The VCI ( the part that connects to the diagnostic port)
is smaller and the cable connecting is shorter, but it is a standard USB
to miniUSB cable so you can purchase an longer one anywhere. The tester can be changed from after sales mode to developer mode which allows for a lot of special features ( looking at you who want to disable start stop permanently). The software is faster, and easier to use than the previous version.
For example on the diagnostic program, the tester auto detects the car
model. Just plug it in, turn the key on and it does its thing. For me,
I'm not sure if it is a function of the unit I have or not but the
guided fault finding works well. Click on any fault and press the fault finding button and the unit tries to provide you a diagnostic plan. The
plan is better and the English description is better. I haven't tried
the wiring diagram software but I imagine it works as well as the
previous version. There is a new ODBC program on the unit that reads standard ODBC codes, I
am wondering if this unit can be used for other cars for simple code
reading. I will try it on a buddy's car next week and let you know.
There is a oscilloscope function and a multimeter function but the laptop clones don't come with these cables. If you check out the link I added you can see a factory tool and what
that kit contains as compared to a laptop clone with VCI. All in all it
is a better tool but really can't do more than the piwis 2 can do, only faster and on cars from model year 2018 to current which the piwis 2can't do. Later I will clone the hard disk then see if I can upgrade the OS to
Windows 10. I am certain it will work but cloning the SSD makes sense
given my investment.
- Launch X431 V Pro review on Panamera 2018:
I received my Launch X431 V Pro and played around with it a bit. My first impressions are positive. The unit is well constructed and the software is intuitive and more refined then I expected. I have to say that it is kind of hilarious the number of connectors and cables that come with the kit where I'll likely ever only use the same connector for every car I own. I guess if I ever buy a TATA or a Proton I'll be set though!The tool communicated flawlessly with my vehicle and it has all the standard functionality that I would expect plus a lot of 971-specific functionality.
I have no way to know what is missing compared to a PIWIS but if you
tell me what specific function you're looking for, I can try it out and
report back. Using the tool, I quickly discovered that whomever replaced
the battery in my car before I bought it (I've only had the car 2.5
weeks) had disconnected the battery voltage sensor and forgot to plug it
back in. This was the cause of the stop/start fault message I was
seeing on the cluster (which popped up 3 days after I purchased the
car). One thing that became evident after using the scan tool is that
without a workshop manual I am going to have trouble diagnosing many of
the issues that I could encounter. For example, I have two DTCs
stored in the gateway for missing messages but a google search for the
trouble code numbers returned no hits (my suspicion is that a module was
replaced and not properly coded following replacement). This is not a
fault of the scan tool, of course, but speaks to a general problem that
us as 971 owners must find an answer to. With the nearest competent
Porsche dealer being 2.5 hours away, it is simply not practical for me
to spend an entire day making trips to the dealer to repair something
that I could have taken care of myself. Furthermore, I have always performed all of my car repairs and maintenance and the factory warranty on my car expires in April of next year.Anyways, I didn't take any pictures of the unit in action I haven't had much time to put anything together.
Credits to @ brett968
Go to official site to confirm the functions list of Launch X431 V Pro for my 2017 Panamera 4S:http://qcar.x431.com/newqcar/carDes?lan=en&pdtTypeId=2&pageNum=1&menuIndex=16&serial=PORSCHE&area=P&serialName=PORSCHE&pdtStr=
- Autel MS906BT review on Panamera:
Delighted with my Autel MS906BT.
Autel MS906BT Porsche Panamera from 2017 function list:
|
Vehicle Model |
Year |
Engine |
Chassis |
System |
Sub-system |
Function |
Sub-function |
Version |
|
971 - Panamera(from MY 2017) |
/ |
/ |
/ |
Airbag |
/ |
Codings online |
/ |
Above Porsche_V9.50 |
|
971 - Panamera(from MY 2017) |
/ |
/ |
/ |
Airbag |
/ |
Active test |
/ |
Above Porsche_V9.50 |
|
971 - Panamera(from MY 2017) |
/ |
/ |
/ |
Airbag |
/ |
Codings |
Backup and restore codes |
Above Porsche_V9.50 |
|
971 - Panamera(from MY 2017) |
/ |
/ |
/ |
Airbag |
/ |
Codings |
Coding without rules |
Above Porsche_V9.50 |
|
971 - Panamera(from MY 2017) |
/ |
/ |
/ |
Airbag |
/ |
Codings |
Control unit replacement |
Above Porsche_V9.50 |
|
971 - Panamera(from MY 2017) |
/ |
/ |
/ |
Airbag |
/ |
ECU information |
/ |
Above Porsche_V9.50 |
|
971 - Panamera(from MY 2017) |
/ |
/ |
/ |
Airbag |
/ |
Erase codes |
/ |
Above Porsche_V9.50 |
|
971 - Panamera(from MY 2017) |
/ |
/ |
/ |
Airbag |
/ |
Live data |
/ |
Above Porsche_V9.50 |
|
971 - Panamera(from MY 2017) |
/ |
/ |
/ |
Airbag |
/ |
Read codes |
/ |
Above Porsche_V9.50 |
|
971 - Panamera(from MY 2017) |
/ |
/ |
/ |
Airbag |
/ |
Special function |
Calibrate combination sensor |
Above Porsche_V9.50 |
|
971 - Panamera(from MY 2017) |
/ |
/ |
/ |
Airbag |
/ |
Special function |
Locking |
Above Porsche_V9.50 |
|
971 - Panamera(from MY 2017) |
/ |
/ |
/ |
Airbag |
/ |
Special function |
Teach reversible belt tensioners |
Above Porsche_V9.50 |
|
971 - Panamera(from MY 2017) |
/ |
/ |
/ |
Airbag |
/ |
Special function |
Teach seat occupancy detection |
Above Porsche_V9.50 |
|
971 - Panamera(from MY 2017) |
/ |
/ |
/ |
Gateway |
/ |
Codings online |
/ |
Above Porsche_V9.50 |
|
971 - Panamera(from MY 2017) |
/ |
/ |
/ |
Gateway |
/ |
Active test |
/ |
Above Porsche_V9.50 |
|
971 - Panamera(from MY 2017) |
/ |
/ |
/ |
Gateway |
/ |
Codings |
Backup and restore codes |
Above Porsche_V9.50 |
|
971 - Panamera(from MY 2017) |
/ |
/ |
/ |
Gateway |
/ |
Codings |
Coding without rules |
Above Porsche_V9.50 |
|
971 - Panamera(from MY 2017) |
/ |
/ |
/ |
Gateway |
/ |
Codings |
Control unit replacement |
Above Porsche_V9.50 |
|
971 - Panamera(from MY 2017) |
/ |
/ |
/ |
Gateway |
/ |
ECU information |
/ |
Above Porsche_V9.50 |
|
971 - Panamera(from MY 2017) |
/ |
/ |
/ |
Gateway |
/ |
Erase codes |
/ |
Above Porsche_V9.50 |
|
971 - Panamera(from MY 2017) |
/ |
/ |
/ |
Gateway |
/ |
Live data |
/ |
Above Porsche_V9.50 |
|
971 - Panamera(from MY 2017) |
/ |
/ |
/ |
Gateway |
/ |
Read codes |
/ |
Above Porsche_V9.50 |
|
971 - Panamera(from MY 2017) |
/ |
/ |
/ |
Gateway |
/ |
Special function |
Battery replacement |
Above Porsche_V9.50 |
|
971 - Panamera(from MY 2017) |
/ |
/ |
/ |
Gateway |
/ |
Special function |
Deactivate/activate 48 V vehicle electrical system |
Above Porsche_V9.50 |
|
971 - Panamera(from MY 2017) |
/ |
/ |
/ |
Gateway |
/ |
Special function |
Resetting the range calculation |
Above Porsche_V9.50 |
|
971 - Panamera(from MY 2017) |
/ |
/ |
/ |
Gateway |
/ |
Special function |
Wake-up monitor |
Above Porsche_V9.50 |
|
971 - Panamera(from MY 2017) |
/ |
/ |
/ |
Instrument cluster |
/ |
Codings online |
/ |
Above Porsche_V9.50 |
|
971 - Panamera(from MY 2017) |
/ |
/ |
/ |
Instrument cluster |
/ |
Active test |
/ |
Above Porsche_V9.50 |
|
971 - Panamera(from MY 2017) |
/ |
/ |
/ |
Instrument cluster |
/ |
Codings |
Backup and restore codes |
Above Porsche_V9.50 |
|
971 - Panamera(from MY 2017) |
/ |
/ |
/ |
Instrument cluster |
/ |
Codings |
Coding without rules |
Above Porsche_V9.50 |
|
971 - Panamera(from MY 2017) |
/ |
/ |
/ |
Instrument cluster |
/ |
Codings |
Control unit replacement |
Above Porsche_V9.50 |
|
971 - Panamera(from MY 2017) |
/ |
/ |
/ |
Instrument cluster |
/ |
ECU information |
/ |
Above Porsche_V9.50 |
|
971 - Panamera(from MY 2017) |
/ |
/ |
/ |
Instrument cluster |
/ |
Erase codes |
/ |
Above Porsche_V9.50 |
|
971 - Panamera(from MY 2017) |
/ |
/ |
/ |
Instrument cluster |
/ |
Live data |
/ |
Above Porsche_V9.50 |
|
971 - Panamera(from MY 2017) |
/ |
/ |
/ |
Instrument cluster |
/ |
Read codes |
/ |
Above Porsche_V9.50 |
|
971 - Panamera(from MY 2017) |
/ |
/ |
/ |
Instrument cluster |
/ |
Special function |
Back up fuel-level sensor calibration values |
Above Porsche_V9.50 |
|
971 - Panamera(from MY 2017) |
/ |
/ |
/ |
Instrument cluster |
/ |
Special function |
Fuel level sensor calibration |
Above Porsche_V9.50 |
|
971 - Panamera(from MY 2017) |
/ |
/ |
/ |
Instrument cluster |
/ |
Special function |
Resetting maintenance interval |
Above Porsche_V9.50 |
|
971 - Panamera(from MY 2017) |
/ |
/ |
/ |
Instrument cluster |
/ |
Special function |
Restore fuel-level sensor calibration values |
Above Porsche_V9.50 |
|
971 - Panamera(from MY 2017) |
/ |
/ |
/ |
Instrument cluster |
/ |
Special function |
Setting total distance |
Above Porsche_V9.50 |
|
971 - Panamera(from MY 2017) |
/ |
/ |
/ |
Instrument cluster |
/ |
Special function |
Writing maintenance interval |
Above Porsche_V9.50 |
|
971 - Panamera(from MY 2017) |
/ |
/ |
/ |
Steering wheel electronics |
/ |
Codings online |
/ |
Above Porsche_V9.50 |
|
971 - Panamera(from MY 2017) |
/ |
/ |
/ |
Steering wheel electronics |
/ |
Active test |
/ |
Above Porsche_V9.50 |
|
971 - Panamera(from MY 2017) |
/ |
/ |
/ |
Steering wheel electronics |
/ |
Codings |
Backup and restore codes |
Above Porsche_V9.50 |
|
971 - Panamera(from MY 2017) |
/ |
/ |
/ |
Steering wheel electronics |
/ |
Codings |
Coding without rules |
Above Porsche_V9.50 |
|
971 - Panamera(from MY 2017) |
/ |
/ |
/ |
Steering wheel electronics |
/ |
Codings |
Control unit replacement |
Above Porsche_V9.50 |
|
971 - Panamera(from MY 2017) |
/ |
/ |
/ |
Steering wheel electronics |
/ |
ECU information |
/ |
Above Porsche_V9.50 |
|
971 - Panamera(from MY 2017) |
/ |
/ |
/ |
Steering wheel electronics |
/ |
Erase codes |
/ |
Above Porsche_V9.50 |
|
971 - Panamera(from MY 2017) |
/ |
/ |
/ |
Steering wheel electronics |
/ |
Live data |
/ |
Above Porsche_V9.50 |
|
971 - Panamera(from MY 2017) |
/ |
/ |
/ |
Steering wheel electronics |
/ |
Read codes |
/ |
Above Porsche_V9.50 |
Enjoy!
Source:
https://www.obdexpress.co.uk/service/porsche-panamera-2018-diagnostic-tools.html
Posted by: OBDexpress.co.uk at
02:44 AM
| Comments (4)
| Add Comment
Post contains 1931 words, total size 33 kb.
Posted by: Wheels Powder Coating Services in Stone Mountain GA at June 18, 2021 07:30 AM (OQWo5)
2
This is a great inspiring article.I am pretty much pleased with your good work.You put really very helpful information. Keep it up. Keep blogging. Looking to reading your next post. Homes for sale Jersey City NJ
Posted by: peter John at July 06, 2021 11:46 AM (uvOvW)
3
Great Article it
its really informative and innovative keep us posted with new updates. its
was really valuable. thanks a lot.
Driving School Sherborn
Posted by: jhon alex at July 13, 2021 06:31 AM (OQWo5)
4
Whether you are struggling with a difficult assignment or simply need some extra guidance and support, Lily is the perfect choice for all your academic writing needs. With his vast knowledge and experience, you can be confident that you will receive the highest quality Assignment Help that are tailored to your individual needs and requirements.
Posted by: Lily at June 06, 2023 09:20 AM (qKEkm)
Hide Comments
| Add Comment
July 23, 2020
How much is a Mercedes diagnostic?
Looking for aOBD scannerfor
2014 Mercedes W212. willing to spend upwards of $500 or more. and I’m a
pretty competent mechanic, so any extra functionality I can get WILL be
used.
I’m
an above-average (way above average) shadetree mechanic and do not, and
have never, paid anyone to work on my cars, so I really kinda want
something that does EVERYTHING. Like, real-time sensor readouts, misfire
logging, stuff like that. I can, and have, gone pretty deep into the
programming of my Audi to successfully diagnose things like failed
injectors, wonky sensors, etc and being able to do things like
specifically actuate solenoids, module testing or get real-time readout
values on everything (not just O2 sensors….I mean like suspension level
sensors and stuff) is important.
- Recommend a full Xentry/DAS setup from obdexpress.co.uk.
The system includes:
– cable from OBD port to multiplexer
– mutliplexer
– cable from multiplexer to laptop
– laptop
– software that resides on laptop
Question: Which Xentry level C4 C5 C6?
Answer: Looks like either will work.
You
probably don’t need a full system, the full ones typically go for
$600-$1000 or more although you could put together a system with just
the cables and software and supply your own laptop probably in the
$300-$400 range.
1). C5 + Dell D630 + 256GB SSD with preinstalled software

2) C4 + Dell D630 4G RAM laptop + preinstalled Software HDD

- You
can get the Xentry Passthru software and use it with Tactrix device.
This set up can do diagnostics with no problem. It can work with
vehicles 2006 and up. If you want to be able to do everything from
programming and coding online then I suggest you get aC4 cloneand
get the Xentry Openshell. With this setup you will need access to the
server in order to do programming and coding. As BHOPKINS mentioned,
don’t be fool by the people claiming their set up is GOLD and make it
sound like they engineering the software. These fools are charging and
arm and a leg to install the software.

- There’s
also lots of scanners that just read codes and those are in the
$100-$200 range. About the only thing the full system may be handy for
is being able to program the airmatic for a lower height. Probably a few
other hacks too. Otherwise something like theAutel Diaglinkfor $89 might be all you need if you just want to know the error codes and getting the car fixed.

- Recommend iCarsoft MBII for Mercedes Benz. At $150, you can’t beat the iCarsoft…
You need to read ATF temperature to do fluid change on 7G and iCarsoft MBII will do that just fine.
I found MBII gave me bogus data on my diesel regeneration, but still at this point that seems to be the best scanner for $150.

- Depending
on what you need it for will be the big decider, Do you need it to do
everything, or do you need it to do most things, do you need to use it
for other makes and models?
I
went through the same thing when looking for a scan tool, The Xentry /
Das set up is good if all you are going to do is Mercedes, butif you need an all rounder that will do multiple manufacturers look at theAutelandLaunch, I ended up settling on theAutel
@ $1000 AU, It does everything I need, I even coded new keys to my own
Ford ute just last week, plus reset all codes from airbags, ESP, ABS,
Parktronic, Seatbelts, reset steering angle sensor, etc on a crash
damaged C200 I purchased.
I would say bang for buck out of the boxthe Autel wins for an all rounder, the Launch would be my second choice, which model you need would be dependant on what level you wish to use it for.
I think if you are going to outlay good money for a scanner it needs to do what you need it to do.
Posted by: OBDexpress.co.uk at
02:09 AM
| Comments (5)
| Add Comment
Post contains 676 words, total size 37 kb.
Posted by: Vehicle Electronics Services in Stone Mountain GA at June 18, 2021 08:13 AM (OQWo5)
2
It was a very good post indeed. I thoroughly enjoyed reading it in my lunch time. Will surely come and visit this blog more often. Thanks for sharing. Foreclosures Jersey City NJ
Posted by: peter John at July 06, 2021 11:46 AM (uvOvW)
Posted by: jhon alex at July 13, 2021 06:31 AM (OQWo5)
Posted by: jhon alex at July 13, 2021 06:33 AM (OQWo5)
5
Struggling to meet your assignment deadlines? Don't worry, I'm here to help! I'm Thomas, an Help In Dissertation Writing expertise in various subjects. Working in collaboration with My Dissertations, I offer reliable and efficient writing solutions tailored to your requirements. Contact me today and experience academic excellence.
Posted by: Thomas at October 04, 2023 07:47 AM (uHeKh)
Hide Comments
| Add Comment
July 21, 2020
OBDSTAR Odo Master Basic VS. Standard VS. Full Version
OBDSTAR ODOMaster mileage programmer is available with 3
configurations ( full, standard, basic), they are designed for different
cars according to the needs of different people.

|
Software Comparison Data |
SP350 |
SP350-B |
SP350-C |
|
OdoMaster FULL |
Odo Master STD |
Odo Master BASIC |
|
Nissan calculator |
√ |
√ |
√ |
|
DP50_DISPLAY |
√ |
√ |
√ |
|
ORMAINRESET |
√ |
√ |
√ |
|
OLOBD |
√ |
√ |
√ |
|
VWH |
√ |
√ |
√ |
|
SKAH |
√ |
√ |
√ |
|
AUDIH |
√ |
√ |
√ |
|
SEATH |
√ |
√ |
√ |
|
PORSCHE |
√ |
√ |
√ |
|
BENZH |
√ |
√ |
√ |
|
BENTLEY |
√ |
× |
× |
|
FORD |
√ |
√ |
√ |
|
CHRYSLER |
√ |
√ |
√ |
|
GM |
√ |
√ |
√ |
|
HYUNDAI |
√ |
√ |
√ |
|
INFINITE |
√ |
√ |
√ |
|
KIA |
√ |
√ |
√ |
|
MAZDA |
√ |
√ |
√ |
|
MITSUBISHI |
√ |
√ |
√ |
|
NISSAN |
√ |
√ |
√ |
|
SSANGYONG |
√ |
√ |
√ |
|
SUBARU |
√ |
√ |
√ |
|
SUZUKI |
√ |
√ |
√ |
|
GREATWALL |
√ |
√ |
× |
|
GEELY |
√ |
√ |
× |
|
FIAT |
√ |
√ |
√ |
|
CITROEN |
√ |
√ |
√ |
|
BESTURN |
√ |
√ |
√ |
|
LANDROVER |
√ |
√ |
√ |
|
JAGUAR |
√ |
√ |
√ |
|
MG |
√ |
√ |
× |
|
ROEWE |
√ |
√ |
√ |
|
RENAULT |
√ |
√ |
√ |
|
PROTON |
√ |
√ |
× |
|
PEUGEOT |
√ |
√ |
√ |
|
OPEL |
√ |
√ |
√ |
|
VOLVO |
√ |
√ |
√ |
|
SMART |
√ |
√ |
√ |
|
TOYOTA |
√ |
√ |
√ |
|
ALFA |
√ |
√ |
√ |
|
FERRARI |
√ |
× |
× |
|
BMWH |
√ |
× |
× |
|
MASERATI |
√ |
× |
× |
|
LANCIA |
√ |
√ |
√ |
|
IVECO |
√ |
√ |
√ |
In sum:
ODO Master Full Version covers all vehicle list;
ODO Master Standard Version Only removes luxury cars for BENTLEY, for FERRARI, for BMW and for MASERATI;
ODO
Master Basic Version Only removes luxury cars for BENTLEY, for FERRARI,
for BMW and for MASERATI, and for GREATWALL GEELY, for MG & PROTON.
http://www.mileageprogrammer.com/differences-among-obdstar-odo-master-basic-standard-full-version/
Posted by: OBDexpress.co.uk at
07:40 AM
| Comments (3)
| Add Comment
Post contains 283 words, total size 10 kb.
July 16, 2020
VVDI Key Tool Max "File Make Key" free update, support list and how to use
VVDI Key Tool Max "File Make Key" free update, free cloud storage for
temporary data.

KeyTool Max File Make Key Vehicle
List:
Acura
Besturn Brilliance Chang An Chery China Immobox Daewoo Daihatsu Geely Great
Wall Haima Honda Hyundai IKCO Infiniti Isuzu Kawasaki Kia Lexus Mazda
Mitsubishi Nissan Proton SaicMotor Saipa SsangYong Subaru Suzuki Tata Toyota
Yamaha
Alfa
Romeo Aprillia Aston Martin Audi Bentley BMW Citroen Dacia DAF Ducati Ferrari
Fiat Gilera Iveco Jaguar Lancia LOV MAN Maserati Mercedes Benz Opol Peugeot
Piaggio Polonez Porsche Renault Rover Saab Scania Seat Skoda Smart TagAZ UAZ
VAZ Volvo VW
Bombardier
Buick Cadillac Chevrolet Chrysler Dodge Ford GMC Jeep Lincoln Oldsmobile
Pontiac
VVDI Key Tool Max: how to use the File
Make Key function?
1. Click on "Special
Function".
2. Click on "Immo data
tool".
4. Select car brand and model.

7. Scan the QR code with the Xhorse
App.
8. Click on "Quick login - scan
PC QR code".
9. Scanned the QR code successfully,
then click on "Confirm login".
10. Upload the file based on your
needs.

12. Select the uploaded file.
13. Select the key information then
click on "Prepare dealer key".
14. Take the next step based on users'
needs.
15. Congratulations! File make key is
now done.

Write back data upload instruction:
If the APP prompts you need to write
back data, please follow the next steps to upload file.
3. Click on "File
management".
4. Click on "Local file".
5. Please select the file you need,
then click on "upload".
6. Download the uploaded file on your
computer for the further steps.

Posted by: OBDexpress.co.uk at
07:37 AM
| Comments (4)
| Add Comment
Post contains 320 words, total size 11 kb.
Posted by: Vehicle Electronics Services in Stone Mountain GA at June 18, 2021 08:13 AM (OQWo5)
2
This is a great article thanks for sharing this informative information. I will visit your blog regularly for some latest post. I will visit your blog regularly for Some latest post. Townhomes for sale Jersey City NJ
Posted by: peter John at July 06, 2021 11:46 AM (uvOvW)
3
Wonderful article,
thanks for putting this together! This is obviously one great post. Thanks
for the valuable information and insights you have so provided here.
Driving License Sherborn
Posted by: jhon alex at July 13, 2021 07:04 AM (OQWo5)
4
Get 20% Off of your
oasis discount code order when shop with our discount code . Shop from varieties of clothing, shoes, homeware, accessories through oasis stores voucher code and get 20% discount on your order.
Posted by: Emma Watson at May 30, 2022 09:01 AM (x6x5W)
Hide Comments
| Add Comment
571kb generated in CPU 0.0504, elapsed 0.245 seconds.
51 queries taking 0.2048 seconds, 270 records returned.
Powered by Minx 1.1.6c-pink.