


May 31, 2018
How to installFord IDS 109:
1- Install the ids 86 before changing the date to 1 07 2015
(hold the date1/7/2015 ,until you finish step 5
every time you restart your computer, check thedate,if it is on 1/7/2015)
2- install patch ( choice option 2 )
3- Make a backup of your windows system (I recommend, this is optional)
4- Open the program with the interfaceconnected ,,( choose NON DEALER,whenopenprogram forfirsttime) ,keepvcmturn on,onthe computer.
5 – create a restore point,,,thenturn offvcmof the computer
6 –Okay, now install the new version, v109.01, before installing, changing the date of your computer, to the current day
7- After installing, go back to the restore point, which you created in step 5, activate this restore point, and then open the program
8- Finally, install FordExtendProgram (click right mouse button click on, run as administrator)
Done, will work in the new version
Ps. here’s solution of "VCM II-IDS softwareversion mismatch (update IDS) â€
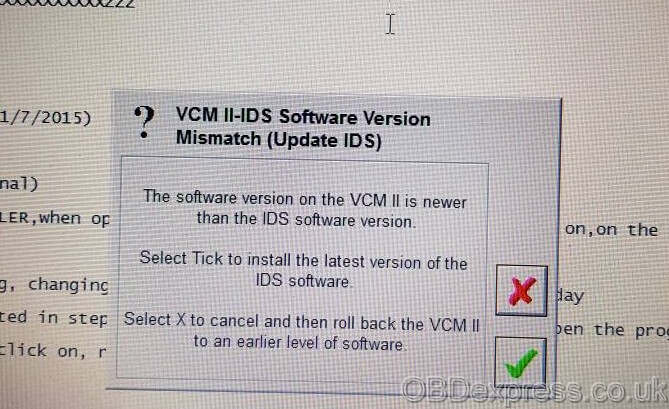
Click green Tick box to updatefirmware.
If it does nothing, <=Perform VCMiireset .Unplug USB cable from end VCM take off black rubber end boot plug back in USB restart IDS hold BUTTON middle end VCM plugin toPC all lights flashand andwhen VCM beeps release button IDS will prompt VCM update to IDS level press Tick
Note that Ford IDS V109 can be download forfreefromhttp://blog.obdexpress.co.uk/2018/04/11/mazda-ids-109-download-free-on-mega/But it’s not tested by professionals. If you want to have IDS with security and relief, you’re advised to spend some dollars with it:http://www.obdexpress.co.uk/wholesale/ford-vcm-ids-v108.01-software.htmltested 100%, confirmed to workperfectwithVCM 2 clone
Posted by: OBDexpress.co.uk at
03:09 AM
| No Comments
| Add Comment
Post contains 261 words, total size 14 kb.
How to installFord IDS 109:
1- Install the ids 86 before changing the date to 1 07 2015
(hold the date1/7/2015 ,until you finish step 5
every time you restart your computer, check
2- install patch ( choice option 2 )
3- Make a backup of your windows system (I recommend, this is optional)
4- Open the program with the
5 – cre
6 –Okay, now install the new version, v109.01, before installing, changing the date of your computer, to the current day
7- After installing, go back to the restore point, which you created in step 5, activate this restore point, and then open the program
8- Finally, install FordExtendProgram (click right mouse button click on, run as administrator)
Done, will work in the new version
Ps. here’s solution of "VCM II-IDS
Click green Tick box to
If it does nothing, <=Perform
Note that Ford IDS V109 can be download forfreefromhttp://blog.obdexpress.co.uk/2018/04/11/mazda-ids-109-download-free-on-mega/But it’s not tested by professionals. If you want to have IDS with security and relief, you’re advised to spend some dollars with it:http://www.obdexpress.co.uk/wholesale/ford-vcm-ids-v108.01-software.htmltested 100%, confirmed to workperfectwithVCM 2 clone
Posted by: OBDexpress.co.uk at
03:09 AM
| No Comments
| Add Comment
Post contains 270 words, total size 17 kb.
May 30, 2018
FREE version & TESTED version WinOLS 2.24 download with installation tutorials:
Part 1: Free Version – WinOLS 2.24 anddamos800gb
Free downloadWinOLS 2.24+ damos 800gbfor all members, without password..!
Here is what skynete collection from the Internet.
3 another worked server for download 800gb damos
at Google drive 127 file have archive problem so better 127 file download from mega or torrent.
Everything works, tested by skynete only.
WinOLS installation instruction in archive.
WinOLS 2.24:
damos mega:
damos google drive:
damos torrent:
magnet![]() xt=urn:btih:b320a038f8729fa16e004873fa6d32eb161d2a3e&dn=damos%20800
xt=urn:btih:b320a038f8729fa16e004873fa6d32eb161d2a3e&dn=damos%20800
How to installWinOLS 2.24:(big thanks to skynete)
WARNING !!
Follow this tutorial to the letter installation
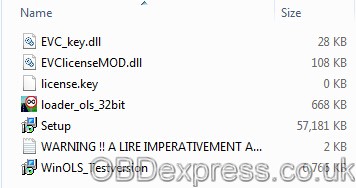
- Instaler (SETUP)
- Put the file [EVC_key.dll] and the file [EVClicenceMOD.dll] and the file [loader_ols_32bit]
in C: Program files \ EVC
(be careful not to put them in the WINOLS folder but in EVC !!!!)
once the files dont touch anything for now !!!!
- Then install [WinOLS_Testversion] at the end of the instalation launch it by doing all the
next time and ok without changing anything until opening the demo version then once winols open the close leaving
- Return to C: Program files \ EVC select [loader_ols_32bit] and click on it, a window will open
by displaying a message "Restart app!â€
- Menu started / then control panel / add or remove programs / enssuite only uninstall the program [WinOLS 2.14.03]
- Return to C: Program files \ EVC select [loader_ols_32bit] and right click the mouse select send-to (desktop creates a shortcut)
- Then on the desktop suprimmer the icon WinOLS (Be careful not to launch the program !!!!)
and this only serve as [loader_ols_32bit] to launchwinols!!!
- Click [loader_ols_32bit] on the desktop to wait for winols to open, then close it again !!
- Click [loader_ols_32bit] on the desktop if while loading winols before the open you see registered
below the registered loading bar "REGISTERED TO CAR-LINK†is that it’s good !!
Here are now made good use![]()
Part 2: Tested Version –WinOLS 2.24 & 1.500
No one holds responsibility of the WinOLS link above. Good luck!
If you don’t want to take any risk, you can have a testedWinOLS crack at a low price:
WinOLS 2.24 working perfect for New Genius clone:
WinOLS 1.500 with unlock patch:
How to installWinOLS on your laptop:(credits toobdexpress.co.uk)
First install WinOLS_Testversion.exe & launch program, configure as required
Once the application is opened close it & uninstall via "Add or Remove Programs†via control panel or "Programs & Features†(W7)
Navigate to C:\Program Files
Now copy / paste the "EVC†folder to this location. If you get a question about folder replacement answer "YES TO ALLâ€
Now navigate to C:\Program Files\EVC
Right click on "loader_ols_32_XP_free.exe†then select send shortcut to desktop (You can rename it later)
Now run the program using the shortcut & you will get a message about the License key completed, click OK
Now run again the program & configure as required ….You should now have a registered version of WinOLS 2.24
Now you can useWinOLSwith security and relief


Src:
Posted by: OBDexpress.co.uk at
06:21 AM
| No Comments
| Add Comment
Post contains 505 words, total size 55 kb.
May 29, 2018
Free downloadKsuite2.47 forKess V2 firmware 5.017for all PC
No need HWID an
Ksuite_2.47 for clone
DLL

(Big thanks to svvag2000, sourced http://mhhauto.com/)
Installing a higher version ofKsuitedoes not bring new protocols but adds ECUs to existing protocols and a lot of bug fixes and checksums fixes, Simos18 4.5MB…
This is not useless and the grayed out protocols are not really a problem.
AndKsuite2.47 is even better with Kess firmware v2 5.028.
If you don’t have a good Kessfw5.028,firmware 5.017 withsw2.23is the best option for you.
Q:Does not block thektag?
A:Not for ktag.. is for kess5.017
ktagmax 2.25..
Q:What is the procedure forinstallation ?
A:No install just start ksuite.exe if you us
Posted by: OBDexpress.co.uk at
08:34 AM
| No Comments
| Add Comment
Post contains 139 words, total size 16 kb.
May 28, 2018
KTAG/KTM100 BMW M4 2016 Test: Success!
Here isinformation provided is by su_root for educational purposes.It’s sourced f80.bimmerpost.com
Disclaimer:su_root andobdexpress.co.ukwill not be responsible for any direct or indirect damage that may occur to your property as a result of the information provided here.
KTAG/KTM100 with BDM frame and adaptersis inbound. My intention is to document a regular guys attempt at homebrew DME/ECU tuning my 2016MY F82 M.
Attachments:
BMW-Bosch DME MEVD172G Wiring Guide:NT_BOSCH_MEVD172G_IROM_TC1797_BMW.pdf
Parts arrived this morning. Below are pictures of what was included in the box.
-KTAG/KTM100 Clone
-12v/1A AC Adapter
-USB2.0 A-to-B Cable
-Cables to wire up to the DME


Prepping Bench PC:
The instructions provided recommend the use of WinXP/7, disabling all network connections and malware detection programs. I was in a rush to stage the software and connect the flashing tool to ensure all was OK so I tested the following setup on a Win10Pro x64 machine. I also made the changes below before starting:
-Disable Driver Signature Enforcement - REQUIRED or Dimsport driver will not install and device will show as 'Unknown' under Device Manager
-Disable AV/Malware Software - I use Webroot/Defender and shut them off
-Disable LAN/WLAN adapters
After making the changes above to my PC I powered up the adapter and plugged in the USB cable. Windows warned me of the unsigned driver and continued the install.
Bringing upKTM100I see all is recognized correctly. You can also see below that the DME is supported and a plugin is available to communicate with that DME and calculate the correct checksum. I think Im ready to start!


Update: On Sunday I was able to get the car on the dyno and grab some factory numbers.
I want to thank the guys(one guy who runs the place) over at GarageYourself.com for providing some baseline Dyno runs on their DynoDynamics unit. For anyone in the SouthFlorida/Miami area that enjoys working on their own car but cant find the space or tools this place is quite unique. Drive in with your own car and they provide everything..car lifts, hand tools, air tools, tire changing machine, sand blaster and even a fabrication area with welding tools and an engine lathe. Very useful.


And now the results:

Phase 1 - Reading the DME:
Here she is. Bosch MEVD172G DME.
Below are a few pictures of the outside of the unit. I cleaned up a bit of sand around the unit to make sure nothing gets in while I attempt to open it up.


After about 30 minutes with a small blade going around the edges of the unit I was able to open the casing up. Luckily the components are not close to the edge of the case so as you're going around it with a blade you don't have to worry too much. But as always be careful not to jam the blade too deep; you may accidentally damage some of the surface mounted components.


Wired up the unit to theKTM100 cloneusing the PDF I posted earlier. Reading procedure is as follows:
1. Connect wires from the provided harnesses to the DME pins as shown in the Bosch PDF including BOOT pin.
2. Power ON KTM100 and connect to USB on PC
3. Launch KTM100 Application
4. Connect the harness side of the cables to the KTM100
5. Click 'ID' in KTM100 Application to verify DME communication.
6. Done. Now you can carry out the function you need (read/write/etc)


Phase 2 - Tuning:
You have two options:
1. Acquire and LEARN tuning software like WinOLS or similar, and spend time and resources on custom dyno tuning the car(which is quite honestly way above my level of expertise).
2. Take your dumped files and send them off to a tuner for tuning service. Most US tuners will flat out turn your business away. I wont call them out here but I would encourage you to contact them and listen to their response first hand. So USA is out. Sort of.
@protuningfreaks ProTuningFreaks (PTF) supports the DIY guys like myself and the Community. After sending my unencrypted DME files to them they validated all was green and offered to help. Kudos!
Update: I installed the DME back into the car yesterday afternoon. It was pretty nerve wrecking to sit in the car and push the 'Start' button. I was very confident I followed all the right steps but theres always that sense of uncertainty in the back of your mind. What if i damaged something? At that moment I didnt care if the remaps actually yielded any results; I was just hoping the car would crank back up. I held my breath, pushed 'Start' and the car sprung back to life. It was such a sense of accomplishment.
Thoughts..throttle response in noticeably sharper and the car definitely pulls harder. Unfortunately its been raining all day here in SFlorida and all the roads are wet so I havent attempted WOT.
IMPORTANT NOTES OF Phase 1 & 2:
What needs to be understood is that there are two phases to the process of tuning or remapping your DME.
Phase 1- gaining read/write access to the DME. Fxx DMEs are password protected(TPROT) and bootmode tools for Infinity Tricore DMEs have been available for some time from makers like EVC and CMD Flashtec to name a few. However, as you pointed out, these tools are prohibitively expensive for the DIY'er to attempt this on his/her own. The well established shops invest in these tools and eventually come to market with their software. Some see this as the easy phase since it's simply wiring up a few pins and clicking a button. Recently, clones of these tools have made their way to market. This brings the price to play way down and is what prompted this writeup.
Phase2- Tuning. Once you have your original DME file you have to edit it, aka remap it. Editing seems to work around the concept of maps. Maps are areas of the file that correspond to values like ignition timing or air fuel, etc. This isn't an exact science. More of an art some would say and takes time, resources and experience. I believe this is why we are just now seeing the tunes come to market. The mad scientists at respected shops have been hard at work on the dyno editing the different maps and are now ready to come to market with not only the performance remaps(HP/Torque), but also bonus remaps like 'ZCP burble' and GTS roar, etc.
Here is where I see the most value in my write up to the community. Once you dump your own DME you have a choice. 1)Do you learn to tune your own car or 2)you simply send your file to a European tuner like Heinz OLS(www.heinz-ols.be), Sedox Performance(sedox-performance.com), B&C Consulting(www.bcconsulting.be) or any of the US based tuners like ACM(www.autocouturemotoring.com) or VF(www.vfengineering.com). Point is having your own DME file opens up a world of options for tuning.
I'm still learning each day as I go through this process and some of my content may change as I learn and correct previous statements. Do not take my findings as law.
Update:
Update! After a quick checksum correction the new remapped MPC file has been successfully written to DME.


Remap is expected to deliver +70hp +130nm(95lb/ft tq). Also, top speed limiter has been increased to 300km/h (186mph)
It's not much to see but below is a Hexedit compare between my original file and the remapped file

About my tuning on M4:
I am doing this as a DIY and I have zero intention to profit from this. The only benefit here is to my own M4.
Tuning in itself is a business. Tuners are very smart and knowledgeable educated men/women who understand how engines work and fuel and timing boost and etc etc. Things I know nothing about. They spend hours on a dyno changing things here and there and developing better performance on a specific car. That knowledge they learn about a particular engine/car is the real asset, thats the actual product.
But if a master tuner(lets say Hoffman Tuning) is located in Florida, like I am - How could I tune cars all over the USA for all the M4 owners our there, without asking them to drive down here or pull&ship their DME's to me while at the same time protecting all the work I put into remapping this car.
Well, DME tuning in a business scenario for firms such as VF,ESS or ACM, Ive learned, is built on a master/slave system.
For example today...Hoffman-Tuning(H-T for short) can simply ask their customers to pull and ship their DME to them. In this scenario, H-T is the only person who ever opens/reads/writes the DME. There is no risk that someone see's what they change in the file to achieve their performance gains. Shy of their own employees stealing their work.
But this scenario comes with a catch; how many of us actually can/want to take a wrench to your shiny new M4, risking damage, and then ship it off for 2-3 days while the car sits in a garage. All the while it can get lost in the mail, or stolen by UPS, or who knows what else could happen? Very few people actually can/want to do that. Which means their customer base is a very small percentage of M owners. Hence, very small earning potential considering the high cost to develop a tune from scratch.
But what M4 owners do want, is to drop off our M3/M4's early in the morning at an 'authorized H-T dealer' and let them take care of everything. We then pickup our car at night, pay the invoice, drive off and all is good in the world.
Except now theres a middle man, how can H-T protect their intellectual property from the peeping eyes of a dishonest mechanic who will copy the file for himself?
Back to what I said earlier, the official/legitimate tools used to read/write the DME are built on a master/slave system. H-T can hand the 'authorized dealer' a slave tool which is married to their master tool. The authorized shop then pulls the DME, opens it, connects the slave tool to the DME and reads it. Except what they read is an encrypted version of the DME files I mentioned earlier (mpc, eeprom, etc). The shop sends the encrypted file to H-T, who decrypts/unpacks the file with their master tool. Edits the file. Re-encrypts/packages the file. Then sends it back to the 'authorized dealer'. Who then writes the changes to the DME using their slave tool. Puts the car back together, and off you go.
In practice its a good system and it works, sortof. Genuine Master tools are expensive. Slave tools are even more expensive- so for VF/ESS/ACM to invest in a network of authorized dealers is a costly endeavor. And they need/should protect their property. They also need to make sure that the authorized shop has mechanics with the skillset not to damage the car.
Which brings up the issue with finger pointing. Take a look at the guy going through the horror story in the other thread. VF says its the shops fault, the shop says its VFs fault. In the end everyone blames someone else and it will cost the owner time and money.
In any case, this has been a really interesting learning experience for me-especially on the tech side. Ive never worked on a car to the degree this has taken me. I've learned so much. Would I do it for someone else? Hell no. I dont need that kind of liability. Will I lend my master tool for anyone else willing to follow in my steps?...Sure, Ill teach you everything I know-knock yourself out.
As far as costs. BOM to date:
1.KTM100 Master Clone tool- $379 (OBDExpress.co.uk)
2. Craftsman 7-Piece External Torx Set - $38 (Sears.com)
3. BMW Coolant - $24 (BMW of Pembroke Pines)
4. F82 Remap - $0 (thanks Mike at Heinz-Performance.com)
Learning Experience...Priceless
BIG THANKS to su_root
Src:http://ktagecu.blogspot.com/2018/05/how-to-use-ktm100-to-readwritetuneremap.html
Posted by: OBDexpress.co.uk at
06:47 AM
| No Comments
| Add Comment
Post contains 2014 words, total size 31 kb.
KTAG/KTM100 BMW M4 2016 Test: Success!
Here isinformation provided is by su_root for educational purposes.It’s sourced f80.bimmerpost.com
Disclaimer:su_root andobdexpress.co.ukwill not be responsible for any direct or indirect damage that may occur to your property as a result of the information provided here.
KTAG/KTM100 with BDM frame and adaptersis inbound. My intention is to document a regular guys attempt at homebrew DME/ECU tuning my 2016MY F82 M.
Attachments:
BMW-Bosch DME MEVD172G Wiring Guide:NT_BOSCH_MEVD172G_IROM_TC1797_BMW.pdf
Parts arrived this morning. Below are pictures of what was included in the box.
-KTAG/KTM100 Clone
-12v/1A AC Adapter
-USB2.0 A-to-B Cable
-Cables to wire up to the DME
Prepping Bench PC:
The instructions provided recommend the use of WinXP/7, disabling all network connections and malware detection programs. I was in a rush to stage the software and connect the flashing tool to ensure all was OK so I tested the following setup on a Win10Pro x64 machine. I also made the changes below before starting:
-Disable Driver Signature Enforcement - REQUIRED or Dimsport driver will not install and device will show as 'Unknown' under Device Manager
-Disable AV/Malware Software - I use Webroot/Defender and shut them off
-Disable LAN/WLAN adapters
After making the changes above to my PC I powered up the adapter and plugged in the USB cable. Windows warned me of the unsigned driver and continued the install.
Bringing upKTM100I see all is recognized correctly. You can also see below that the DME is supported and a plugin is available to communicate with that DME and calculate the correct checksum. I think Im ready to start!
Update: On Sunday I was able to get the car on the dyno and grab some factory numbers.
I want to thank the guys(one guy who runs the place) over at GarageYourself.com for providing some baseline Dyno runs on their DynoDynamics unit. For anyone in the SouthFlorida/Miami area that enjoys working on their own car but cant find the space or tools this place is quite unique. Drive in with your own car and they provide everything..car lifts, hand tools, air tools, tire changing machine, sand blaster and even a fabrication area with welding tools and an engine lathe. Very useful.
And now the results:
Phase 1 - Reading the DME:
Here she is. Bosch MEVD172G DME.
Below are a few pictures of the outside of the unit. I cleaned up a bit of sand around the unit to make sure nothing gets in while I attempt to open it up.
After about 30 minutes with a small blade going around the edges of the unit I was able to open the casing up. Luckily the components are not close to the edge of the case so as you're going around it with a blade you don't have to worry too much. But as always be careful not to jam the blade too deep; you may accidentally damage some of the surface mounted components.
Wired up the unit to theKTM100 cloneusing the PDF I posted earlier. Reading procedure is as follows:
1. Connect wires from the provided harnesses to the DME pins as shown in the Bosch PDF including BOOT pin.
2. Power ON KTM100 and connect to USB on PC
3. Launch KTM100 Application
4. Connect the harness side of the cables to the KTM100
5. Click 'ID' in KTM100 Application to verify DME communication.
6. Done. Now you can carry out the function you need (read/write/etc)
Phase 2 - Tuning:
You have two options:
1. Acquire and LEARN tuning software like WinOLS or similar, and spend time and resources on custom dyno tuning the car(which is quite honestly way above my level of expertise).
2. Take your dumped files and send them off to a tuner for tuning service. Most US tuners will flat out turn your business away. I wont call them out here but I would encourage you to contact them and listen to their response first hand. So USA is out. Sort of.
@protuningfreaks ProTuningFreaks (PTF) supports the DIY guys like myself and the Community. After sending my unencrypted DME files to them they validated all was green and offered to help. Kudos!
Update: I installed the DME back into the car yesterday afternoon. It was pretty nerve wrecking to sit in the car and push the 'Start' button. I was very confident I followed all the right steps but theres always that sense of uncertainty in the back of your mind. What if i damaged something? At that moment I didnt care if the remaps actually yielded any results; I was just hoping the car would crank back up. I held my breath, pushed 'Start' and the car sprung back to life. It was such a sense of accomplishment.
Thoughts..throttle response in noticeably sharper and the car definitely pulls harder. Unfortunately its been raining all day here in SFlorida and all the roads are wet so I havent attempted WOT.
IMPORTANT NOTES OF Phase 1 & 2:
What needs to be understood is that there are two phases to the process of tuning or remapping your DME.
Phase 1- gaining read/write access to the DME. Fxx DMEs are password protected(TPROT) and bootmode tools for Infinity Tricore DMEs have been available for some time from makers like EVC and CMD Flashtec to name a few. However, as you pointed out, these tools are prohibitively expensive for the DIY'er to attempt this on his/her own. The well established shops invest in these tools and eventually come to market with their software. Some see this as the easy phase since it's simply wiring up a few pins and clicking a button. Recently, clones of these tools have made their way to market. This brings the price to play way down and is what prompted this writeup.
Phase2- Tuning. Once you have your original DME file you have to edit it, aka remap it. Editing seems to work around the concept of maps. Maps are areas of the file that correspond to values like ignition timing or air fuel, etc. This isn't an exact science. More of an art some would say and takes time, resources and experience. I believe this is why we are just now seeing the tunes come to market. The mad scientists at respected shops have been hard at work on the dyno editing the different maps and are now ready to come to market with not only the performance remaps(HP/Torque), but also bonus remaps like 'ZCP burble' and GTS roar, etc.
Here is where I see the most value in my write up to the community. Once you dump your own DME you have a choice. 1)Do you learn to tune your own car or 2)you simply send your file to a European tuner like Heinz OLS(www.heinz-ols.be), Sedox Performance(sedox-performance.com), B&C Consulting(www.bcconsulting.be) or any of the US based tuners like ACM(www.autocouturemotoring.com) or VF(www.vfengineering.com). Point is having your own DME file opens up a world of options for tuning.
I'm still learning each day as I go through this process and some of my content may change as I learn and correct previous statements. Do not take my findings as law.
Update:
Update! After a quick checksum correction the new remapped MPC file has been successfully written to DME.
Remap is expected to deliver +70hp +130nm(95lb/ft tq). Also, top speed limiter has been increased to 300km/h (186mph)
It's not much to see but below is a Hexedit compare between my original file and the remapped file
About my tuning on M4:
I am doing this as a DIY and I have zero intention to profit from this. The only benefit here is to my own M4.
Tuning in itself is a business. Tuners are very smart and knowledgeable educated men/women who understand how engines work and fuel and timing boost and etc etc. Things I know nothing about. They spend hours on a dyno changing things here and there and developing better performance on a specific car. That knowledge they learn about a particular engine/car is the real asset, thats the actual product.
But if a master tuner(lets say Hoffman Tuning) is located in Florida, like I am - How could I tune cars all over the USA for all the M4 owners our there, without asking them to drive down here or pull&ship their DME's to me while at the same time protecting all the work I put into remapping this car.
Well, DME tuning in a business scenario for firms such as VF,ESS or ACM, Ive learned, is built on a master/slave system.
For example today...Hoffman-Tuning(H-T for short) can simply ask their customers to pull and ship their DME to them. In this scenario, H-T is the only person who ever opens/reads/writes the DME. There is no risk that someone see's what they change in the file to achieve their performance gains. Shy of their own employees stealing their work.
But this scenario comes with a catch; how many of us actually can/want to take a wrench to your shiny new M4, risking damage, and then ship it off for 2-3 days while the car sits in a garage. All the while it can get lost in the mail, or stolen by UPS, or who knows what else could happen? Very few people actually can/want to do that. Which means their customer base is a very small percentage of M owners. Hence, very small earning potential considering the high cost to develop a tune from scratch.
But what M4 owners do want, is to drop off our M3/M4's early in the morning at an 'authorized H-T dealer' and let them take care of everything. We then pickup our car at night, pay the invoice, drive off and all is good in the world.
Except now theres a middle man, how can H-T protect their intellectual property from the peeping eyes of a dishonest mechanic who will copy the file for himself?
Back to what I said earlier, the official/legitimate tools used to read/write the DME are built on a master/slave system. H-T can hand the 'authorized dealer' a slave tool which is married to their master tool. The authorized shop then pulls the DME, opens it, connects the slave tool to the DME and reads it. Except what they read is an encrypted version of the DME files I mentioned earlier (mpc, eeprom, etc). The shop sends the encrypted file to H-T, who decrypts/unpacks the file with their master tool. Edits the file. Re-encrypts/packages the file. Then sends it back to the 'authorized dealer'. Who then writes the changes to the DME using their slave tool. Puts the car back together, and off you go.
In practice its a good system and it works, sortof. Genuine Master tools are expensive. Slave tools are even more expensive- so for VF/ESS/ACM to invest in a network of authorized dealers is a costly endeavor. And they need/should protect their property. They also need to make sure that the authorized shop has mechanics with the skillset not to damage the car.
Which brings up the issue with finger pointing. Take a look at the guy going through the horror story in the other thread. VF says its the shops fault, the shop says its VFs fault. In the end everyone blames someone else and it will cost the owner time and money.
In any case, this has been a really interesting learning experience for me-especially on the tech side. Ive never worked on a car to the degree this has taken me. I've learned so much. Would I do it for someone else? Hell no. I dont need that kind of liability. Will I lend my master tool for anyone else willing to follow in my steps?...Sure, Ill teach you everything I know-knock yourself out.
As far as costs. BOM to date:
1.KTM100 Master Clone tool- $379 (OBDExpress.co.uk)
2. Craftsman 7-Piece External Torx Set - $38 (Sears.com)
3. BMW Coolant - $24 (BMW of Pembroke Pines)
4. F82 Remap - $0 (thanks Mike at Heinz-Performance.com)
Learning Experience...Priceless
BIG THANKS to su_root
Src:http://ktagecu.blogspot.com/2018/05/how-to-use-ktm100-to-readwritetuneremap.html
Posted by: OBDexpress.co.uk at
06:47 AM
| No Comments
| Add Comment
Post contains 2014 words, total size 31 kb.
May 25, 2018
Odometer correction tool Digiprog 3 or Digimaster 3
Here you go. Digiprog 3 vs. Digimaster 3
Analysis from the official:
|
Product |
||
|
Image |
|
|
|
Original/clone |
Cloned |
Original from Yanhua |
|
Software |
V4.94 Not able to update |
V1.8.1707.21Update all the time |
|
ScreenSize |
Smaller |
Bigger |
|
LanguageSupported |
English, Espanol, French, Deutsch
|
English |
|
Waytochangemileage |
ByOBD2ordashboardorChip |
ByOBD2ordashboardorChip |
|
Update |
Usersarenotallowedtoupdateswbythemselves. (Needtoupdateswby email
|
Originalandupdateonlinebyusersanywhereanytime,
|
|
Vehicle list |
Foruniversalcar,butcoverlessvehiclemodelsthandigimaster3. CannotdowellForFord,
|
The best odometer tool for universal cars (incl.high-end cars), such as Ford, BMW, Toyota, Benz, VW, Audi
|
|
Vehicle year |
Covers vehicles from 1996 to 2013 (some can do 2014 year); Not works for new cars in the future |
Covers vehicles from 1996-2017; Good for new cars and future cars |
|
Tokens |
No tokens limited |
Item No.SP78no token limitation; Item No.SP78-
|
|
Function |
Mainly for setting and programming digital speedometer. |
odometer correction, Audio decoding, airbag resetting, engine ECU resetting, IMMO, programming key for Benz &BMW etc |
|
Difference |
Digiprog 3 is good for odometer correction for most universal vehicles. But for the new and high-end cars or new cars, you need have a Digimaster 3.
If you want to choose one multi-function mileage correction, Digimaster 3 is the best choice.it contains the advanced technology of programming new keys for BMW and Benz, CAS-BDM reading/
|
|


Customer feedback
Feedback 1:
I
Best is to buy Yanhuadigiprogif you can find them (its better quality).
The
If you're thinking about spending 1500 euro then I'd suggest x-tool!
If you want to start and not spend more money you should
Feedback 2:
I have bothdigiprogandyanhuadigimaster.50% of the cars
30% of the cars
I believe
Not worth to buy at all.Of which waste your money
FAQ:
Up to which year they work with?
U2008 change mileage in the dashboard for the old car prior to2006year, Digiprog3 works with the newer cars up to2012year, so if you think Tacho universal for 100usd does
What vehicles
U2008
Fiat,
Can copydigiprog3 work with BMW and Mercedes Benz?
No, Digimaster 3 is the best mileage programmer for BMW and Mercedes Benz.
Which one is most powerful?
Digimaster 3
Digiprog3 and tacho universal are mainly used to correct mileage
By what way they correct mileage?
There are three method options to correct mileage: via diagnosis, via chip and via Micro. By which way, all the three tools main unit will prompt the user depends on specific models, at the same time it will display car model appearance, where to remove chip or Micro, what adapter to use and where the chip or Micro locates.
Takedigiprogfor example, when it corrects mileage for Toyota YARIS C 56, it clearly shows the car model appearance, where to
How to update?
Digimaster 3: digimaster3 supportswupdate online.
Plug the power supply and network cable into digimaster3, click "Managementâ€-"Updateâ€-"Software Upgradeâ€,
Digiprog 3: it can update, once the newest software is released, if you want to update, send the supplier serial number and they will send you an updating software. Steps: Connect the USB to the computer, start dp3,run Digiloader1.exe; Choose the right port, select Digi1.bin,click the button, then dp3 enter blue screen, if dp3dosenot enter blue screen, check the setting and restart from step 1; wait it process end, if the power supply disconnect, the unit will
Tacho Pro 2008ca
Src:http://www.mileageprogrammer.com/digiprog-3-or-digimaster-3-you-have-to-read/
Posted by: OBDexpress.co.uk at
03:47 AM
| No Comments
| Add Comment
Post contains 854 words, total size 21 kb.
Odometer correction tool Digiprog 3 or Digimaster 3
Here you go. Digiprog 3 vs. Digimaster 3
Analysis from the official:
|
Product |
||
|
Image |
|
|
|
Original/clone |
Cloned |
Original from Yanhua |
|
Software |
V4.94 Not able to update |
V1.8.1707.21Update all the time |
|
ScreenSize |
Smaller |
Bigger |
|
LanguageSupported |
English, Espanol, French, Deutsch
|
English |
|
Waytochangemileage |
ByOBD2ordashboardorChip |
ByOBD2ordashboardorChip |
|
Update |
Usersarenotallowedtoupdateswbythemselves. (Needtoupdateswby email
|
Originalandupdateonlinebyusersanywhereanytime,
|
|
Vehicle list |
Foruniversalcar,butcoverlessvehiclemodelsthandigimaster3. CannotdowellForFord,
|
The best odometer tool for universal cars (incl.high-end cars), such as Ford, BMW, Toyota, Benz, VW, Audi
|
|
Vehicle year |
Covers vehicles from 1996 to 2013 (some can do 2014 year); Not works for new cars in the future |
Covers vehicles from 1996-2017; Good for new cars and future cars |
|
Tokens |
No tokens limited |
Item No.SP78no token limitation; Item No.SP78-
|
|
Function |
Mainly for setting and programming digital speedometer. |
odometer correction, Audio decoding, airbag resetting, engine ECU resetting, IMMO, programming key for Benz &BMW etc |
|
Difference |
Digiprog 3 is good for odometer correction for most universal vehicles. But for the new and high-end cars or new cars, you need have a Digimaster 3.
If you want to choose one multi-function mileage correction, Digimaster 3 is the best choice.it contains the advanced technology of programming new keys for BMW and Benz, CAS-BDM reading/
|
|
Customer feedback
Feedback 1:
I
Best is to buy Yanhuadigiprogif you can find them (its better quality).
The
If you're thinking about spending 1500 euro then I'd suggest x-tool!
If you want to start and not spend more money you should
Feedback 2:
I have bothdigiprogandyanhuadigimaster.50% of the cars
30% of the cars
I believe
Not worth to buy at all.Of which waste your money
FAQ:
Up to which year they work with?
U2008 change mileage in the dashboard for the old car prior to2006year, Digiprog3 works with the newer cars up to2012year, so if you think Tacho universal for 100usd does
What vehicles
U2008
Fiat,
Can copydigiprog3 work with BMW and Mercedes Benz?
No, Digimaster 3 is the best mileage programmer for BMW and Mercedes Benz.
Which one is most powerful?
Digimaster 3
Digiprog3 and tacho universal are mainly used to correct mileage
By what way they correct mileage?
There are three method options to correct mileage: via diagnosis, via chip and via Micro. By which way, all the three tools main unit will prompt the user depends on specific models, at the same time it will display car model appearance, where to remove chip or Micro, what adapter to use and where the chip or Micro locates.
Takedigiprogfor example, when it corrects mileage for Toyota YARIS C 56, it clearly shows the car model appearance, where to
How to update?
Digimaster 3: digimaster3 supportswupdate online.
Plug the power supply and network cable into digimaster3, click "Managementâ€-"Updateâ€-"Software Upgradeâ€,
Digiprog 3: it can update, once the newest software is released, if you want to update, send the supplier serial number and they will send you an updating software. Steps: Connect the USB to the computer, start dp3,run Digiloader1.exe; Choose the right port, select Digi1.bin,click the button, then dp3 enter blue screen, if dp3dosenot enter blue screen, check the setting and restart from step 1; wait it process end, if the power supply disconnect, the unit will
Tacho Pro 2008ca
Src:http://www.mileageprogrammer.com/digiprog-3-or-digimaster-3-you-have-to-read/
Posted by: OBDexpress.co.uk at
03:47 AM
| No Comments
| Add Comment
Post contains 854 words, total size 20 kb.
May 22, 2018
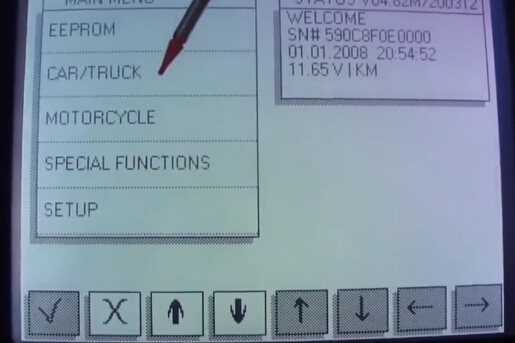
This tutorial is about how to useDigiprog III clone to do odometer mileage correction of Smart ForTwo 2007 BOX andSmart ForTwo 2007 TACHO
Part 1: Smart ForTwo 2007 BOX
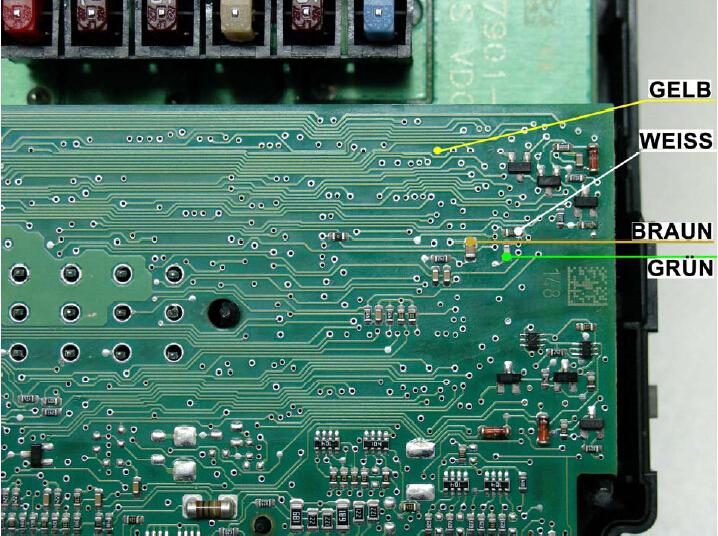
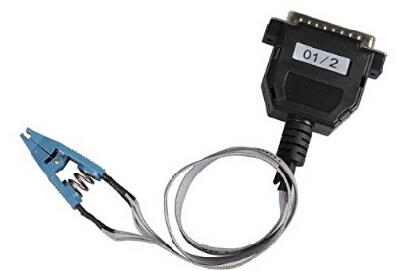
Requires plug 48:
ST 48
yellow 18 yellow
green 17 green
white 7 white
brown 13 brown
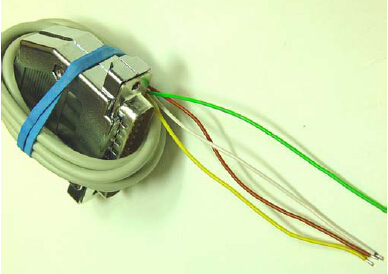
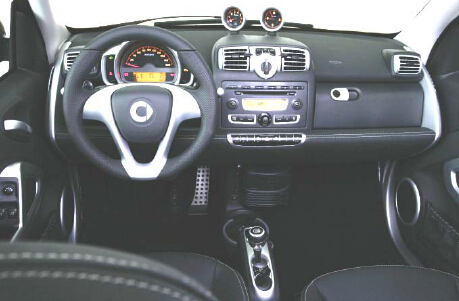
SMART Model 2007 BOX

!!! ALWAYS FOLLOW THE BATTERY !!!
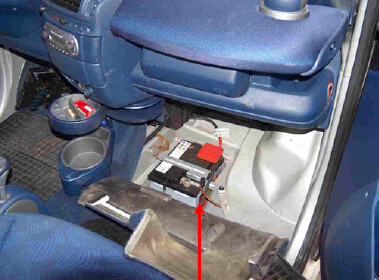
Remove box and disassemble.
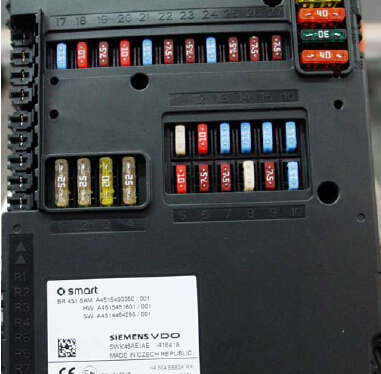
Position of the box: driver footwell left above the steering column.
Connect the plug 48 with the marked solder points
Attention the big fuses have to be pulled to open the box; Remember slots.
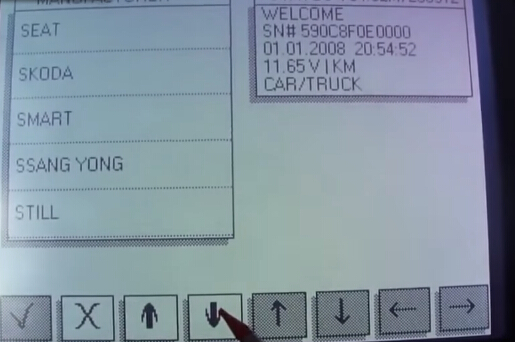
Select the program: car / truck - SMART - FORTWO - BOX.
The DIGIPROG 3 indicates the old / wrong KM level.
Program the new / correct KM booth and you're done.
The speedometer must gem.
Part 2: Smart ForTwo 2007 TACHO
Requires plug 01:
ST 1 clip 3M 923650-08
1 1
2 2
3 3
4 4
19 5
6 6
5 7
7 8
SMART FORTWO 95C640
!!! ALWAYS FOLLOW THE BATTERY !!!
Remove and disassemble the speedometer.
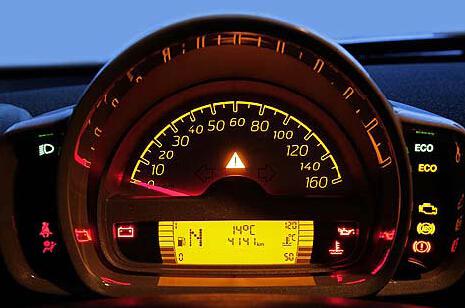
Carefully peel off the pointer.
Locate the chip 95C640
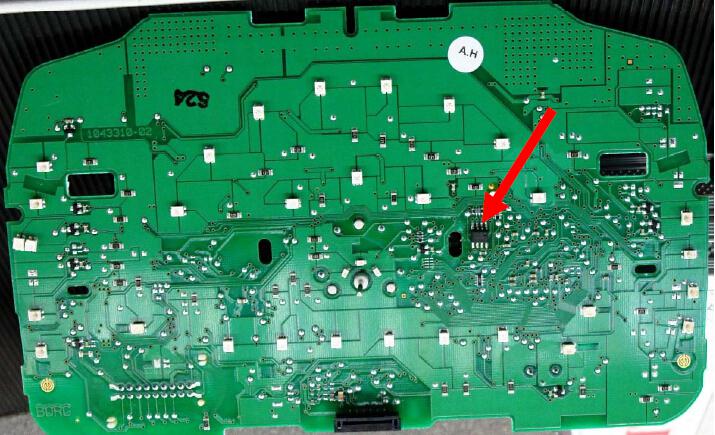
The designation can also be 25LC640.
ATTENTION: you have to unsolder this chip.
First, always make a backup of the chip via the EEPROMM program.
Select the program: CAR / TRUCK - SMART FORTWO - CHIP 95C640.
The DIGI PROG displays the old / wrong KM level.
Program the new / correct KM booth and you're done.
The box must gem.
Tech support fromhttp://blog.obdexpress.co.uk/2018/05/22/digiprog-3-smart-fortwo-2007-box-tacho/
Posted by: OBDexpress.co.uk at
03:31 AM
| No Comments
| Add Comment
Post contains 261 words, total size 5 kb.
May 21, 2018
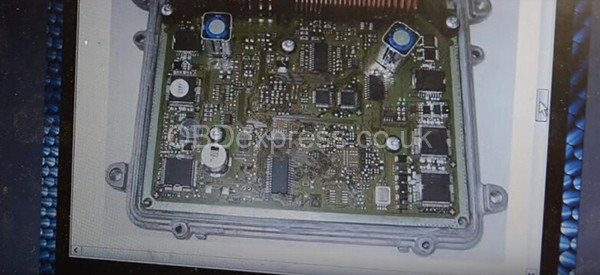
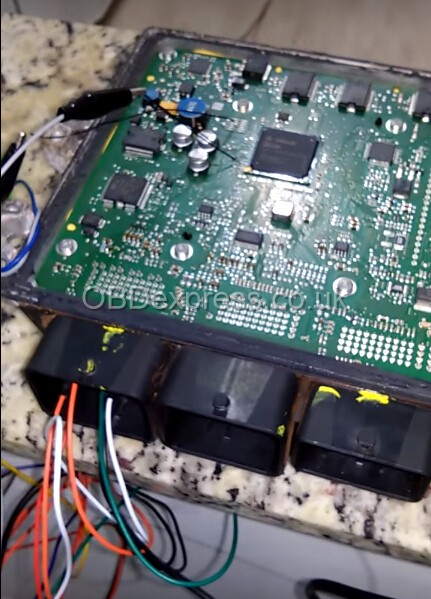
Can usektagecuprogrammerto work on ME 9.7 Mercedes S350 2006? How todo ?
Here we go:
Test: Ktag on ME 9.7 Mercedes S350 2006
Tool:Ktag programming tool China clone
Car: Mercedes S350 (W211) 2006
ECU: Bosch ME 9.7
Procedure:
Select a model in KTag software

IMPORTANT: make a backup copy of the ECU
Connect the ECU to the Ktag programmer
Pin 2 = GND
Pin 15, 16 = +12V


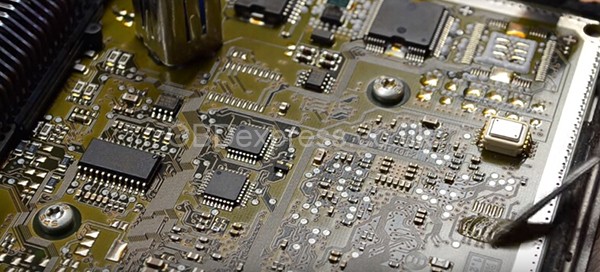


Ktag is gonna to read Bosch Me 9.7 Mercedes (P102)


Success! Then save data.
Result: Ktag can read Me 9.7 Mercedes without any issue!
Src:
http://www.obdexpress.co.uk/service/how-ktag-reads-me-97-mercedes-s350-w221-2006-29709.html
Posted by: OBDexpress.co.uk at
05:58 AM
| No Comments
| Add Comment
Post contains 102 words, total size 12 kb.
May 18, 2018
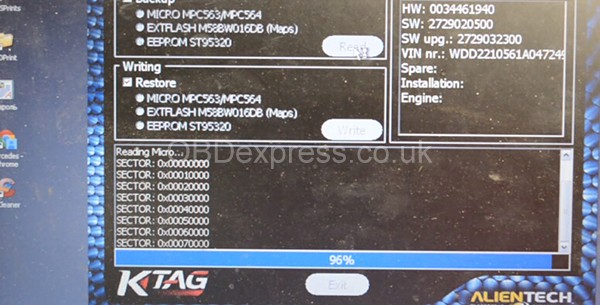
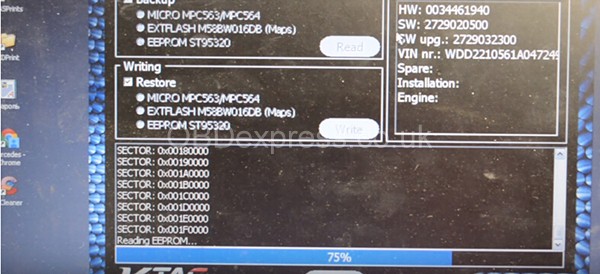
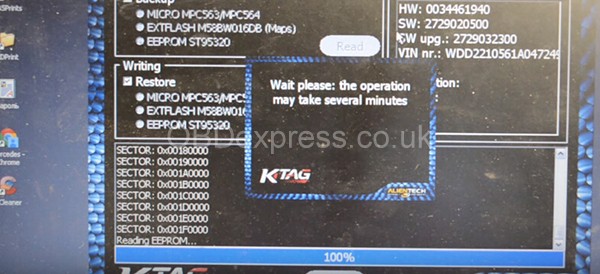
Firmware:Ktag 6.070
Software:Ksuite2.08
Car:Ford Transit 2.2cdi2012g,block SID 208
Tips:
Ford Transit 2.2cdi2012g.block SID 208. It is necessary to remove the soot.Themanual saysthatfirstyouneed to connect the K-Tag to the OBD connector with a cable 144300T108.Clickon the ID and follow the instructions for unlocking, and then onthetableyoucan merge and fill the firmware.
Cable144300T108 pinout:
KTAG_DB15 —> OBDII
11 ————> 04;05 (Ground)
07 ————> 06 (CAN_H)
14 ————> 07 (K-Line)
15 ——- —–> 14 (CAN_L)
05 ————> 16 (Battery Power)
Note that It is unlocked on the table, if you do not plan to write in the outlet in the future, you can not unblock it.

Procedure:Ktagfirmware 6.070reading 2008 Ford Transit 2.2 SID 208


Done!
Src:
http://blog.obdexpress.co.uk/2018/05/18/ktag-6-070-reads-2008-ford-transit-2-2-sid-208/
Posted by: OBDexpress.co.uk at
09:14 AM
| No Comments
| Add Comment
Post contains 124 words, total size 17 kb.
May 17, 2018
About: VVDI MB adds a key to ’09 W211
Purpose:Add a key
Mercedes:2009 E350, W211
Xhorse tool:VVDI MB app
Problem:Just trying to add a key. When I autodetectit asked if I wanted to read password via IR. I said ok, plugged the IR adapter in and during the process my VVDI MB app was removed from my computer not sure how since antivirus stuff is all off. I’m in the process of reinstalling now.
FAQs – Solutions:
Q: Do I need to remove EIS to make a spare for this vehicle?
A: No need remove anything
Q: Do Ineedremove windows defender
A: You need to uninstall it
Q: I disabled it, uninstall completely?
A: Yeah uninstall it …..disable not enough
justtemporaly
first god rule for key programmers ….no antivirus or firewalls
Q: Got error: current EIS doesn’t support reading password via IR

A: you will never get a key pass byiroonthose
key pass byirits cars from 2001 to 2004 tops
do it by server calculation
Q: I savedeisdata, nowimon to data acquisition. the message down bottom confused me, sayingcantreadpw
A: Mate you are making it too complicated …
do server calculation…make sure you select rightezsand make sure thatelvunlocks whenvvdiask you ifiotslock or unlocked
server calculation you will getkeypass forsure,if you have one token
Q: Iselvunlock? is theelvthe steering lock?
A: Yes. mate no offense …but at least you gotta read the manual first otherwise you will get in trouble soon. Download VVDI MB Tool manual though
Src:
http://blog.obdexpress.co.uk/2018/05/17/adds-a-new-key-to-w211-2009/
Posted by: OBDexpress.co.uk at
07:44 AM
| No Comments
| Add Comment
Post contains 258 words, total size 17 kb.
May 16, 2018
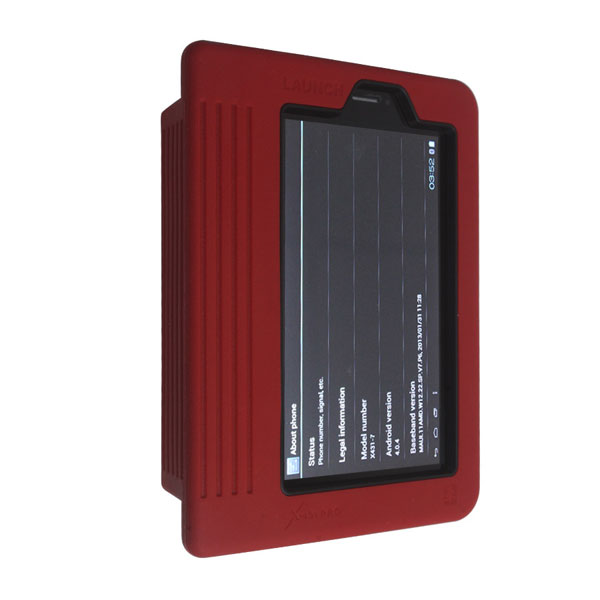
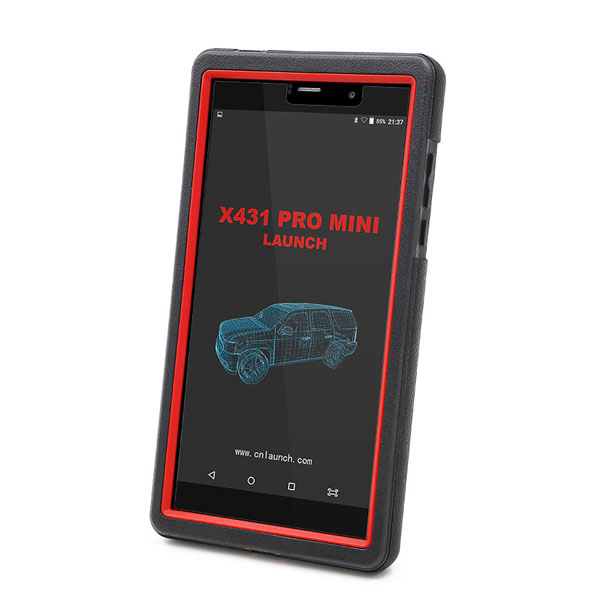
What isLaunch X431 Pro Miniand what isLaunch X431 Pro? Any difference?
Look at the chart here. This is tech support fromobdexpress.co.uk
|
Product |
||
|
Image |
|
|
|
Operating system |
Android 5.1 |
Android |
|
Processor |
Quad core1.3 GHz |
Dual core1GHz |
|
Memory |
2GB |
512MB |
|
Storage |
16GB |
2GB |
|
LCD screen |
6.9 inch with a resolution of 1280 x 720 pixels |
7.0 inch with resolution: 1024X600 |
|
Camera |
Front-facing 2MP camera + rear-facing 5MP camera |
2 mega rear and 0.3 mega front |
|
Battery |
3.7V/3000mh rechargeable polymer lithium battery |
3000mh, rechargeable polymer lithium battery |
|
Connectivity |
Wi-Fi: WLAN 802.11b/g/n Bluetooth: Bluetooth 4.1 |
Wi-Fi: supported Bluetooth: supported |
|
Working temperature |
0℃ ~ 45℃ |
-10℃ ~ 55℃ |
|
Storage temperature |
-10℃ ~ 50℃ |
-20℃ ~ 70℃ |
|
Product |
Launch X431 Pro Mini |
Launch X431 Pro |
|
Automotive Diagnostics |
√ |
√ |
|
Remote Diagnosis |
√ |
√ |
|
Recording and playback |
√ |
√ |
|
Special functions |
√ |
√ |
|
Waveform Display |
√ |
√ |
|
VIN Identification |
√ |
√ |
|
Feedback |
√ |
√ |
Special functionsincl.
Oil Reset Service
Steering Angle Calibration
Electronic Parking Brake Reset
Battery Register / Battery Maintenance
ABS Bleeding
Electronic Throttle Position Reset / Learn
Diesel Particulate Filter (DPF) Regeneration
Tire Pressure Monitor System Reset
Gear Learning
Immobilizer Matching
Fuel Injector Coding
Acura, Changan, Daweoo, Gaz, Hafei, Huachen, Jiao, Lexus, Xiali, Xinkai, Benz, Fiat, Holden, Maruti, Opel, Peugeot, Saab, Ssangyong, Tata, Changhe, Flyer, GMSA, Infiniti, Mahindra, Perodua, Proton, Qirui, Tlisuzu, Zhongshun, EOBD2, Euroford, GM, Jaguar, Renault, Smart, Sprinter, USAFord, VAZ, VW, Changcheng, Dacia, Ford, HaoQing, Jinlong, Liuwei, Rover, ZhongTai, ZhongXing, Bxfiat, HM, Isuzu, Jacty, JPIsuzu, Mazda, Seat, Skoda, Suzuki, BMW, Daihatsu, Mitsubishi, Porsche, Toyota, Volvo, Audi, Chrysler, Citroen, Hyundai, Kia, Lancia, Landrover, Nissan, Romeo and Subaru.
In summary, Launch X431 PRO3 win in hardware (helps better smoothness of diagnostics/programming, running speed, visual enjoyment). Itsharethe same functions and features as Launch X431 PRO tho.
http://blog.obdexpress.co.uk/2018/05/15/launch-x431-pro-mini-vs-launch-x431-pro/
Posted by: OBDexpress.co.uk at
01:34 AM
| No Comments
| Add Comment
Post contains 312 words, total size 8 kb.
May 11, 2018
ThisKeyDIY tutorialfrom members that have mastered the KD remote generating, kindly post a how-to’s here successfully generating and coding the remote

Firstyou need to know which is the correct remote profile to generate.
Who did you buy theKEYDIY KD-X2device through? You should also have thekdsoftware which identifies the correct remote.
Search remote by car or remote type onkdsoftware, select correct remote from your stock, plug it intourgmachine and select the remote thatwas identified inkdsoftware. Now generate remote viaurg. Now you will need to add remote tocareither throughonboardprocedure or diagnostic depending onvehicle. Not all of them are the same.
Use your wholesaler as a reference. (If that’s who you bought it through)
How do you know for sure that you’ve chosen the correct remote on the software:
look for identifying features, numbers etc.
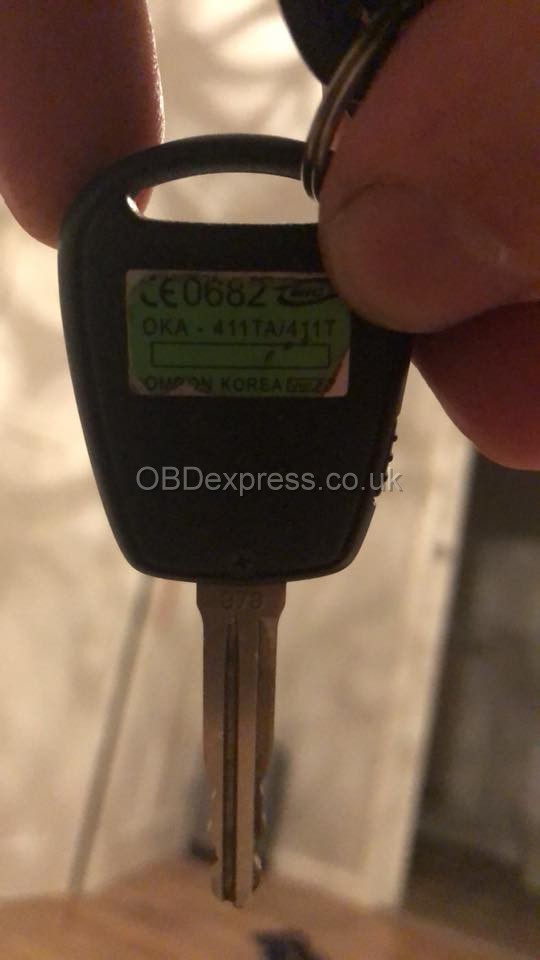
So, this is thehyundaiload key with the matching remote onkdsoftware

also if you place original remote onurgand read remote then it will also tell you which remote to use too.
Posted by: OBDexpress.co.uk at
03:24 AM
| No Comments
| Add Comment
Post contains 175 words, total size 9 kb.
ThisKeyDIY tutorialfrom members that have mastered the KD remote generating, kindly post a how-to’s here successfully generating and coding the remote
Firstyou need to know which is the correct remote profile to generate.
Who did you buy theKEYDIY KD-X2device through? You should also have thekdsoftware which identifies the correct remote.
Search remote by car or remote type onkdsoftware, select correct remote from your stock, plug it intourgmachine and select the remote thatwas identified inkdsoftware. Now generate remote viaurg. Now you will need to add remote tocareither throughonboardprocedure or diagnostic depending onvehicle. Not all of them are the same.
Use your wholesaler as a reference. (If that’s who you bought it through)
How do you know for sure that you’ve chosen the correct remote on the software:
look for identifying features, numbers etc.
So, this is thehyundaiload key with the matching remote onkdsoftware
also if you place original remote onurgand read remote then it will also tell you which remote to use too.
Posted by: OBDexpress.co.uk at
03:24 AM
| No Comments
| Add Comment
Post contains 175 words, total size 9 kb.
May 07, 2018
This is how I madeFord VCMIIcloneworkwith the Suzuki sdt2 software.
I used the
I used a dell latitude d630 with clean install windows 7 32 bit professional.
I installed the Ford V.86.
I opened the Bosch VCI manager and updated the VCM II to work with Ford v86.
I installed Suzuki sdt2 software, and when the install asked me to connect theVCMIIiconnected the Ford VCM II and continued with the install.
Once it finished I opened the BOSCH folder, then VTX-VCIsub folder, and copied the entire contents of the VCI Software (Ford-VCM-II) to VCI Software (6516-Suzuki). Replace all files !!!
the Suzuki software will see theVCMIIas the OEM VCM even that the VCI
Theregeditwill
DONE.
Remember to open VCI manager and connect the VCM before you go into the Suzuki or Ford software.
I connected a 2015 carnonUSAmodel and worked perfectly.
I also connected other USA model cars and worked OK.
I tried on Suzuki swift 2001 g10a, SuzukiwagonR 1.3 2007′,
I mean it’s not able to do programming VIN
I hope this helps !!
Btw, you can change Ford VCM2 Device type to
So if
Cheers
Note: VCM2 clone can work with a lot of software. Look here:http://blog.obdexpress.co.uk/2018/04/25/ford-vcm-ii-a-lot-of-software-can-work-with/
Posted by: OBDexpress.co.uk at
03:36 AM
| No Comments
| Add Comment
Post contains 278 words, total size 10 kb.
May 04, 2018
About: Passat id48 key copy and program with Xhorse VVDI key tool + Obdstar X300 DP
Copy id48 Passat key usingVvdi key toolfor 25 min (calculation time)!

Program remote withObdstar x300dp pad

Big thanks to the contributor
Src:http://blog.obdexpress.co.uk/2018/05/04/how-to-copy-and-program-passat-id48-key/
Posted by: OBDexpress.co.uk at
06:25 AM
| No Comments
| Add Comment
Post contains 46 words, total size 2 kb.
About: Passat id48 key copy and program with Xhorse VVDI key tool + Obdstar X300 DP
Copy id48 Passat key usingVvdi key toolfor 25 min (calculation time)!
Program remote withObdstar x300dp pad
Big thanks to the contributor
Src:http://blog.obdexpress.co.uk/2018/05/04/how-to-copy-and-program-passat-id48-key/
Posted by: OBDexpress.co.uk at
06:25 AM
| No Comments
| Add Comment
Post contains 46 words, total size 2 kb.
May 02, 2018
Purpose:I need to replace theremotecontroldoorlockreceiver (RCDLR) on my European C6.
Tool:I have aTech2 scan tool
Reference:
According to the "GMServiceManual†it says: "Connect a scantoolto the vehicle using the pass-thru This method requires connecting the scantoolto the vehicle, Then connecting the Techline Terminals RS-232 cable to the scantool..â€
Suggestion/Tutorial:
Tech II is connected to acomputerusing TIS2000 software, hence the needed dongle cable from the Tech II scanner to thecomputerrunningTIS2000(connected in ona RS232port).
This allows you to download the needed programming fromGMdirectly for the RCDLR in the first place via/to thecomputer running TIS2000, then push it through the tech II to program the RCDLR through the OBD IIportonce the RCDLR is mounted in the car.
Note: some have had luck with aUSBdongle, instead of RS232 Tech II dongle cable, but don’t bank that you will have the same luck and best to have acomputerthat hasa RS-232portto run TIS2000 on.
Important: Prior to programming per the information below, the Radio and HVAC Fuses MUST be removed and the ignition must be in "Key On Engine Off Mode†The radio and HVAC fuses can be located in the BCM fuse block on thepassengersfloor electrical center. One of the fuses is labeled RDO/S’BAND/VICS and the other is labeled HVAC/PWR SND.
Program the RCDLR with revised software using TIS-2-WEB "Pass Through†method. When programming, it is required to select "Replace and Reprogram ECUâ€.
Important:If the programming procedure does not finish successfully and the RCDLR appears to be in a "locked up†state do not turn off the ignition, follow the directions below…
The RCDLR can be reset by removing the RCDLR fuse (#11 in the UBEC) for at least 30 seconds or longer and then reinstalling it. Once this fuse is reinstalled in the UBEC, there will be a2 minutewindow to restart the programming of the RCDLR through TIS2WEB. Failure to restart the programming of the RCDLR through TIS2WEB within 2 minutes may cause programming to fail and this procedure will need to be repeated. It is recommended that the Tech 2 remain connected to the vehicle and that the TIS2WEB application is open and ready to program the vehicle prior to reinstalling RCDLR fuse #11 into the UBEC.
This video will walk you through bothstandalone, and pass through programming (go to 8:30 for pass through and note that the op is using a tis2web disc to access the needed programming, instead of pulling it down over the web).
And again, As for the latest RCDLR updates, tis2web is needed for that to pull the needed program; unless you can get your hands on a tis-2-web legacy disc current enough for your car and there are not any updates from that point forward from the disc.
Src:
http://blog.obdexpress.co.uk/2018/05/01/tech-ii-programs-rcslr-on-european-c6/
Posted by: OBDexpress.co.uk at
01:58 AM
| No Comments
| Add Comment
Post contains 462 words, total size 15 kb.
32 queries taking 0.1017 seconds, 149 records returned.
Powered by Minx 1.1.6c-pink.

