



September 29, 2017
There are many versions of Opcom firmware running
Look here:


Reply: The last official firmware is 1.64
Check also the official op-com.hu and you will see there the newest firmware version that it will come in the new version
Forvaux-com 120309a you need onlyopcomfw1.45
Even you are using the fakevauxcom120309a+131223a version you need also fw1.45
Not any newer. But you can use any newer versions of firmware but you will have nothing new and it will not help you more then fw1.45
The most
OPCOM V1.59 with PIC18F458chip..Look here:
" data-blogger-escaped-sizes="(max-width: 600px) 100vw, 600px" data-blogger-escaped-srcset="http://blog.obdexpress.co.uk/wp-content/uploads/2017/09/OPCOM-firmware-1.59-PIC18F458-chip-8-1-600x302.jpg 600w, http://blog.obdexpress.co.uk/wp-content/uploads/2017/09/OPCOM-firmware-1.59-PIC18F458-chip-8-1.jpg 638w" data-blogger-escaped-style="border: 0px; font-family: inherit; font-size: inherit; font-stretch: inherit; font-style: inherit; font-variant: inherit; font-weight: inherit; height: auto; line-height: inherit; margin: 0px; max-width: 100%; padding: 0px; vertical-align: baseline;" data-orig-src="http://blog.obdexpress.co.uk/wp-content/uploads/2017/09/OPCOM-firmware-1.59-PIC18F458-chip-8-1-600x302.jpg" height="302" src="https://images-blogger-opensocial.googleusercontent.com/gadgets/proxy?url=http%3A%2F%2Fblog.obdexpress.co.uk%2Fwp-content%2Fuploads%2F2017%2F09%2FOPCOM-firmware-1.59-PIC18F458-chip-8-1-600x302.jpg&container=blogger&gadget=a&rewriteMime=image%2F*" width="600" />


So, if you wanna have Opel diagnostic with Opcom China clone, forget the firmware version (new v1.95 or old v1.45) and check if it’s with a PIC18F458 chip with the vendor. That is the most most most important!!!!!!!!! Anything else is secondary.
You can find that there is a PIC18F458 chip in all versions of Opcom china clone above. So use Opcom
Posted by: OBDexpress.co.uk at
06:11 AM
| No Comments
| Add Comment
Post contains 207 words, total size 30 kb.
September 27, 2017
Kess V2 EU comes with a purple board andKess V2 China with a green or red board. Look here:
Kess V2 EU


source: http://mhhauto.com/Thread-EU-KESS-KTAG-NEW-PCB-S-FOR-2016-SPECIAL-SALE-THIS-WEEK
Kess V2 China
The first


The second


The third one: the only one version with a token-reset button


The fourth


THE MOST IMPORTANT TIP:
EitherkessEU orkessChina isn’t original Alientech Kess V2. if you wantkessv2 original, please go tohttp://www.kessv2-alientech.com/
You can use Kess v2 with relief to read or write ECUs
connected to the car, read data very fast. Works fine.
Look here: Kess v2 5.017 is working great with a 2007 BMW 323i 2500 24v N52B25, ECU: siemens msv80.


" data-blogger-escaped-style="border: 0px; font-family: inherit; font-size: inherit; font-stretch: inherit; font-style: inherit; font-variant: inherit; font-weight: inherit; height: auto; line-height: inherit; margin: 0px; max-width: 100%; padding: 0px; vertical-align: baseline;" data-orig-src="http://blog.obdexpress.co.uk/wp-content/uploads/2017/09/kess-5.017-read-write-bmw-msv80-8-1-600x450.jpg" height="450" src="https://images-blogger-opensocial.googleusercontent.com/gadgets/proxy?url=http%3A%2F%2Fblog.obdexpress.co.uk%2Fwp-content%2Fuploads%2F2017%2F09%2Fkess-5.017-read-write-bmw-msv80-8-1-600x450.jpg&container=blogger&gadget=a&rewriteMime=image%2F*" width="600" />


kess-5.017-read-write-bmw-msv80-(1)


" data-blogger-escaped-style="border: 0px; font-family: inherit; font-size: inherit; font-stretch: inherit; font-style: inherit; font-variant: inherit; font-weight: inherit; height: auto; line-height: inherit; margin: 0px; max-width: 100%; padding: 0px; vertical-align: baseline;" data-orig-src="http://blog.obdexpress.co.uk/wp-content/uploads/2017/09/kess-5.017-read-write-bmw-msv80-18-1-600x450.jpg" height="450" src="https://images-blogger-opensocial.googleusercontent.com/gadgets/proxy?url=http%3A%2F%2Fblog.obdexpress.co.uk%2Fwp-content%2Fuploads%2F2017%2F09%2Fkess-5.017-read-write-bmw-msv80-18-1-600x450.jpg&container=blogger&gadget=a&rewriteMime=image%2F*" width="600" />


Why
First, Kess v2 is
Second, it has better stability when running
The last but the most important, it has
– works
– No token limitation for ALL vehicles
(the old versions have token limitation on some models)
–FULL authorization of ALL software
(works well for EDC17/MED17/k-line/DSG/DQ200 DQ250 DQ500 Gearbox/ST10/Ford J1850…. !)


Posted by: OBDexpress.co.uk at
07:11 AM
| No Comments
| Add Comment
Post contains 223 words, total size 69 kb.
September 25, 2017
Fast delivery. ReceivedKess V2 firmware 5.017and tested on 2007 BMW 323i with ECUsiemens msv80.satisfied!
Kess 5.017ihave


Kess v2 5.017on a 2007 BMW 323i 2500 24v N52B25, ECU: siemens msv80. good


kess-5.017-read-write-bmw-msv80-(1)


" data-blogger-escaped-style="border: 0px; font-family: inherit; font-size: inherit; font-stretch: inherit; font-style: inherit; font-variant: inherit; font-weight: inherit; height: auto; line-height: inherit; margin: 0px; max-width: 100%; padding: 0px; vertical-align: baseline;" data-orig-src="http://blog.obdexpress.co.uk/wp-content/uploads/2017/09/kess-5.017-read-write-bmw-msv80-8-600x450.jpg" height="450" src="https://images-blogger-opensocial.googleusercontent.com/gadgets/proxy?url=http%3A%2F%2Fblog.obdexpress.co.uk%2Fwp-content%2Fuploads%2F2017%2F09%2Fkess-5.017-read-write-bmw-msv80-8-600x450.jpg&container=blogger&gadget=a&rewriteMime=image%2F*" width="600" />


Kess 5.017Ksuite2.23 works no issues on 2007 BMW 323i. read & write ok.
Source:
Posted by: OBDexpress.co.uk at
02:33 AM
| No Comments
| Add Comment
Post contains 54 words, total size 32 kb.
September 23, 2017
Kess V5.017 Master EU version with Red
Here we go in details.
Attach Kess V5.017 Master EU version Red PCB


AttachKess V5.017 online


Kess V5.017 Master EU version Red PCB VS Kess V5.017 green PCB
- What are differences?
Kess V5.017 Red PCB: 1:1 copy EU version, better performance
-
Whatarethe same?
Online version: feel easy to use, don’t worry it will be locked.
Unlimited tokens
No reset button,
no USB dongle,
Cover more than 140 protocols
Kess V5.017 online version with green PCB VS Kess V5.017 4.036:

Attach Kess V5.017 4.036 PCB

Kess V5.017 RedPCB/ Green PCB test report:
edc15/16/17 basics
lot
(The EDC17 made by OBD are Audi,
Kess accept virtual
ksuiteSw reset token when open, same as allkess5.017 or newktag7.020/26 Fw.
Berlingo 9HX:onlyreadIDfromengineandworks ok
PSA Bosch EDC
Skoda Octavia 1.9 AXR
BMW
BMW
Ford Mondeo
K-line and CANboth OK
VW
2008 Sprinters withEdc16:
KESS V5.017 can support car/truck/tractor/Bike…support both 12V and 24V vehicle..and newer vehicles
KESS V5.017 has no token limited for all compatible vehicles
KESS V5.017 has no grey protocols ..full protocols such as EDC17/k-line/DSG/DQ200 DQ250 DQ500 Gearbox/ST10….
KESS V5.017 read and write ECUs via OBD easily, Do not need to disassemble ECU…more user-friendly thanKTAG V7.020
KESS V5.017 do connect internet…Online operation..no need disable the
That’s all.
Good luck.
Posted by: OBDexpress.co.uk at
02:46 AM
| No Comments
| Add Comment
Post contains 339 words, total size 36 kb.
September 20, 2017
Here are some tips of how to flash TCU of BMW E85 (Z4) using BMW INPA software with a HQ K+DCAN cable orICOM A2emulator (clone ok).
Car:Z4 3.0I with the ZF 6H
Purpose:want to test different TCU calibration files on my E85 (Z4)
All should be donevia aK+DCAN usb cablerunning working INPA software
Which SGBD does the GKE211 use?
|
For Inpa, its the GS19D.prg |
Here is a quick and dirty INPA scriptI wrote for you all for reference:

It sets the protocol to KWP2000 over K-Line and executes the IDENT job.
If it’s unable to use KWP over K-Line, it will display a large red box indicating so.
There are a few ways to execute a custom INPA script.
For quick and dirty testing, the CLI is probably easiest. c:\ec-apps\inpa\bin\inpaload <path to IPO file>:
Code:
c:\ec-apps\inpa\bin\inpaload c:\users\rjahl\downloads\gke211kwp_808.ipo
If you want to add the script to the E85 menu, copy the GKE211KWP_808.IPO file to the SGDAT folder and then edit the E85.ENG file in the CFGDAT folder.
In the [ROOT_GETRIEBE] section of the E85.ENG file, add two lines similar to the following:
Code:
[ROOT_GETRIEBE]DESCRIPTION=TransmissionENTRY=,,ENTRY= GS19,Gearbox / Automatic GS19,ENTRY= gsds2,GS 8.xx / GS 20,ENTRY=,,ENTRY= gs30,Sequential Gearbox SSG,ENTRY=,,ENTRY= GKE211KWP_808,GS19D Ancillary Diagnostics,

Alternatively, you could add a shortcut to the Windows desktop which runs INPALOAD.EXE and calls the custom script.
OK, done and working.
Posted by: OBDexpress.co.uk at
06:53 AM
| No Comments
| Add Comment
Post contains 232 words, total size 18 kb.
September 18, 2017
There are three diagnostic tools mostly used to diagnose/program BMWmotorcycles:BMWIcom a2, BMW motodiagnotictool and gs-911 BMW motorcycle diagnostic. Here, take the best choice for you all to share:BMW ICOM A2+ICOM D.
What can BMW Icom a2 + Icom D do forbmwmoto?
1Supported BMW and MINI complete system diagnostic and offline programming.
2Supported to BMW vehicles up toyear2016
3Support Vehicles including BMW cars, BMW motorcycle, rolls-royce, mini cooper
4Support BMW all series diagnose and programming
Actually,ICOM A2 + ICOM D… is kind of expensive but most people use this kit. So far, it is the TOP 1 in the BMW motor diagnostics list, with the most powerful & stable function and the best reputation. ICOM A2 and ICOM D do well indiagnostic, coding and programming. A cool BMW motor deserves the best diagnostic kit.
Here is a successful case ofbmwmoto diagnosis viaicoma2 andicomd.
Managed to do flash programming onBMWmotorradk1300s:


But, if you really cannot afford to ICOM A2 + ICOM D for diagnosis, we suggest you try the cheap kit –K+DCAN cableandBMW Motorcycles Motobikes ICOM D. Attention!! The kit is fordiagnosisonly, not programming!
Here are the steps that I followed:
1. I cut all the big wire

- I used a multimeter in order to get the relationship between the pins and wires. I used continuity function.
3. I ordered a female OBD2 (k+dcan cable and Vagcom cable both ok) because I broke mine trying to eliminate the plastic housing - Theniused this configuration below:
Universal K-Line &CAN BUSAdaptor (K1600)
Signal OBDII Socket BMW 10 pin Plug
K1 15 (Ignition On) 1————————————————–10
Ground 4&5————————————————-4
CAN Hi 6—————————————————–7
K-Line 1 (BMS) 7—————————————–1
K-Line 2 (ABS) 8——————————————2
CAN Lo 14—————————————————–9
KL 30 (Bat+) 16—————————————————–6
How to setupK+Dcaninpacable
Notes
1/ Dependant on the software, model & adaptor cable used it may be necessary to invert RI #
and DSR signals to for detection of battery and ignition as per the VAG KKL cable.
2/ Thiscable& access through the diagnostics port is yet to be tested
INPA software Installation
1/ If the cable is supplied without drivers & utilities download them from FTDI
2/ Install driver
Plug in cable, WinXP will find cable,
point todirectorywith drivers, windows installs.
3/ Set the USB Serial port parameters
/MyComputer/Properties/DeviceManager/Ports(Com&LPT/SerialUSB/Advanced
Set the Latency timer from default 16 msec. to 1 msec
Check USB Port No matches Port No set in INPA/EDIABAS (OBD2.ini)
4/ Install Mprog & modify the programming of theeepromFT232RL
We need to invert RI # and DSR # signals to fool the detection of battery and ignition.
After programming check your I/O Control settings, they must be :
#C0 = RXLED #C1 = TXLED #C2 = POWERON #C3 = PWRON
#C4 = SLEEP Invert RI ticked Invert DSR ticked
Save settings
How to setupICOM D adapter
8 pins fitted but in wrong pin No’s
Pin 01 – Vi/Sw
Pin 02 – Sw/Rt
Pin 04 – Ws/Ge
Pin 05 – Ws/Bl
Pin 07 – Ws
Pin 08 – Gn/Ws
Pin 09 – Br
Pin 10 – Gn We need pins 1,2,4,6,7,9,10 (Pins 7 & 9 are K1600 CAN Bus)
Plug with bike socket


Source:
Posted by: OBDexpress.co.uk at
08:40 AM
| No Comments
| Add Comment
Post contains 524 words, total size 44 kb.
September 15, 2017
VCM2manual: NEW module programming using Ford IDS software
You
(VCM2 genuine definitely is the best solution, but a high-quality one should work great, not cheap crappy tools)
When installing a new module, the configuration data must be transferred from the old
Step
Step
Step
Step
Step
Step
Step
Step
NOTE: Be sure to follow these instructions in the exact order that they are given. Do not remove or install any modules until instructed to do so. Failure to follow the instructions correctly may result in the configuration data received during vehicle identification to program incorrectly or not at all.
Step
a non-functioning module or a module which was removed before the data was retrieved, the
application will request that the
database. Access to this database is included in the Ford Module Programming subscription. The
data can be obtained by doing the following:
- Go to the Motorcraft website (www.motorcraft.com)
- Go to the Technical Resources area
- Log in using the User ID and password set up when the subscription to Ford Module
Programming was purchased
- Select "My Subscriptions"
- Select "Ford Module Programming"
- Select "Module Build Data (as Built)"
- Enter the Vehicle Identification Number (VIN) and select "Submit"
- Write down the information that was requested by the Ford Module Programming
application
- Return to the Ford Module Programming application and enter the requested information
Step 9: If necessary, apply the reprogramming label to the PCM
If an emissions recall has been performed or a required emissions-related TSB has been completed,
an Authorized Modification label must be placed on the PCM. These labels can be purchased at the
parts counter of a Ford or Lincoln/Mercury dealership.
NOTE: It is the responsibility of the technician to inform the customer that Ford Motor Company will not reimburse the vehicle owner for field service actions that are not completed at a Ford or Lincoln/Mercury dealership.
Step
PATS initialization procedure.
Step
Good tips you may need:
Where to buyVCM2clone of high quality?
Where to buy VCM2 clone at the best price?
Ford IDS crack download: (TRY ON YOUR OWN RISK)
IDS 104:
How to reprogram Ford PCM with vcm2 clone:
Posted by: OBDexpress.co.uk at
01:52 AM
| No Comments
| Add Comment
Post contains 578 words, total size 23 kb.
September 13, 2017
I have the original Nexiq Nexiq USB Link 2 and the clone. Here share something with you all. Hope it helps.
THE PACKAGING
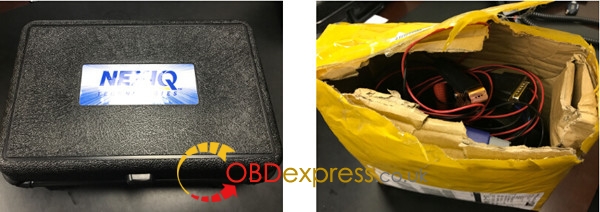
We also then take the contents out to compare. The original device, again shown on the left, comes with the adapter (with all the stickers attached), 6/9-
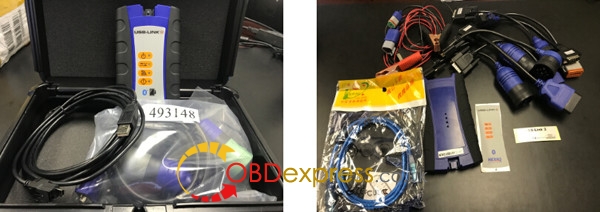
In summary, the genuine USB Link 2 will come in a hard plastic case and will only come with the USB Cable and 6/9 pin cable. The fake and clone adapters from China and beyond will come with a large assortment of cables, along with multiple DVD discs.
THE CABLE CONNECTOR
So far, not a huge deal. You can save $400, and not just get a cheap plastic box, right? Well, there are many more differences, so
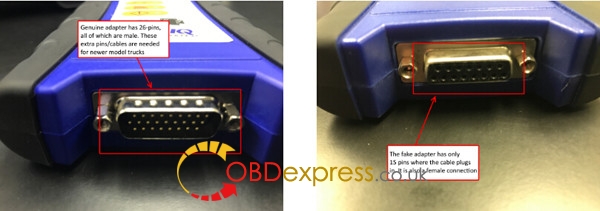
In summary, the genuine USB Link 2 will come with a 26-pin male connector for the cables, while the clone USB Link 2 will come with a 15-pin male connector. Remember, Nexiq put an authentication chip in each cable, so how possibly can these clones be doing this? The answer is that the china clone adapters are simply Nexiq USB Link original circuit boards placed in USB Link 2 cases. We will continue to prove this point as we move on.
THE CABLES
One thing that people may like
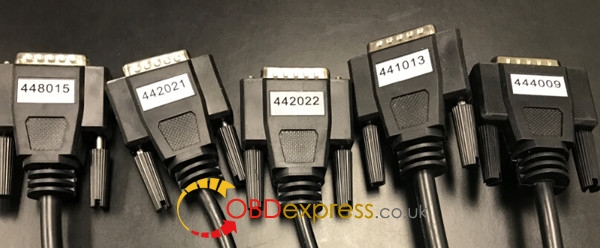
The other issue is that the included 6/9 pin cable from the China clone is NOT the new green 9-pin that has been used in all model 2016 model year trucks. This means that this cable will not physically connect to any trucks built in 2016 or newer. Even if you had the correct cable, we have serious doubts that this China clone is cable of handling the new 500k bus speeds that use this green connector.
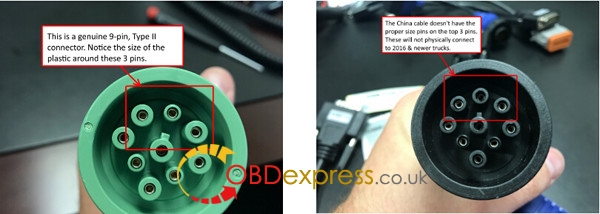
In summary, the USB Link 2 clone from China comes with more cables, yet they are cables for the original USB Link. The included 9-pin from China also will not fit or work on 2016 model year and newer trucks.
USB CABLE
The USB connection port is also different on China knock-off versus the genuine USB Link 2. With the USB Link 2, there is a fancy clip on the USB cable to prevent it from being detached from the adapter. On the clone tool, we find that it is a "regular†USB cable
The other important item to note is that on the clone/fake adapter, you will see that there is a hole in the bottom. On the genuine adapter, this is an actual button that you would push.
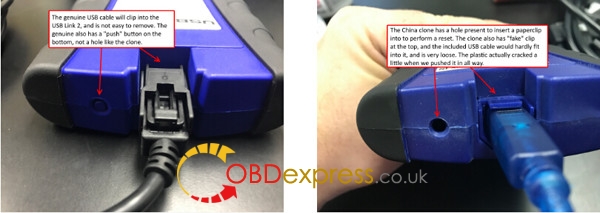
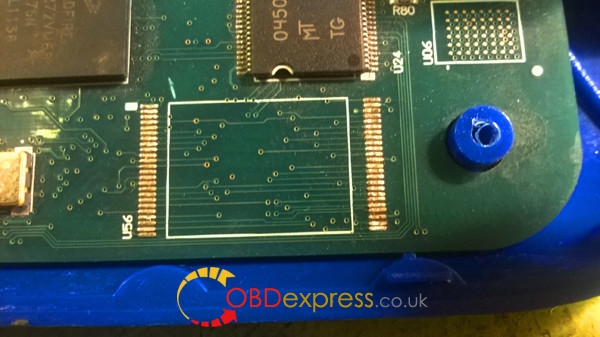
CIRCUIT BOARD
Now that we’ve explored all of the components,
the genuine PCB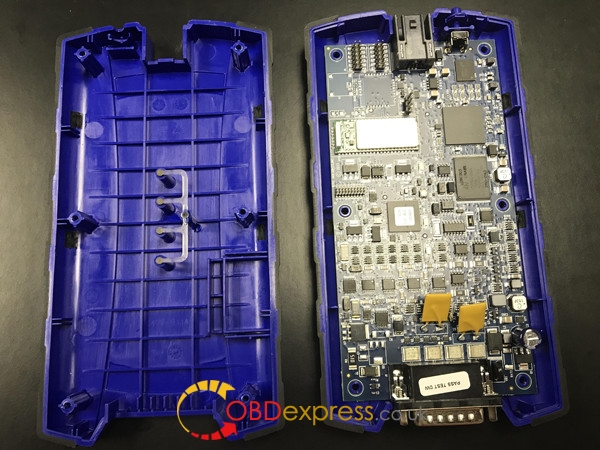
the clone PCB
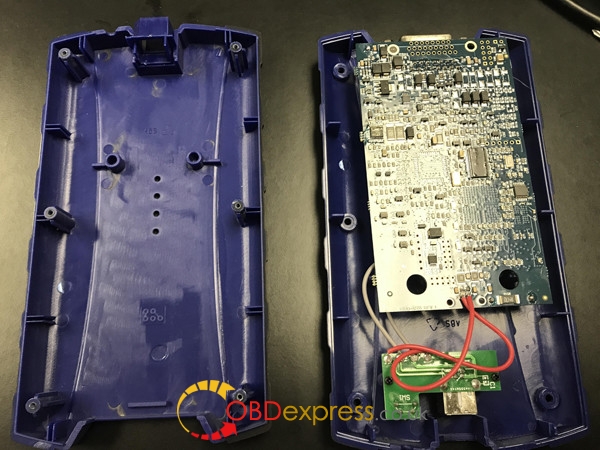
NEXIQ USB LINK 2 CLONE STICKER COMPARISON
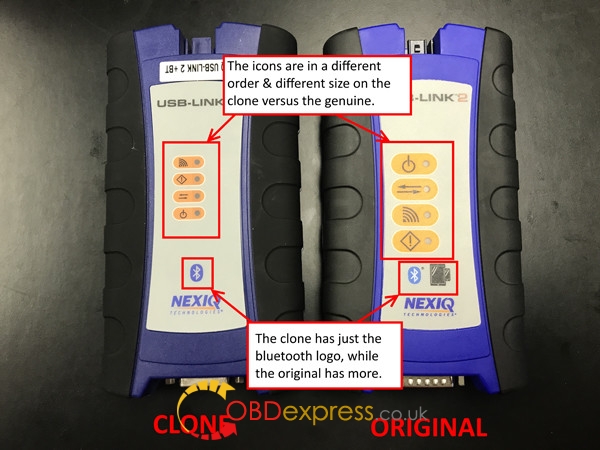
We also thought it a good idea to show you the adapters side-by-side. In the first view of the front, you can see some noticeable differences. The sticker on the front, while the same size, has the order of the LED lights and also the size of the icons different. Both adapters will show the Bluetooth Logo,
On the back side of the adapter, the sticker is a completely different size and much smaller on the USB Link 2 clone. There is also far less information, including the fact that
SUMMARY
In summary, we highly suggest staying away from the USB Link 2 clone adapters. Using a USB Link 2 clone will cause you nothing but problems, and just isn’t worth the hassle of saving a couple dollars. There are plenty of other RP1210 adapters that are priced less
- It doesn’t come in a black plastic case
- It comes with more
then just the 6/9 pin "long†cable - The connector on the bottom is a 15-pin female
- The 9-pin connector isn’t green
- The USB cable doesn’t "
clamp †into the Nexiq USB Link 2 - There is a hole at the bottom of the tool where the cable plugs in
- The sticker on the front looks different
then it should
Of
Be careful to buy
I have had several people having issues with all the lights blink and they can not connect
I have had so many support issues that ended up being bad Chinese Nexiq adapters that I warn customers that if they have a Chinese adapter, they are on their own, I don’t support them and Nexiq won’t warranty them. Be Very careful who you buy a Nexiq off of. TRVideo is a supplier of the real Nexiq and has great support so that is the only source I recommend (Truck Parts Today)
http://www.obdexpress.co.uk/wholesale/nexiq2-
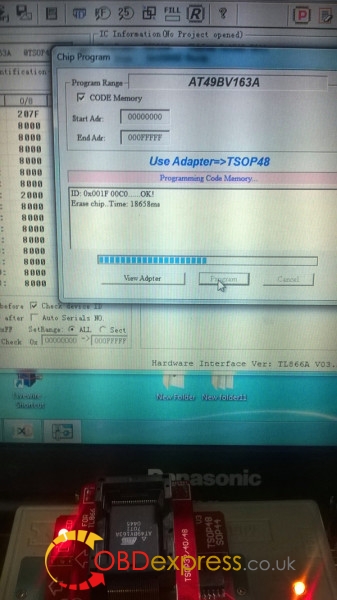
I have used it to program a new chip. Success.
Posted by: OBDexpress.co.uk at
03:41 AM
| No Comments
| Add Comment
Post contains 1329 words, total size 15 kb.
September 11, 2017
Latest update at Sept.11th,
Part
Honda HDS3.014.011.rar 886.8 MB
https://mega.nz/#!tUUwwC7Y!RZHIDh-tHVnIQqxumfvT1vBZb0mqatwnFq8x_M521zE
Honda HDS 3.101.019.rar 3.22 GB
https://mega.nz/#!kAlBnKgA!xAz33xQC2651y_vrnis7LwkHUpnnAoxmyaG9n4ztpcQ
FordVxdiag Vcx Nano Ford:
Ford IDS86.rar 353.7 MB
https://mega.nz/#!YR0TkKbI!IceZeZAtA2fwAJMu01uzT1abBY3m1v8hBwHjwcx-9go
Ford IDS98 VM.rar 1.42 GB
https://mega.nz/#!QYcDALhL!O8ibp-syZzPcc99vthyhGRoQ3lUQpUHYb74d9omK_1A
FORD IDS V100 EN/CN
Mazda IDS 106.00.exe 485.1 MB
GMTech2Win16.02.24.rar 138.9 MB
GMGDS2 VM.iso 3.95 GB
2016.4Subaru SSM.iso 1.95 GB
SubaruSSM 01.2015.rar 712.2 MB
https://mega.nz/#!5YcnXBiC!ipnGmoe1i5ZJZxxr04sXn08TxH7cE-7DApELvHbxXB4
JLR SDDsoftware
JLR SDDpatch.rar 47.4 MB
ODISService4.1.3
ODIS-S 3.03
VAS-PCV19EN5054.rar 3.48 GB
Part 2: Vxdiag Vcx Nano best price
Vxdiag Vcx Nano for sale:
Part 3: VXDIAG VCX Nano reviews
VXDIAG VCX Nano Mazda Review:
The VCX Nano I took apart seems to be a custom design to emulate in hardware part of the hardware/software of the VCM II but the driver is most important too. I did not take pictures but gently peeling down the stickers reveals 4 screws. Once inside it is a very simple board
Soldering looks like reasonable quality surface mount and no hand work
Vxdiagvcxnano gm review:
I have
I
VXDIAG Vcx Nano Ford Review:
VXDIAG VCX NANO is the same as VCM2 with a single board (which
By satria_wr
Vehicle: 2014 Ford Ecosport 1.5L Ti-VCT 110hp
My clone vcm2 was able to update the module online.
The single board is known to brick module since it doesn't
By Automate
Vehicle: 2010 Ford Fusion Hybrid
The VCX Nano I took apart seems to be a custom design to emulate in hardware part of the hardware/software of the VCM II but the driver is most important too. I did not take pictures but gently peeling down the stickers reveals 4 screws. Once inside it is a very simple board
Soldering looks like reasonable quality surface mount and no hand work
By stvkram
Vehicle: 2003 Mazda 6 3.0 V6 220hp
I test this tool,

By satria_wr
Vehicle: 2014 Ford Ecosport 1.5L Ti-VCT 110hp
I own VXDIAG VCX Nano WiFi. I use IDS v103.xx fine without issue.
Tony Back
Vehicle: Ford Focus
Well, I just took the chance and bought one.
Couldn't figure out how to get WiFi working on it, so I installed the driver
for USB
Forscan detected it as J2534, and no
It didn't find as many modules as my Vlink adapter does, but it had
the same missing fuel trims for bank 2 for my Scorpio 24V 
One hurdle with this device though - it is almost impossible to connect it
to the Scorpio, because the plug is a bit hidden, and this device is very big.
Anyone buying it
By Yoda
Vehicle: Scorpio 2,9 24V 207HK 1997
I can add that regarding the VCX Nano for ford/
By stvkram
Vehicle: 2003 Mazda 6 3.0 V6 220hp
Full chiphigh qualityVCM II (SP177-C) is much better than VXDIAG NANO.
But be careful programming!
By ipy1975
Vehicle: 2015 Ford Mustang GT 5.0L V8
Posted by: OBDexpress.co.uk at
08:43 AM
| Comments (2)
| Add Comment
Post contains 811 words, total size 43 kb.
September 08, 2017
Attention please.Xhorse vvdi2softwarelatestversionV4.5.0is released and ALL USERS ARE
TO ALL VVDI2 USERS:
Xhorse warnings:
- AllcustomersshouldupdatethesoftwaretoV4.5.0,
usethelatestsoftwaretosynchronizeyourdevice
Updatefirmwarev4.5.0requirethelatestonlineupdatetoolv4.5.0version
3.Pleasedownloadlatestinstallsoftwarefirstthenupdatefirmware
Xhorse vvdi2 4.5.0:
VVDI2 4.5.0 software download:
VVDI2 4.5.0 update information:=====VAGV4.5.0=====
1.Bugfix
=====BMWV4.5.0=====
1.ImprovementforBMWFEM/BDCkeylearn
2.Bugfix
=====PorscheV4.5.0=====
1.Bugfix
=====PSAV4.5.0=====
1.Bugfix
=====TransponderProgrammerV4.5.0=====
1.Bugfix
=====J2534V4.5.0=====
1.Bugfix
How to update VVDI2 firmware to v4.5.0:
1) Close other VVDI2 programs, connect VVDI2 to PC with USB cable
2) Choose VVDI2 firmware version from Firmware List
3) Press button Update Online, wait the progress end
4) If failed to get firmware list or get something like "communicate with server error!†while update your device, close antivirus and firewall programs, try again. Change your internet provider once failed again
5) DON’T shutdown your PC or disconnect USB cable while update device

Refresh Firmware List
Update Online Tool will connect to
Device Information
After
Update Online
After
How to update VVDI2 software to v4.5.0:
This function
Use "Menu ->Software Update ->Software Update†to obtain VVDI2 latest software version, the software version
If there’s no display for software version,

While you use VAG, BMW, Transponder Programmer programs, if you get some window like (


Latest Update Information
This function
Use "Menu->Software Update ->Latest Update Information†to obtain VVDI2 latest update information
History Update Information
Use "Menu->Software Update ->History Update Information†to obtain VVDI2 history update information
How to installVVDI2 4.5.0
Step
Open VVDI2 software folder
InstallVVDI2-Insatller.exe setup

Select software language

Install VVDI2 Setup Wizard, click

Save file toC: \Program Files \VVI2\VVDI2 \, clickNext

click on "Installâ€

Install VVDI Device FDTI CDM Driver
NOTE: If you install VVDI2 software (any version) for the first time, you need to select "Nextâ€, otherwise, select "Cancelâ€

Device drivers are installed. click on "Finishâ€

VVDI2 software has been successfully installed. click on "Closeâ€

Step
Generally, VVDI2 driver will be installed automatically. If driver installation failed or programs cannot connect to VVDI2, you need install driver manually.
Manual Install Driver
Open My Computer-> Manager-> Device Manager
Open windows explorer, right click on "My computer†and select "Propertiesâ€

Open "System propertiesâ€

Select "Hardwareâ€-> "Device Managerâ€, open Device Manager

Install Bus
VVDI 2 install with other version drivers: In select "Universal Serial Bus controllersâ€-> "USB Serial Converterâ€, double click
click on Driver tab.: "Driver Date†should be3/18/2011, "Driver Version†should be2.08.14.0. If driver date and driver version are set right, do not install


Select "Driverâ€-> "Update Driverâ€. Open "Hardware Update Wizardâ€
Select "Install from a list or specific location (Advanced)â€, click

Select "Don’t search. I will choose the driver to installâ€. click on "Next†Sometimes you will get directly,

Select "Universal Serial Bus controllersâ€, click

Select "Hard Disk….â€, get install from disk window

Input absolute path for USB driver folder in
Sometimes system will ask again for "Are you sure to install

VVDI2is
Then install driver accord VVDI2 install with other version drivers.

Verify Bus
Check"Update Dateâ€=3/18/2011
"Driver Versionâ€=2.8.14.0.


VVDI2
Posted by: OBDexpress.co.uk at
07:41 AM
| No Comments
| Add Comment
Post contains 757 words, total size 88 kb.
Canidownload and save Renaultecudata inCAN CLIP interface?
It should be YES.
So, how to do that? Here you go.
– You need another cable for that.
–ihave some experience with s3000 which is on petrol models after 2003 inc 2.0t sport onmeganeversion and readmanually bympps.
iresolderobdand give 14v supply to theecuand themppsv12 (chineesclone) but always use supply over +13v cause the interface burningthe can chip
– It is possible, command name SC003, look here the picture from Dialogys e.g. DCM12 savingdatasbefore replacing theecu:

An otherphoto for V42 petrol injection

There are some ecus SC003 possible >> diesel DCM12, DCM34 , petrol V42 <<
also some SC003 not implemented >> petrol EMS 3132, SIM32
So finding that command depends on theecu, dieselhave, petrol might not have.
Posted by: OBDexpress.co.uk at
02:03 AM
| No Comments
| Add Comment
Post contains 148 words, total size 10 kb.
September 06, 2017
This
- Unzip the zip file, run XProgDestop.exe
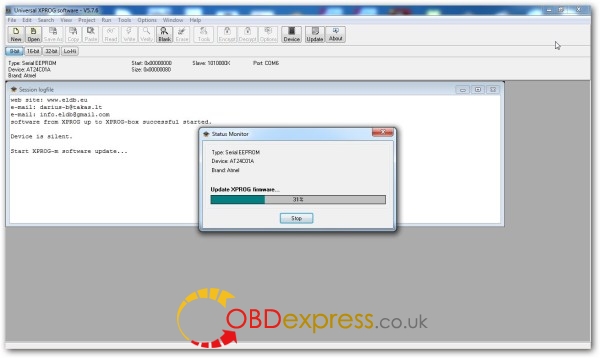
2. Press the Help -> Hardware Info and update the firmware
3. Do not press the Update Certificate
Says it works 100%.
But unluckily,
I was thinking about upgrading my
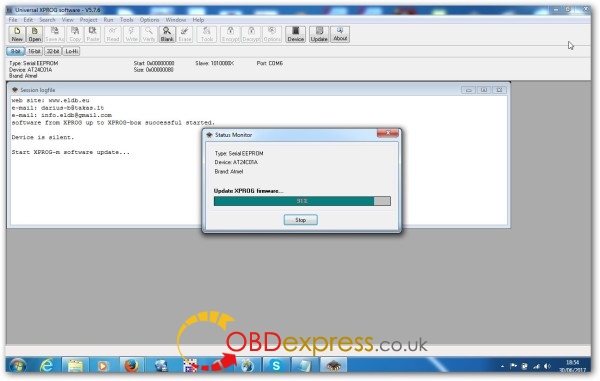
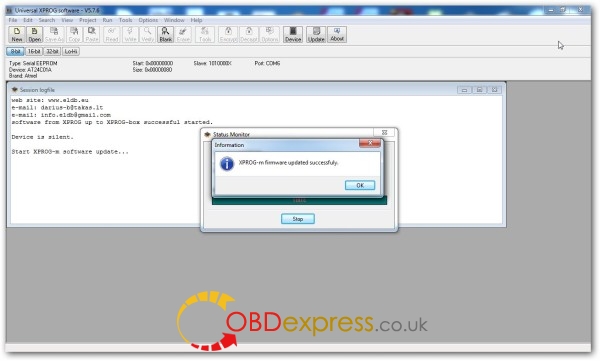
Everything appears to go smoothly see pictures below.
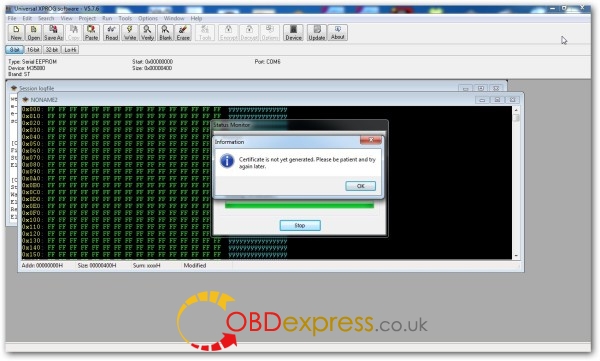
However, you cannot read or write any chips without being locked into a certificate error loop. see pics.
Rolling back to 5.5.5 all
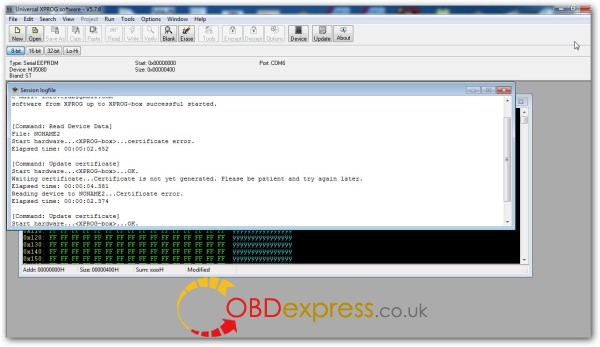
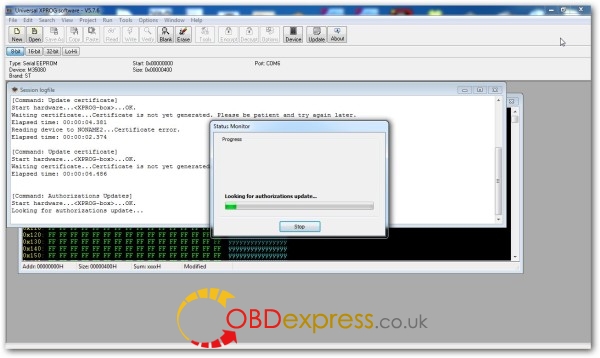
So for the benefit, my advice is don’t use this
I finally gave it up and spent some dollars with a new one (Xprog box 5.7.6, it’s fromhttp://www.obdexpress.co.uk/wholesale/x-prog-box-ecu-programmer-x-prog-m.html)
It adds new authorization:
MCU/MPU->infineon{XC16x}->SAK-XC164CS-16F
MCU/MPU->FresscaleHC08-Updated->MC68HCx08AS/AZ32_CONFIG
MCU/MPU->FresscaleHC08-Updated->MC68HCx08AS/AZ32_CONFIG
MCU/MPU->Fresscale9S08->MC9S08AW8_FLASH
MCU/MPU->Fresscale9S08->MC9S08AW8_FLASH
MCU/MPU->Fresscale9S12XD->MC9S12XDx128_EFPROM
MCU/MPU->Fresscale9S12XD->MC9S12XDx128-EFPROM-secured
MCU/MPU->Fresscale9S12XF->MC9S12XF128_EEE
MCU/MPU->Fresscale9S12XF->MC9S12XF128_EEE
MCU/MPU->Fresscale9S12XHY->MC9S12XHY128_D-FLASH
MCU/MPU->FresscaleMPC55xx->MPC5515_Code-Flash
MCU/MPU->FresscaleMPC560x->MPC5602B/C_Code-Flash
MCU/MPU->FresscaleMPC560x->MPC5602B/C_Code-Flash
Immobilizers->Yamaxa->T-MAX_TYPE_I_9S12T64
Other ECU ->Chrysler-DodgeJeep->BCM-GRAND_CHEROKEE_WK_2014_Flash
Other ECU ->GM ECU->SAF-XC164CS-16F
Other ECU ->HONDA Bikes->CB650F 2015_Code_Flash
Other ECU ->Renault ClioOther ->EPS_ST10F269
Other ECU ->Renault Modus ->ECU_SAK-XC164CS-32F
Airbag(XC2xxx)->FR3T-14B321-AF(XC2336A-72)->FR3T-14B321-AFflash0
Airbag(SPC560xx)/MPC560x)->Honda_CR-V(SPC560P50LS)->Code_Flash
Xprog 5.7.6has all authorization:
AUTH-0001 Motorola HC05 family authorization (allows to read/write EEPROM)
AUTH-0002 Motorola HC08 family authorization (allows to read/write EEPROM)
AUTH-0003 Motorola HC11 family authorization (allows to read/write EEPROM)
AUTH-0004 Motorola HC12, 9S12 family authorization (allows to read/write EEPROM and flash memory)
AUTH-0005 Texas Instruments TMS370/TMS374 family authorization (allows to read/write EEPROM)
AUTH-0006 Motorola HC05Bxx and HC05Xxx family bypass security authorization (allows to read/write secured EEPROM and flash memory)
AUTH-0007 ST M35080 authorization. Read/Write/Erase device to delivery state.
AUTH-0008 BMW EWS3 authorization
AUTH-0009 ATMEGA family authorization (allows to read/write EEPROM and flash memory)
AUTH-0010 MB ZGS001 authorization
AUTH-0011 Motorola HC11EA9/E9 bypass security authorization (allows to bypass security bit and read EEPROM and RAM memory)
AUTH-0012 National CR16 authorization (allows to read/write EEPROM memory)
AUTH-0014 ST7, ST10 family authorization (allows to read/write internal flash)
AUTH-0015 MPC5xx authorization (depending on device program automatically detects MPC5xx, M95xxx device type, flash, external flash and configuration memory size)
AUTH-0018 Motorola HC12, HC912, MC9S12, MC9S12X bypass security authorization (allows to read/write secured EEPROM and flash memory)
AUTH-0020 ARM (Micronas, …) Family authorization (allows to read/write internal flash and external serial EEPROM)
AUTH-0021 ARM (Micronas, …) Family bypass security authorization (allows to read/write secured and non-secured internal flash and external serial EEPROM, view/change mileage, Chassis number (VIN), serial number and PIN code).
AUTH-0023-1 MAC7xxx
AUTH-0023-2 XC23xx
AUTH-0024-1 MC9S12Cxx
AUTH-0024-2 MC9S12XE
AUTH-0024-3 9S12XE SECURITY
AUTH-0024-4 MC9S12HA/HY/P
AUTH-0025-1 MPC/SPC5xxx Authorized 11/4/2014
Now, it works
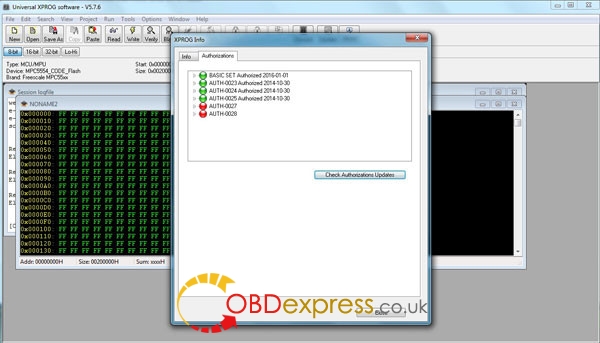
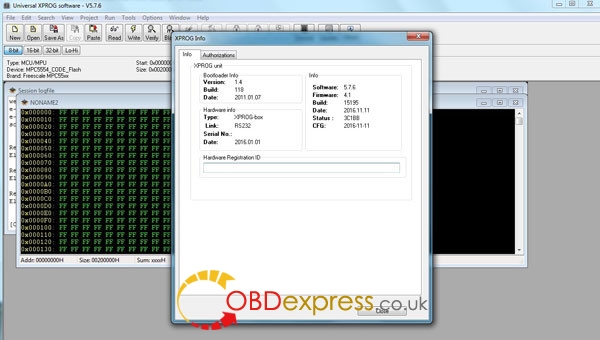
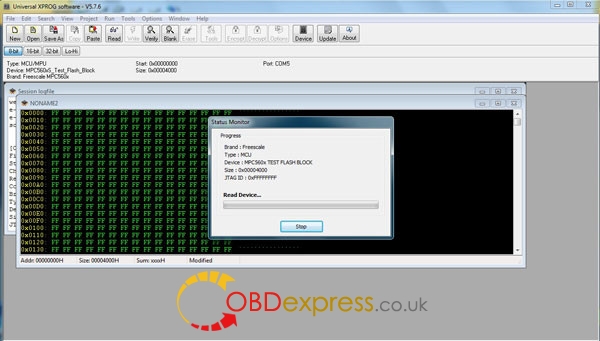
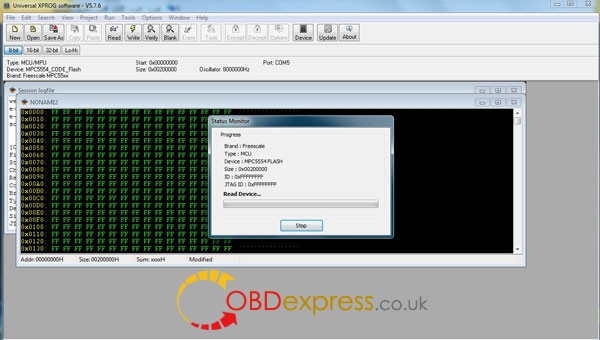
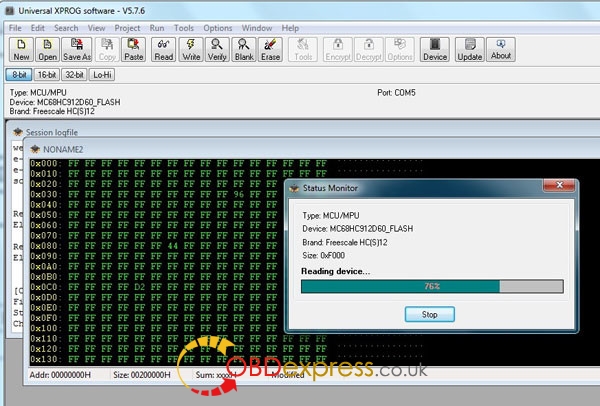
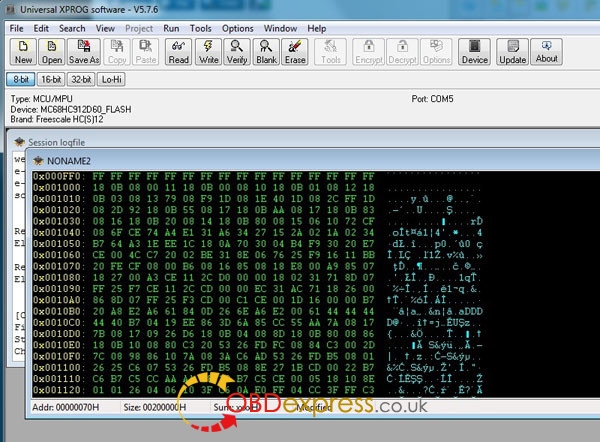
Src:http://www.obdexpress.co.uk/service/how-to-update-
Posted by: OBDexpress.co.uk at
09:44 AM
| No Comments
| Add Comment
Post contains 435 words, total size 12 kb.
This isXPROG 5.5.5to 5.7.6, software and firmware update internet active
- Unzip the zip file, run XProgDestop.exe
2. Press the Help -> Hardware Info and update the firmware
3. Do not press the Update Certificate
Says it works 100%.
But unluckily, i have no luck.
I was thinking about upgrading my xprog box so I thought I would have little to lose by following instructions given to see what happens.
Everything appears to go smoothly see pictures below.
However, you cannot read or write any chips without being locked into a certificate error loop. see pics.
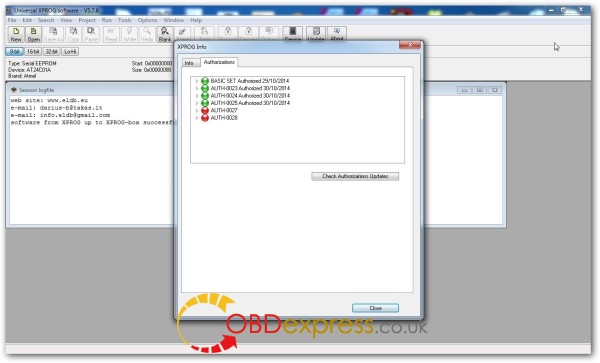
Rolling back to 5.5.5 all authorisations are gone hardware registration ID is blank and unit wont read or write.
So for the benefit, my advice is don’t use this
I finally gave it up and spent some dollars with a new one (Xprog box 5.7.6, it’s fromhttp://www.obdexpress.co.uk/wholesale/x-prog-box-ecu-programmer-x-prog-m.html)
It adds new authorization:
MCU/MPU->infineon{XC16x}->SAK-XC164CS-16F
MCU/MPU->FresscaleHC08-Updated->MC68HCx08AS/AZ32_CONFIG
MCU/MPU->FresscaleHC08-Updated->MC68HCx08AS/AZ32_CONFIG
MCU/MPU->Fresscale9S08->MC9S08AW8_FLASH
MCU/MPU->Fresscale9S08->MC9S08AW8_FLASH
MCU/MPU->Fresscale9S12XD->MC9S12XDx128_EFPROM
MCU/MPU->Fresscale9S12XD->MC9S12XDx128-EFPROM-secured
MCU/MPU->Fresscale9S12XF->MC9S12XF128_EEE
MCU/MPU->Fresscale9S12XF->MC9S12XF128_EEE
MCU/MPU->Fresscale9S12XHY->MC9S12XHY128_D-FLASH
MCU/MPU->FresscaleMPC55xx->MPC5515_Code-Flash
MCU/MPU->FresscaleMPC560x->MPC5602B/C_Code-Flash
MCU/MPU->FresscaleMPC560x->MPC5602B/C_Code-Flash
Immobilizers->Yamaxa->T-MAX_TYPE_I_9S12T64
Other ECU ->Chrysler-DodgeJeep->BCM-GRAND_CHEROKEE_WK_2014_Flash
Other ECU ->GM ECU->SAF-XC164CS-16F
Other ECU ->HONDA Bikes->CB650F 2015_Code_Flash
Other ECU ->Renault ClioOther ->EPS_ST10F269
Other ECU ->Renault Modus ->ECU_SAK-XC164CS-32F
Airbag(XC2xxx)->FR3T-14B321-AF(XC2336A-72)->FR3T-14B321-AFflash0
Airbag(SPC560xx)/MPC560x)->Honda_CR-V(SPC560P50LS)->Code_Flash
Xprog 5.7.6has all authorization:
AUTH-0001 Motorola HC05 family authorization (allows to read/write EEPROM)
AUTH-0002 Motorola HC08 family authorization (allows to read/write EEPROM)
AUTH-0003 Motorola HC11 family authorization (allows to read/write EEPROM)
AUTH-0004 Motorola HC12, 9S12 family authorization (allows to read/write EEPROM and flash memory)
AUTH-0005 Texas Instruments TMS370/TMS374 family authorization (allows to read/write EEPROM)
AUTH-0006 Motorola HC05Bxx and HC05Xxx family bypass security authorization (allows to read/write secured EEPROM and flash memory)
AUTH-0007 ST M35080 authorization. Read/Write/Erase device to delivery state.
AUTH-0008 BMW EWS3 authorization
AUTH-0009 ATMEGA family authorization (allows to read/write EEPROM and flash memory)
AUTH-0010 MB ZGS001 authorization
AUTH-0011 Motorola HC11EA9/E9 bypass security authorization (allows to bypass security bit and read EEPROM and RAM memory)
AUTH-0012 National CR16 authorization (allows to read/write EEPROM memory)
AUTH-0014 ST7, ST10 family authorization (allows to read/write internal flash)
AUTH-0015 MPC5xx authorization (depending on device program automatically detects MPC5xx, M95xxx device type, flash, external flash and configuration memory size)
AUTH-0018 Motorola HC12, HC912, MC9S12, MC9S12X bypass security authorization (allows to read/write secured EEPROM and flash memory)
AUTH-0020 ARM (Micronas, …) Family authorization (allows to read/write internal flash and external serial EEPROM)
AUTH-0021 ARM (Micronas, …) Family bypass security authorization (allows to read/write secured and non-secured internal flash and external serial EEPROM, view/change mileage, Chassis number (VIN), serial number and PIN code).
AUTH-0023-1 MAC7xxx
AUTH-0023-2 XC23xx
AUTH-0024-1 MC9S12Cxx
AUTH-0024-2 MC9S12XE
AUTH-0024-3 9S12XE SECURITY
AUTH-0024-4 MC9S12HA/HY/P
AUTH-0025-1 MPC/SPC5xxx Authorized 11/4/2014
Now, it works perfect:
Src:http://www.obdexpress.co.uk/service/how-to-update-xprog-555-to-576-via-internet-active-22608.html
Posted by: OBDexpress.co.uk at
09:44 AM
| No Comments
| Add Comment
Post contains 433 words, total size 10 kb.
September 05, 2017
Free downloadTech2win + Tech2Opel PCMCIA V182 V161 V160 V159 V158 V157 V152 V137 V124 V123 multi-language (English, Spanish, German,)
THE MOST IMPORTANT NOTE:
NO ONE BUT YOURSELF HAVE TO HOLD RESPONSIBILITY OF TECH2 BIN FILES & TECH2WIN BIN FILES BELOW: free, but not tested by professionals!!!!!!! unknown security and perhaps high risk sometimes!!!
Tech2 bin files+Tech2Win bin filesdownload:
OPEL-TECH2-32MB-V182.000_en.part01.rarhttps://mega.nz/#!QPYU2B5J!JvOBKyrB1bqpXuUXC8gJU8_HCAAtc3PTLwHMRGWkPz4
OPEL-TECH2-32MB-V182.000_en.part02.rar
Opel161.002.rar (free, try on your ownrsik)
Opel160.000EN
Cadillac 117.500
Cadillac BLS 120.000
China-1 29.002
Isuzu truck 11_530 1996-2011
Isuzu truck 11_530
ISUZU Truck CAN 122_050
opel_160-000_en
suzuki29.003 eng
V33-002_NAO_EN
vauxhall
Opel vauxallv159 English
Opel Tech2Win158.000
Opel tech2win157
Tech2win PCMCIA Opel152 Russian
Opel vauxall152.00Spanish.rar
Opel137.000
isuzu 107.021
nao 32.08
opel 137.000
saab 148.000
suzuki 28.007
Tech2Win version1.301
Opel -Vauxhall 124.000 English.rar
NAO 30.007 English.rar
NAO 30.007 German.rar
nao 31.011.rar
Opel - Vauxhall123.000 German.rar
Opel - Vauxhallbin file Version123.000 multi-language
English:
http://www.rapidshare.com/files/4326...00_English.rar
Bulgarian:
http://www.rapidshare.com/files/4326..._Bulgarian.rar
Czech:
http://www.rapidshare.com/files/4326....000_Czech.rar
Danish:
http://www.rapidshare.com/files/4326...000_Danish.rar
Dutch:
http://www.rapidshare.com/files/4326....000_Dutch.rar
Finish:
French:
http://www.rapidshare.com/files/4326...000_French.rar
German:
http://www.rapidshare.com/files/4326...000_German.rar
Greek:
http://www.rapidshare.com/files/4326....000_Greek.rar
Hungarian:
http://www.rapidshare.com/files/4326..._Hungarian.rar
Italian:
http://www.rapidshare.com/files/4326...00_Italian.rar
Norwegian:
http://www.rapidshare.com/files/4326..._Norwegian.rar
Polish:
http://www.rapidshare.com/files/4326...000_Polish.rar
Portuguese:
Romanian:
http://www.rapidshare.com/files/4326...0_Romanian.rar
Russian:
http://www.rapidshare.com/files/4326...00_Russian.rar
Slovakian:
Password forALL:PatrianAutomotive Industries
Good news for you!!!!!!! You havetested tech2 bin files,use with security!!
Tech2 + Tech2win:100% working
Tech2Win PCMCIA 32GB Card Bin Files: 100% working
software includes:
Tech2Win GM English 32.007
Tech2Win SAAB English 148
Tech2Win OPEL English 180 (Cars from 1997-2014)
Tech2Win Holden English 149 (Cars from 1999-2013)
Tech2Win SUZUKI English 01.210.020
Tech2Win ISUZU English K line 11.53;
Tech2Win ISUZU English CAN line 107.021
GM
GM-English 33.004 1991-2013
GM-Germany 32.007 1991-2013
GM-Spanish 31.007 1991-2013
GM-French 32.007 1991-2013
GM-Portuguese 32.007 1991-2013
OPEL
update to V180
OPEL-English 173,000 1997-2014
OPEL-Italian 133.001 1997-2014
OPEL-Germany 85.001 1997-2014
OPEL-Spanish 91.001 1997-2014
SUZUKI
SUZUKI-English 01.210.020
SAAB
SAAB-English 148,000
ISUZU
ISUZU CAN BUS-English 107.021 2006 to 2010
ISUZU-K-line is for ISUZU from 1998 to 2011
Holden
Holden-English 149,000 1999-2013
For 12V CARsonly (no trucks)!!!
Diagnostics:cars from 1991 to 2013
Programming with TIS2000: cars before the 2007 year
(You are takingriskwhen programming a car, so it’s 100% necessary to use a 100% working softwareTIS2000. For software untested, forget it. HIGH RISK!!!!!!!!!)
Enjoy!!!
Source:http://blog.obdexpress.co.uk/2017/09/05/tech2win-bin-file-tech2-opel-pcmciav123-v182-download/
Posted by: OBDexpress.co.uk at
06:29 AM
| No Comments
| Add Comment
Post contains 371 words, total size 39 kb.
September 04, 2017
Hellofriends!!
Free downloadFord IDS 101.03 VMWare in Spanish with C81 Calibration Fileswithoutpassword, to working withVCM2clone:
https://mega.nz/#!gRtBTJpL!KrUe8wum3bgOy2Zn7nGzyh9tqTWE8g_JEio7HTqPxdE(3.7 GB)
For all those who need IDS V.101.03 inSpanishlanguage!!
Ford IDS 101.03 in the Spanish language VCMII Manager 2.3.85.7
VMWare + C81.00
For all those who need VCM2 clone to get it work with IDS software
VCM2 clone SP177-C or SP177-C1:http://blog.obdexpress.co.uk/2017/05/05/where-to-buy-ford-vcm2-clone-sp177c-or-sp177c1/
VCM2 clone review:http://blog.obdexpress.co.uk/2017/01/28/vcm-2-clone-review/
Posted by: OBDexpress.co.uk at
03:54 AM
| No Comments
| Add Comment
Post contains 78 words, total size 7 kb.
Free
https://mega.nz/#!gRtBTJpL!KrUe8wum3bgOy2Zn7nGzyh9tqTWE8g_JEio7HTqPxdE(3.7 GB)
For all those who need IDS V.101.03 inSpanishlanguage!!
Ford IDS 101.03 in the Spanish language VCMII Manager 2.3.85.7
VMWare + C81.00
For all those who need VCM2 clone to get it work with IDS software
VCM2 clone SP177-C or SP177-C1:http://blog.obdexpress.co.uk/2017/05/05/where-to-buy-ford-vcm2-clone-sp177c-or-sp177c1/
VCM2 clone review:http://blog.obdexpress.co.uk/2017/01/28/vcm-2-clone-review/
Posted by: OBDexpress.co.uk at
03:54 AM
| No Comments
| Add Comment
Post contains 79 words, total size 7 kb.
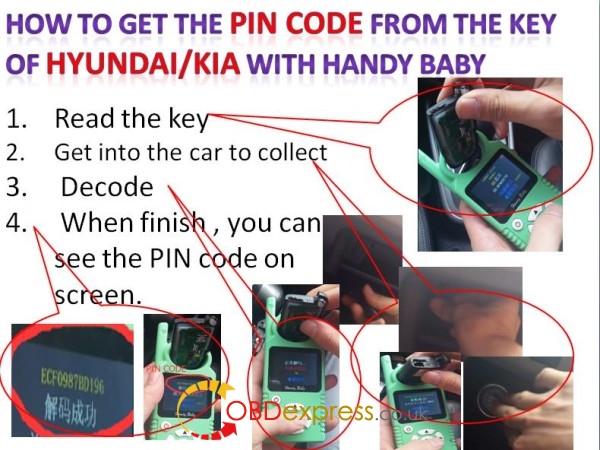
This is an easy instruction on How to
For steps, here you go….
- Read the key
2. Get into the car to collect
3. Decode
4. Whenfinish ,screen .
Note: Handybaby CANNOT support smart key
Posted by: OBDexpress.co.uk at
02:19 AM
| No Comments
| Add Comment
Post contains 67 words, total size 2 kb.
34 queries taking 0.064 seconds, 146 records returned.
Powered by Minx 1.1.6c-pink.

