


September 29, 2018
This is a tutorialoffor those being the first 2005 GX470 owner to "program†the key.
I had a bit of a problem at first with programming the key but it was due to the "timing†where you had to press one or two of the buttons within 2 seconds after opening and closing the door…
For the record, by "programming†I mean that I was able to get a brand new replacement key to function with my 2005 GX470 for the following functions:
Lock doors
Unlock doors
Panic button
The key still had to go back to the dealer to have it keyed for the ignition kill start. But everything else worked fine.
Note: ignition kill start
The ignition kill start is the FACTORY LEXUS ignition starter kill. Embedded inthe theonboardLEXUS vehicle is a master component/computer that prevents any attempts to hotwire/jump startthe vehicle, like in the movies (eg, break glass, open door, rip panel from under steering wheel,ripwires and splice/short the wires…)
The LEXUS system I believe is called the IMMOBILIZER (?) and it will NOT allow the car/truck to start without the decoded encoded onto the KEY FOB. I told a fib to my dealer and told them that my "factory†key stopped working for the ignition, everything else worked, doors unlock/lock/panic,keyturns in (locksmith cut it for me…), dealer cheerfully reprogrammed the key no charge.
Programming instructions – as requested
System Operation:
Pressing LOCK button activatesalarmand central locking.
Pressing UNLOCK button one deactivatesalarmand unlocks driver’s door only.
Pressing UNLOCK button twice within 3 seconds deactivatesalarmand unlocks all doors.
Ifvehicleis unlocked and doors or trunk/tailgate not opened within 30 seconds, locks/alarm are reactivated.
Programming
When:
* Key remote transmitter added or replaced.
* System malfunction
How:
* Driver’s door open, all other doors closed, key removed from ignition switch.
* Within 5 seconds:
* Insert and remove the key from the ignition switch twice.
* Within 40 seconds:
* Close and open the driver’s door twice.
* Insert and remove the key from the ignition switch.
* Within 40 seconds:
* Close and open the driver’s door twice.
* Insert the key into the ignition switch and close the driver’s door.
* Switch ignition ON and OFF once to program a key remote transmitter code whilstretaingthe original codes or twice to program a remote transmitter code whilst erasing the original codes. Three times to check how many key remote transmitters are currently registered or five times to erase all registered codes.
* Remove key from ignition ****ch:
* System should now lock and unlockvehicle. Once, twice or five timesdependingwhich mode has been selected. One to four times, slowly, to indicatenumberof key remote transmitters registered.
* Within 40 seconds:
* Press and hold LOCK and UNLOCK buttons simultaneously for 1.5 seconds.
* Within 3 seconds:
* Press and release LOCK or UNLOCK button.
* System should now lock and unlock vehicle once to confirm registration, twice to indicate registration has failed.
* Within 40 seconds:
* Repeat button procedure to program remaining key remote transmitters.
NOTE: To exit programming mode: Open driver’s door or insert ignition key.
NOTE: A maximum of 4 key remote transmitters can be programmed.
NOTE: Lexus key programming tool if you need:VXDIAG VCX Nano Lexus
Posted by: OBDexpress.co.uk at
06:16 AM
| No Comments
| Add Comment
Post contains 548 words, total size 24 kb.
September 28, 2018
There are optional solutions to make new keys to Toyota withTechstream softwareor someauto key programmers. Some by the dealer, somediy. Here, you will get the cheapest way to make it.
The Options
A.) Pay the dealership.
This was quoted at~$400. I called 2 local dealerships (I’m in the GTA) and was quoted 2 different prices, with the second dealership referring me to an agent (which I had previously found online).
B.) Pay anagent / locksmith
This was quoted at$250but I’ve only found 1 so far. I was told it was an OEM part and would have 6 months of warranty.Any referrals in the GTA would be much appreciated.
Edit: After a number of calls, the cheapest I could find was $180 and $200.
C.) Partial DIY
I see that I can buy the Smart Key online forabout $110and bring it to a dealership or agent/locksmith to have it programmed into the car. I was quoted $50 by the dealership.Any referrals to purchasing OEM Smart Keys online would be much appreciated.
Edit: This option can be very highly "YMMV†as each dealership’s policy may differ regarding used keys (some may do it, some may do it but fail, and others may opt not to do it at all)
D.) Full DIY
If you have a laptop, Techstream software, a connecting cable, and the Smart Key, you can DIY.Itsunclear whether the "Ignition Key†portion can be DIY with Techstream (someone please clarify). If you cannot, this seems to defeat the benefit and would seem more beneficial to pursue the Partial DIY option above.
The Techstream software is referred toas$20 or lesson the obd2 shops likehttp://www.obdexpress.co.uk/wholesale/cheap-mini-vci-single-cable-for-toyota-26728.html($20 around to get"Techstream†and "Mini VCIâ€)
The website for Techstream shows a subscription model with varying options. I’ve looked at few posts in the forums but overall am lost on the full DIY option.
Confirmed possible! Requires a SEED code calculator which is another $15 for 1 code.
E.) Ski-Mask Approach
According tothis post: https://www.rav4world.com/forums/96-4-3-general/185994-scary-news-smartkey-owners.html, all this can be avoided for the low low price of$17.(joking)
Conclusion:
The cheapest should the fourth solution: full do it yourself to make a new key.
Here is thehow-to’sfor reference.
You should have:
Smart Key:The circuit board # inside the to-be-programmed Smart Key matches your existing key(s).
Techstream:You should be able to run the program without an error appearing. There is typically a manual step to have the program launch properly(modify IT3System.ini, "TISFunction = 1†to "TISFunction = 0â€)
MVCI Cable:When you plug it into your PC, you should hear the iconic "ding†sound. If you don’t, it would suggest aloseconnection(I experienced this and had to open up my cable to get it working). You should also launch the "XHorse Firmware Update Toolâ€(it comes with the cable’s drivers)and click "Device Infoâ€, which will confirm whether it can communicate with the cable or not(for this check, it does not need to be plugged into the car, only to your PC)
Here you go…
Procedure:
Once you have everything ready to go, start your car and launch Techstream. Leave the driver’s door OPEN for the entire duration.
Click"Connect to Vehicleâ€
Note:As theprocedureI’m running through takes about 20 minutes total, its recommended to have the car running to ensure the battery doesn’t drain out. If you can’t start the car, its mentioned in other bulletins to have the car hooked up to a backup battery
Techstream should automatically detect your car(mine was a 2010 RAV4, ignore the details in the image,itsjust for reference), except for an option or two(I had to indicate "/w Smart Key†functionality and that my car was "2WDâ€)
After a while, you will arrive at the System Select page. I suggest you copy-paste your VIN# to Windows notepad so that you have it handy later (applicable forusedSmart Key registration only)
All of the ECUs will be yellow. You can click "Health Check†to have Techstream go through each of the ECUs and determine its status, which takes a few minutes and will change theircolour. If you decide to skip the "Health Checkâ€, you can still click on the individual ECU you’re looking for and it will read only that specific ECU(you’ll be waiting a few seconds instead of minutes, its basically the same as the "Health Checkâ€, but only for that ECU).

The ECU I needed waslabelled"Smart Keyâ€(2010 RAV4, if your vehicle differs, so may your options)
Once in there, select"Utilityâ€on the left-hand side and you will arrive at this screen.

NEW SMART KEY
Now, if you had a NEW Smart Key, the process is relativelystraight forward. You can simply click on the "Smart Code Registration†option, which there are 2 of. Both options work, the Classic is older and haslessexplanations, while the new one has more text and is more user-friendly.
The steps basically consist of; 1.) only have 1 Smart Key in the car at a time, 2.) first start with the Master Key (existing key) and tap it on the ignition button, 3.) remove the key(more than 1 meter from the car)and bring the NEW Smart Key inside, tap it on the ignition button. 4.) Place the NEW Smart Key on the passenger seat until prompted otherwise. 5.) Done.
All of the steps need to be done within 30 seconds of each other, as indicated on the screen (there will be a counter counting down).
USED SMART KEY
The only option that appears to work is the "Smart Code Reset†function. I tried a number of different things but I couldn’t get the used Smart Key to register under any of them except this one (which requires a SEED code, $)
Within the "Smart Code Reset†function, you will arrive at this screen.


You can click on the"Get Pass-Codeâ€button, which will take you to another screen that allows you to copy the 96-digit SEED code(the first one doesn’t seem to let you copy, despite being able to click on it).
IMPORTANT!
Do not close the Techstream window that has the SEED code displayed(the first one).Techstreamgenerates a new SEED code every time you enter the function, so if you close out of it, you lose that session. If you re-enter it, a new SEED code will be supplied and any SEED passcode you received from a calculator will be useless(you can’t re-open a previous session).
NOTE:While you may read in Techstream that its recommended to avoid having wireless devices such are cell phones or your PC’s WiFi on when registering Smart Keys, I had my laptop with WiFi turned on for the entire process and didn’t encounter any issues or interference. With respect to supplying a calculator with your VIN# and SEED code, I would highlyrecommendedthat you do all of it through copy-paste instead of manually typing. This would help you avoid any unintentional typos(as that would end up costing you money for a new SEED passcode).
You now need to go to one of those "calculator†websites I mentioned(www.Pin-Online.net(was $15 USD) orwww.weboctopus.nl(25EUR for 5 codes)and paste your VIN# and SEED number. When I used weboctopus.nl, the 6-digit passcode was generated instantly.
Reminder #1:Do not close the Techstream window that has the SEED code displayed(the first one).
You can then go back into Techstream and paste the code in.
Reminder #2:Remember to leave the driver’s side doorOPEN. Do not close it as it will interrupt the reset procedure. If the function fails for whatever reason, DO NOT CLOSE THE DRIVER’S DOOR. You may still be able to try again or carry through with the remaining steps successfully(otherpost’shave reported so).

You will then arrive at this screen, where you simply wait for 16 minutes.

I suggest you stay nearby(I was playing a game on my phone)and set an alarm a minute before you expect the timer to end and avoid touching or moving anything(I left the laptop on the car seat and sat on the ground outside, most specifically because my particular cable was defective and had a loose connection, so I wanted to avoid any movement that may risk losing the connection).
Once the timer ends, it will tell you the procedure is complete (successfully)…but you’re not done yet!
In order to register your keys, you now need to select one of the other options (I chose "Smart Code Registration (Classic)â€).
Note #1:Previously, if you used this function, you’d choose the first option ("I am just registering keysâ€) but it would fail if you were trying to register ausedSmart Key. Now you will select the third option instead.
Note #2:In case you’re curious, choosing the third option before performing the "Smart Code Reset†will simply result in an error before you even get to load the function. It will produce a message to the effect of "Cannot initialize, reset function not detectedâ€.

(ignore the locksmith bit, I couldn’t find a better picture but will try to upload another one, with the correct option selected)
Here, you will select the third and longest option "I am Registering keys and have replaced the ID Code Box and Smart ECUor have performed Smart Code Resetâ€
When you hit next, you will be asked to eventually tap the key on the ignition button. It has been recommended by other users that the USED keybetapped first and any existing (previously linked) keys to be tapped last.
After this is done, you can click "Register†to finalize the session.
Who Like This Article Also Viewed:
Posted by: OBDexpress.co.uk at
03:22 AM
| No Comments
| Add Comment
Post contains 1614 words, total size 57 kb.
September 27, 2018
For anyone happy using TIS2000 for Saab (TIS2008-2) follow these steps:
First, get your hands on aTech 2handset
1. You will need aTIS2000 USB
2. Download and install TIS2000 for GM/NAO. You may be prompted to install the USB key – just follow the steps. When finished, don’t run the TIS2000 program.
3. Download Saab TIS2008-2. Insert into same physical/virtual CD drive you installed the TIS2000 GM from (drive letter needs to be the same).
4. Launch TIS2000 from desktop icon/start menu
5. TIS2000 should
![]() .OKthis and let it run.
.OKthis and let it run.
6. If you haven’t installed the USB key and patch do this now.
7. Launch TIS2000 and click on SPS or security access to ensure it works
8. Enjoy!
I believe this will allow re-programming of models up to 2008 only, so if you have a later model, you’ll probably need GlobalTIS.
If you’ve bought a clone Tech 2 unit I’d recommend throwing away the supplied flat RJ45/ethernet cable and replacing it with a standard ethernet cable (not cross-over) as mine was faulty and caused many headaches! The correct pin-out is provided by the RJ45 to D9 adaptor. For those interested, only pins 4 and 5 on the RJ45 socket are used (TX/RX).
IMPORTANT:
You may well have a couple of issues getting the software running initially. If your web browser refuses to connect to the TIS2Web service, it’s likely that one of the two GlobalTIS services are not running. To fix this, open the ‘services’ console either by
Start>Run and type "services.
OR
Right-click ‘My Computer†select ‘Manage’ and drill down to the services icon on the left pane.
There are two services that should be running and they’ve got obvious names, something like GlobalTIS and TC6 (not near my TIS PC at the moment) and sit next to each other in the services list. In the
To open registry editor Start>RunregeditBE CAREFUL MODIFYING THE REGISTRY – YOU CAN REALLY SCREW YOUR PC UP!!!!!
In the left pane, expand the keys until you find the following
HKLM\Software\Apache Software Foundation\Procrun2.0\Global TISTC6\Parameters\Java\JvmMx
Change the value of this key from 0X0000044 to 0X00000200 and exit the registry. Try to restart the service – you should find it now works. Don’t ask
Hope this helps someone!
Posted by: OBDexpress.co.uk at
07:46 AM
| No Comments
| Add Comment
Post contains 456 words, total size 11 kb.
September 26, 2018
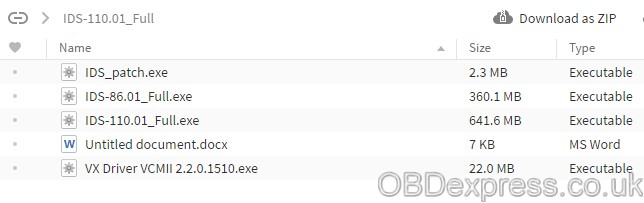
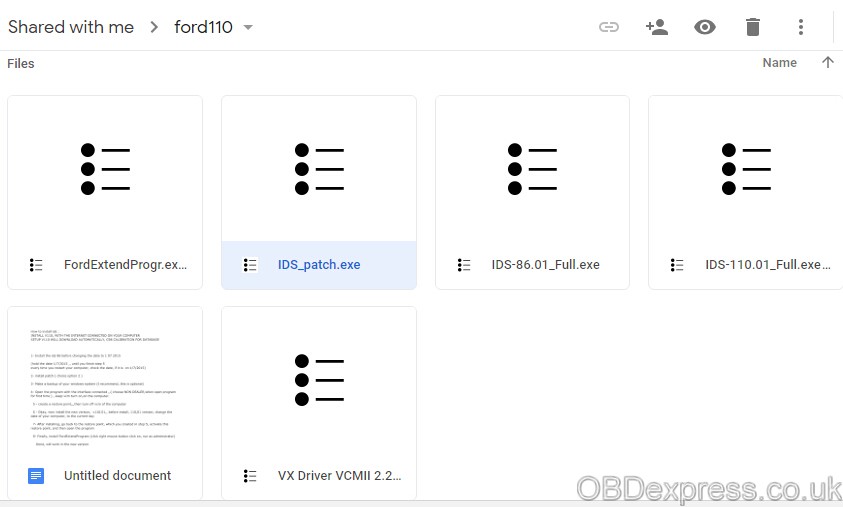
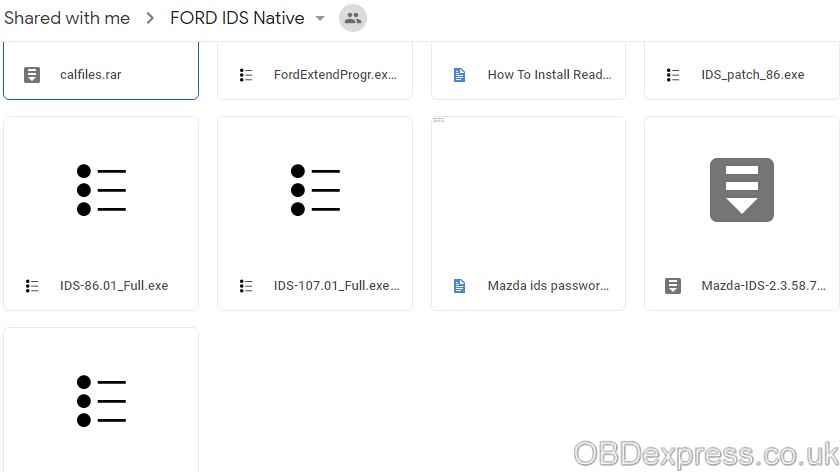
Here is the full dl for the latest Ford IDS 111.01 and Ford IDS 110.01 and 110.06/ 110.07
plus all the patches and extensions drivers etc.
including 86 and the additional necessary files.
Mazda 2.3.58.7FRD
FordExtendProgr
IDS Patch 86
IDS 86.01 full
IDS 107.01 full
Mazda ids password
calfiles
IDS Patch
IDS 110.01 full
IDS 110.07
IDS 111.01 full
VX Driver VCMII 2.2.0.1510
TM100 Key Programmer
cal 91
C98 database - install connected
Taken from
http://blog.obdexpress.co.uk/2018/09/06/ford-ids-110-download-free-how-to-install/
Full 110.01
https://mega.nz/#F!AEcHyAZY!kvD6hf2ACY7Y-qGE74jebQ
110.01 & cal 91 nativeinstall2018
https://drive.google.com/drive/folders/1fzkGAeS5wOhRp6kR0SiZD0KFxo7vrL0Ehttps://drive.google.com/drive/folders/0B3KtUv2Zp7MfN1dnRnNLX3prWUk
Video install help
https://drive.google.com/file/d/1gJ1yKgtWFgh0BmqF8JaZNXLAEqQtrRzg/view
Install online110.07 direct link - you can change the name of the file at the end forever for the latest versionhttp://www.fordservicecontent.com/Ford_Content/IDS/SoftwareUpdates/IDS-110.07.exe
Pulled directly from here
Example - so on 9-12-2018 - You can grab 111.01 direct**** They changed the link structure a little *****111.01 full-https://www.fordtechservice.dealerconnection.com/vdirs/wds/diagnosticsites/vcmdvd/idswebdownload.asp

All the current patches etc are in the files above.
Note: Latest VCI Manager/FPG v2.4.73.53 included ininstall.
HOW TO INSTALLFord IDS 111.01:
important:
Run all as admin and turn antivirus off to bypass any install issues (or not,
1. Install 86 before changing the date to 1/7/2015
- keep the date until you finish step 5
2. install patch, option 2
3. WIn back of system (optional)
4. Open program
5. create a restore point, then remove VCM
6. Change date to current ---Now,
7. After installation, roll back the restore point from step 5 and activate it. Then open the newest program
8. Installfordextendprogramand run as admin
DONE.
http://blog.obdexpress.co.uk/2018/09/26/ford-ids-111-full-download-how-to-install/
Posted by: OBDexpress.co.uk at
08:36 AM
| No Comments
| Add Comment
Post contains 266 words, total size 5 kb.
September 25, 2018
Confirmed! There is a way to use IDS software to reprogram the Ford PCMusing different calibration files.Just make sure you have the correct one - mainly from a van/vinthat has same turbo & injectors.
This is how to remap usingFord IDS crackedsoftware.
This is based on my experience(Ford Transit Custom2.2 125ps),UKbased vehicle mapped from 125 to 155ps.
YOU DO IT AT YOUR OWN RISK. YOU ARE RESPONSIBLE YOURSELF FOR ANY HARM OR DAMAGE THAT YOU SUFFER AS A RESULT. INCLUDING LOSS OF WARRANTY. I MIGHT NOT BE ABLE TO ASSIST IN CASE OF ISSUES.
Things needed:
- basic IDS knowledge (a lot of guides can be found here:http://blog.obdexpress.co.uk/use the Search button)
- IDS with programming capability (VCM2 SP177-C1,VXDIAG Nanoor similar) - cracked will do
- Your own VIN and PCM Calibration number to revert back in case of issues
- Reference vehicle details - (the hard bit - but can be found online) - needed to get the calibration numbers to use; in mycasethis was Ford Transit Custom 2.2, 155ps
The basic process is:
VERY IMPORTANT!!! - MAKE SURE YOU CAN RE-PROGRAM YOUR VEHICLE WITH YOUR OWN CALIBRATION NUMBERS (BEFORE TRYING ANY OTHER ONES). FOLLOW THIS PROCEDURE USING YOUR OWN VIN AND PCM NUMBER - THIS IS WHAT YOU WILL NEED TO DO IF THINGS DONT WORK!!!!
1) get VIN and PCM calibration number from your reference vehicle
2) runIDS softwarewithout physically connected to Vehicle
3) run Vehicle identification which will obviously fail and continue tomanualvehicle identification
4) in manual vehicle identification enter the PCM calibration number - read on below about it
5) when asked enter the reference VIN and odometer value (any)
6) now you can navigate to Module Programming (PM not PMI) and program PCM but DONT PLUG IT TO YOUR VEHICLE YET
7) you should be asked to re-enter the VIN (enter the one from the reference vehicle)
![]() you will getan warningof a low voltage
you will getan warningof a low voltage
9) connect the cable to your vehicle and follow the instructions on the screen
10) after the programming is finished (takes around 10 min on mine) - you will need to reset all adaptation values as the current ones will be invalid (this is very important)!! - MAF, Injectors, Turbo
11) go for a drive - if it has any issues (no turbo, complete lack of power, or no start) - run the same procedure with your own VIN and PCM numbers.
Now, the reference vehicle should be of similar spec to yours. Tominimiseany issues I made sure the following components are the same before trying to program its calibrations to mine:
- injectors
- turbo
-pcmHW
All of the part numbers can be checked in ECAT for your vehicle and the referenced one. You will needVINto do so.
You can search google images for vehicle registration numbers and get the VIN using ETIS Online. You need the VIN to get part numbers in ECAT (injectors, turbo,pcm). If the numbers match (dot to dot) run both the VINs through ETIS Online and check modules HW numbers. Make sure the HW number of PCM is the same and other modules are not far off.
The alternative way of finding reference VIN is just using ETIS Online - just experiment entering VIN that is next to yours (serial number). My reference vehicle was 1 serial number below my VIN
Once you happy with your reference vehicle - we can move on and find the calibration numbers for it.
Go back to ETIS Online and write down the SW number for PCM (calibration numbers). It will be in the following format: BK21-14C204-BNU. The last character is the revision of the calibration - BK21-14C204-BNP was before BK21-14C204-BNU and BK21-14C204-BNUwasbefore BK21-14C204-BNV.
When entering the calibration in IDS you will need to use any but the latest (otherwise IDS won't let you upgrade).
You can check the calibration revisions here:https://www.fordtechservice.dealerconnec...roduct=IDS
just enter the SW parts and try changing the revision number. You will quickly figure out what revisions are available.
Fingers crossed
Source:http://blog.obdexpress.co.uk/2018/09/25/ford-transit-custom-pcm-calibration-reprogramming/
Posted by: OBDexpress.co.uk at
06:10 AM
| No Comments
| Add Comment
Post contains 677 words, total size 5 kb.
September 22, 2018
Customer puzzle:
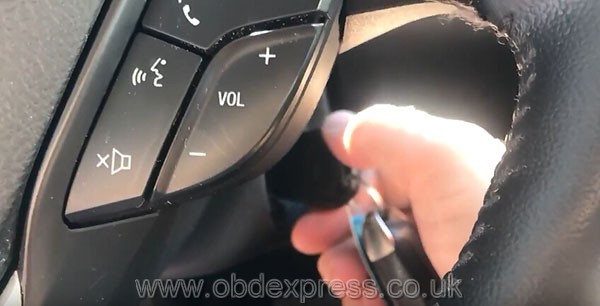
Can I use Otosys Im600 to program a
Obdexpress.co.ukcustomer service:
Yes, yours
Btw, if your car is listed in theAuroDiag Otosys IM100or IM600 car list, try again and you will have success.
Here is the test report of Otosys IM600 on you model, 2014 Ford Fusion…
The car

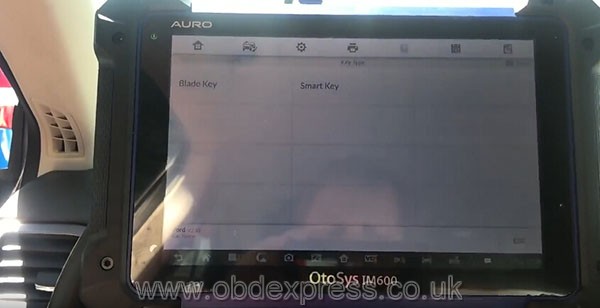
The blade key to be programmed

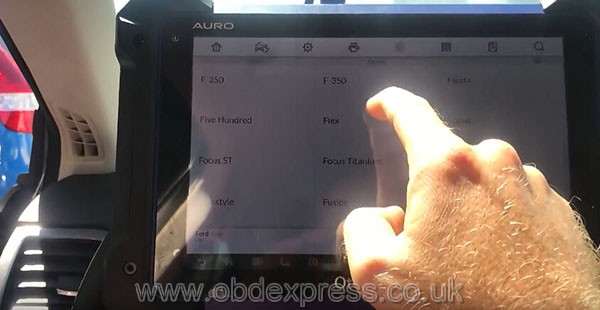
Selected the car: 2014 Ford Fusion
Ford – Manual selection – USA – Fusion – 2013-2018 (IT’S 2014)


OtosysIm600 started to add a remote
(the same as Otosys IM100)
Blade key – Immobilizer (CAN) – Add keys
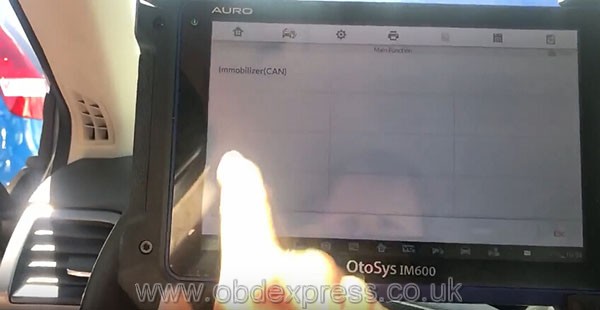

Had to learn and erase keys


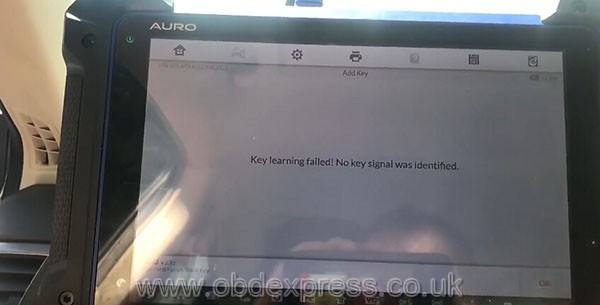

Failed to learn keys…
Then tried again
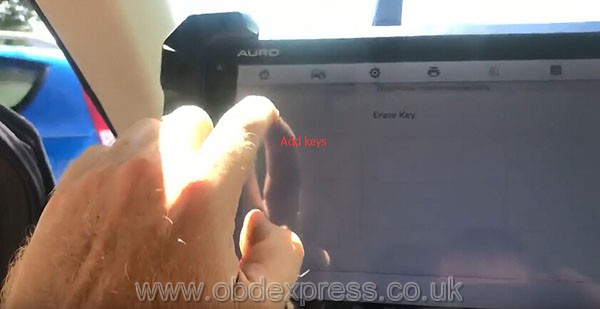


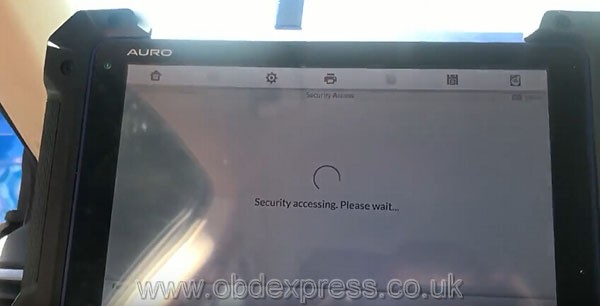


Success! Managed to learn keys: 2 and programmed a new key
Now keys: 3
Job’s done!
If you interested in Auro IM600,
2.Email:sales@OBDexpress.co.uk
3.Skype: bd2express.co.uk" data-blogger-escaped-style="border: 0px; color: #00aae1; font-family: inherit; font-size: inherit; font-stretch: inherit; font-style: inherit; font-variant: inherit; font-weight: 600; line-height: inherit; margin: 0px; padding: 0px; text-decoration-line: none; vertical-align: baseline;" data-blogger-escaped-target="_blank" rel="noopener">obd2express.co.uk
4.WhatsApp:+86-18750906257
Who Like This Article Also Viewed:
Posted by: OBDexpress.co.uk at
07:30 AM
| No Comments
| Add Comment
Post contains 219 words, total size 43 kb.
September 21, 2018
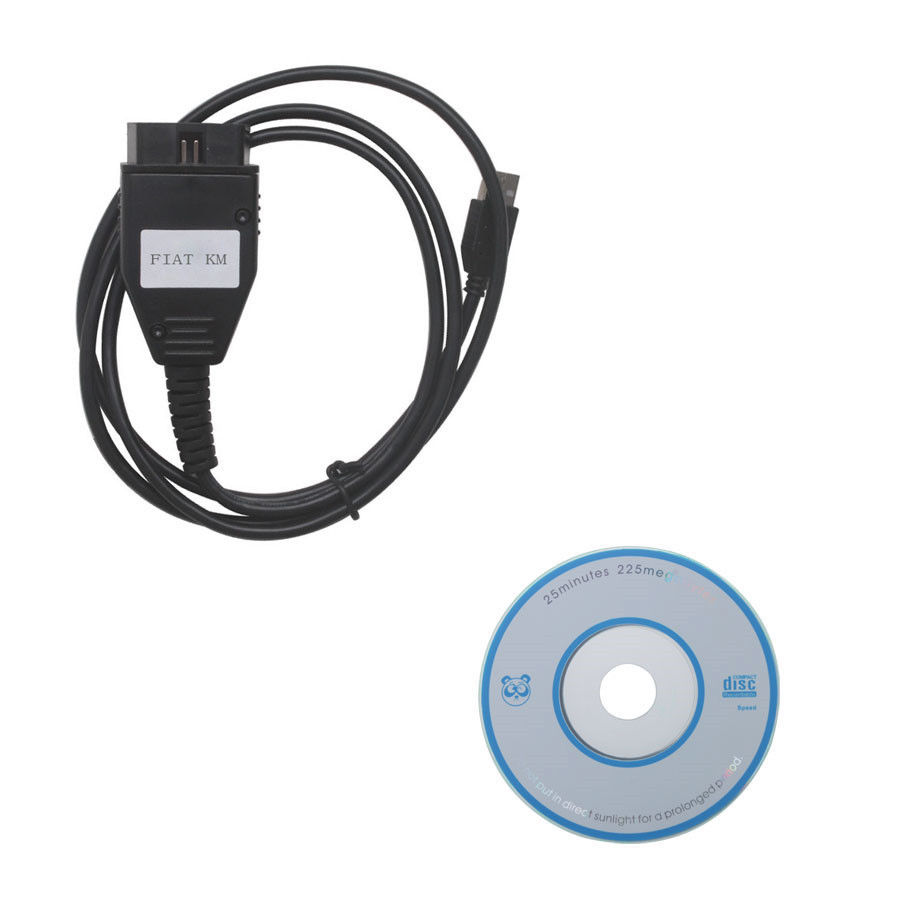
This is for those looking for a decent FIATodometer correction tool.
The topic starts here coz it’s hard to find a good tool to change mileage for FIAT.
Here, we’ll talk about two Fiat odometer correction tools, which discussed a lot on the web. One is KM Tool for Fiat, the other is Obdstar X30M.

What is Obdstar X300M:
ObdstarX300M is a universal odometer correction tool for professionals or personal use. And a lot of FIAT is listed.
What isKM TOOL for Fiat?
Fiat KM TOOL is designed for mileage change for most old Fiat and some Citroen, LanciaandMasarati.
ObdstarX300M
User-friendly: Obdstar X300M wins!
TheObdstaris hand-held and comes with a screen.
The KM Tool is a cable with software installed on a laptop only.
Software update: Obdstar X300M wins!
TheObdstarswis updated frequently online, for FREE;
The KM Tool cannot
Vehicle coverage: Obdstar X300M wins!
TheObdstaris good for new Fiat;
The KM Tool only works with old Fiat.
Look at the Fiat car list:
KM TOOL Fiat car list
ObdstarX300M Fiat car list
In detail...
KM TOOL Fiat odometer mileage car list
Fiat Punto 99-2002motorola
Fiat Punto 99-2002nec
Fiat Punto 2002-2006nec
Fiat Ducato 2006/2007 95080
Fiat Doblo 99-2006motorola
Fiat Doblo 99-2006nec
Fiat Panda 2004-2007 95040
Fiat Panda 2004-2007 95080
Fiat Idea 2004-2007 95040
Fiat Idea 2004-2007 95080
Fiat Croma 2005-2007
Fiat Bravo 2005-2007
Fiat Grande Punto
Fiat Ducato 2006...
Citroen Jumper 2006...
Lancia Musa 2006-2007
Masarati Quattro Porte 2005-2006
OBDSTARx300M Fiat odometer mileage car list
FIAT V31.03
ODOMETER_MILEAGE
500
500
500L
500 TFT
500X
Type 1
Type 2
500X TFT
Albea
95040
Brava
95040
Bravo
95040
Croma
95040
Doblo
95040
2011
2015
Ducato
95040
2011-
2015
Fiorino
Freemont
2012
Grandepunto
Idea
95040
Linea
95040
Marelli(Auto)
Palio
95040
MM95160
VDO
Panda
95040
2012
Punto
95040
95160 2015
EVO
Qubo
Siena
VDO
Stilo
HC -2005
HCS 2005-
Strada
VDO
TORO
2016
2017
Uno way
VDO
MM 2015

Source:http://www.mileageprogrammer.com/fiat-odometer-correction-tool-obdstar-x300m-vs-km-tool/
PS.OBDSTARX300M mileage programmer released new upgrade and adds Mercedes Benz, Volvo, Fiat, VW Audi MQB odometer correction by OBD.
Click the link to see
Posted by: OBDexpress.co.uk at
03:24 AM
| No Comments
| Add Comment
Post contains 359 words, total size 12 kb.
September 19, 2018
LonsdorK518ISEtest report:
Have added new keys to Renault Megane 2 3 4
Here you go.
Lonsdork518 andMegane 2:
Yes. Renault Megane 2 2008 year add new keys OK
Card smart key

Lonsdork518 andMegane 3:
Already done withLonsdorfor Megane3 2014.

Lonsdork518 andMegane4:
Megane4is not only able to be made by Avdi...
but now, MEGANE 4 done
Have made the card with 4 buttons
That's what the Megan 4 Card looks like.

Conclusion:
LonsdorK518ise andMegane 2: Yes!
LonsdorK518ise andMegane3: Yes!
LonsdorK518ise andMegane4: yes!
LonsdorK518ise key programming at a decent price:
http://www.obdexpress.co.uk/wholesale/lonsdor-k5181se-
Posted by: OBDexpress.co.uk at
07:29 AM
| No Comments
| Add Comment
Post contains 104 words, total size 4 kb.
September 17, 2018
How-to's
It’s aimed to cut a Jaguar 8 cut key with a Condor Mini machine
Have just cut the key and it seems to be 1 cut in front / 1 cut behind in placement.

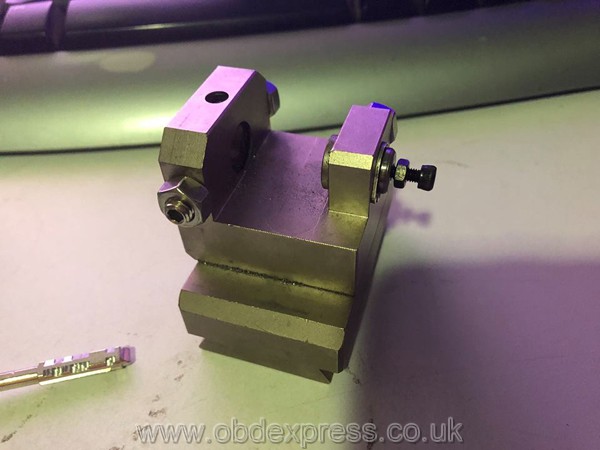

Q: How far should this screw be in / how far out should it be??
A: tbe1

Q: How much does the rear screw need to stick out?
A: It is necessary to re-adjust the position of the key in the vice.
Q: what the best way to make sure it lines up in the correct place perfectly.
A: With the correct attitude, the machine itself will go to the right distance to puncture the key into the position of the first secret. at
Q: I will give it another go fingers crossed lol
A: if properly configured for the Ford device, then do not re-adjust the vise of the length of the bolt. stand the workpiece of the key and cut it

Q: how far out do you have your screw?
A: in the vice, the key is the Ford, and the milling cutter has entered the required length independently. Do not be afraid
Q: the last cutidid was wrong it wastofar forward by nearly a complete cut

A: It is necessary to adjust when the milling cutter stands in such
you do not have a vise
as you adjust the screw, tighten the fixing nut so that the screw does not hang and unwind. I'm sorry, I've got to go to the client.
try to insert the key deeper. with effort.
Source:http://blog.obdexpress.co.uk/2018/09/17/condor-mini-tibbe-jaw-m3-cut-jaguar-8-cut-key/
Posted by: OBDexpress.co.uk at
02:46 AM
| No Comments
| Add Comment
Post contains 326 words, total size 7 kb.
September 13, 2018
Here areFGTech GallettoWindows 10 installation tips and guides, including how to solve FGTech error "driver is not digitally signedâ€
It’s possible that the PC cannot recognize
The reason can be: the driver is not installed
If you try to install the driver manually through the peripheral management it will display the following error message: This driver is not digitally signed
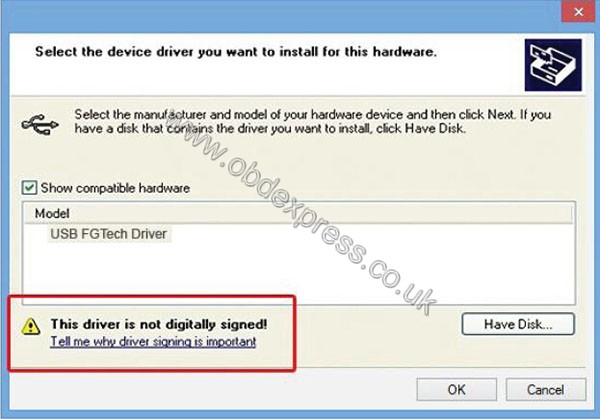
It’s possible to solve the program in Windows 7 operation system
Even if it does not accept the driver manually, you can disable the control if the driver signing
Here you go...
Reboot the PC in an advanced mode
On Desktop, open the Charm Bar to the right can click on Change PC Settings

Now. Click on General - Restart now

PC will restart in an advanced mode
Onwindows10, it will appear the following interface
Click on Troubleshoot - Advanced options - Startup Settings - Restart
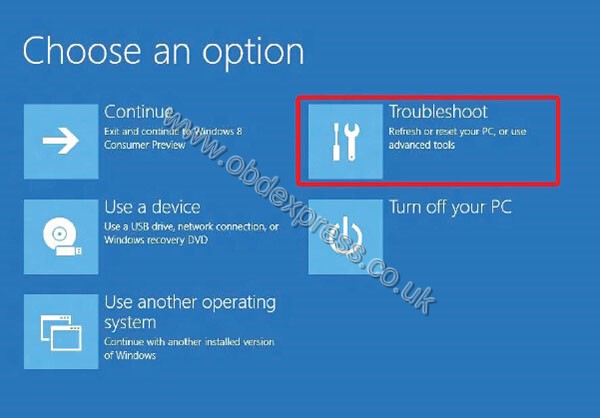
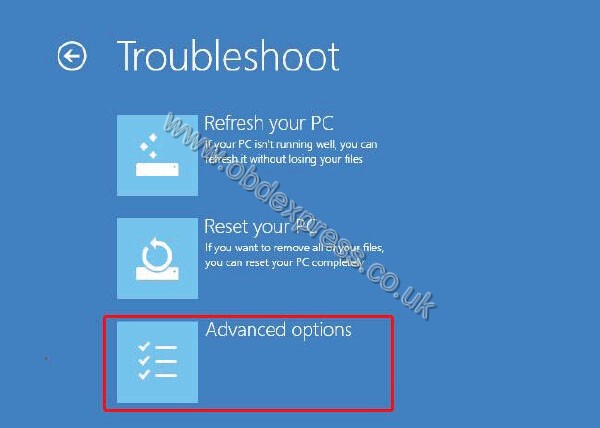
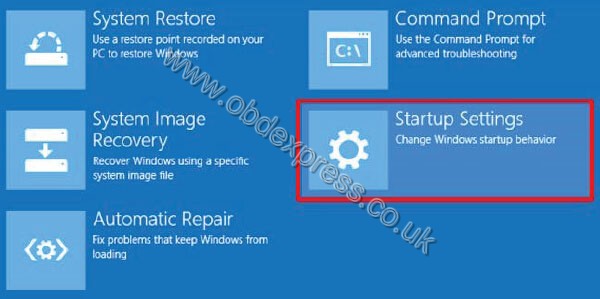
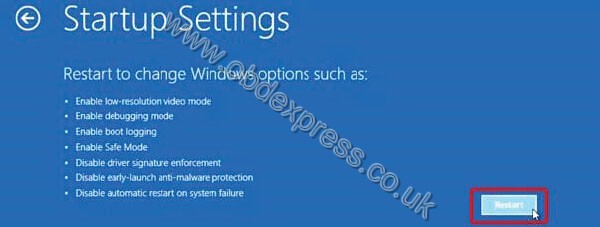
PC restarts, then go to Startup settings
Disable driver signature enforcement
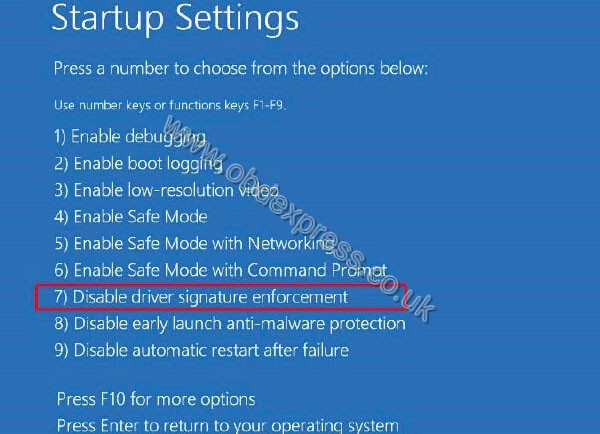
PC will restart
Then you can install the FGTech driver
soft is
mostly problems with software no
trying on
Aceraspire5920ativideo no work
HP Compaq 610nvidiaworkgood
Acer Aspire 6930nvidiaworkgood
readfantomelpost download software install C/
pluggallettousbinstall driver from software C/Program files/Fgth/drivers.
many
Have fun
Source:http://blog.obdexpress.co.uk/2018/09/13/how-to-install-fgtech-galleto-on-windows10/
Posted by: OBDexpress.co.uk at
08:37 AM
| No Comments
| Add Comment
Post contains 264 words, total size 13 kb.
Obdexpress.co.ukupdated a new real test:
FLY FVDI J2534 Test Report: Ford ECU diagnosis wit ScanMaster-ELM
What isFVDI J2534:
FVDI J2534 is a vehicle communication interface device thatfullcompatible with SAE J2534-1 and partly compatible with SAE J2534-2. It supports most of vehicle communication protocols and can be used asPassThrudevice for many dealer level diagnostic software. And it can be used asa ELM327device also, support most ofELM327software.
What isScanMaster-ELM:
ScanMaster-ELM isa OBD-2/EOBDdiagnostic scan tool for vehicle diagnostics under OBD-II/EOBD standards that were developed specifically for the ELM327 chip from the company ELM Electronics and supports all 10 in SAE J1979 defined OBD-2 diagnostic modes $01 - $0A and all communications protocols.
ScanMaster-ELM Installtion demo:
FLY FVDI J2534Tested with ScanMaster-ELM:


What can you do with ScanMaster-ELM onFVDI J2534:
ScanMaster-ELM is an OBD-II / EOBD Diagnostic Tool for vehicle diagnostics to the extent required by law in accordance with OBD-II / EOBD standards developed specifically for ELM Electronics' ELM327 chip and supports all 10 OBD- 2s defined in SAE J1979 Diagnostic modes $ 01- $ 0A and all communication protocols:
- ISO9141-2
- ISO14230-4 (KWP2000) almost init
- ISO14230-4 (KWP2000) slow init
- SAE J1850 VPW
- SAE J1850 PWM
- ISO15765-4 (CAN bus) 11/250
- ISO15765-4 (CAN Bus) 11/500
- ISO15765-4 (CAN bus) 29/250
- ISO15765-4 (CAN bus) 29/500
In conjunction with an ELM327- based interface, ScanMaster is an ideal OBD solution (also known as ScanTool or OBD Scanner) for diagnosing all OBD-2 capable systems and is very well suited for automotive workshops as well as experienced home users and hobbyists.
All ECUs in the vehicle that support OBD-2 are automatically detected and can be diagnosed with our software.In many vehicles, these include the automatic transmission, brake systems, powertrainandother control devices.
Among other things besides the standardized diagnostic possibilities, the software offers extensive additional functions and evaluations, which are based on the data from the diagnostic interface.These are for example:
- The measurement and live display of fuel consumption
- Acceleration measurement of the vehicle from 0-100 km / h
- A very comprehensive power measurement, which enables the performance measurement (KW / PS and Nm) of the engine without much effort and expensive Dyno test bench
- Reading out and deleting error codes on older OBD-1 Opel and Alfa Romeo vehicles
- Dashboard (instrument cluster), optimized for touch control
- diagnostic Report
ScanMaster-ELM languages:
The following language translations are integrated into the program:
![]() German/
German/![]() English/
English/![]() Czech/
Czech/![]() Danish/
Danish/![]() Spanish /
Spanish /![]() French/
French/![]() Croatian/
Croatian/![]() Hungarian/
Hungarian/![]() Italian/
Italian/![]() Polish/
Polish/![]() Serbian/
Serbian/![]() Turkish
Turkish
ScanMaster-ELM car list:
- All petrol cars registered in the EU fromyear2001 and diesel fromyear2004, regardless of make and model.
- Vehicles registered in the USA from 1996 onwards.
- Special functions for older OBD-1 Opel and Alfa Romeo vehicles from year approx. 1996-2001 (see description above).
Alfa Romeo, Alpina, Aston Martin, Audi, Arden, BMW, Brilliance, Buick, Cadillac, Chevrolet, Citroen, Chrysler, Daewoo, Daihatsu, Dacia, De Lorean, De Tomaso, Dodge, Ferrari, Fiat, Ford, General Motors , GMC, Honda, Hummer, Hyundai, Isuzu, Jaguar, Jeep, Kia, Lada, Lamborghini, Lancia, Land Rover, Lexus, Lincoln, Lotus, Marcos, Maybach, Maserati, Mazda, Mercedes-Benz, Mercury, MG, MCC Smart , Morgan, Mini, Mitsubishi, Nissan, Oldsmobile, Opel, Peugeot, Plymouth, Porsche, Proton, Renault, Rolls-Royce, Rover, Saab, Seat, Skoda,Sangyong, Subaru, Suzuki, Toyota, Volkswagen, Volvo
Source: https://www.wgsoft.de/...scanmaster-elm-links.html
Source:http://blog.obdexpress.co.uk/2018/09/12/fvdi-j2534-review-with-scanmaster-elm-on-ford-ecu/
Posted by: OBDexpress.co.uk at
01:56 AM
| No Comments
| Add Comment
Post contains 525 words, total size 18 kb.
September 11, 2018
Confirmed!OtoSys100will be able to do the same key programming as im600
About same, but if you need to do Mercedes-Benz, you need to buy aUP400 programmer
IM100+UP400 will have the
With the up400 apart from the Mercedes key programming, your Otosys IM100 will have features likebmwcas4 key learning, 2015-2018 Land Rover&Jaguar Key Writing, Volvo Smart Key Learning
Most
OtosysIM100 will work like Auro IM600 for immobilizer features and read PIN/CS from AUDI Q5/A4/A5 2015-2017 and learn keys to Mercedes-Benz

OtoSysIM100 immobilizer functions:
|
Immobilizer functions and features |
||
|
Smart Mode (Guided and Automated Key Learning Function) |
X |
X |
|
Auto Detect Make/Model/Year/System |
X |
X |
|
Read PIN/CS |
X |
X |
|
Read PIN/CS (All Keys Lost) |
X |
X |
|
Key Learning |
X |
X |
|
IMMO ECU Reset/Adaption |
X |
X |
|
IMMO ECU Refresh/Coding |
X |
X |
|
Remote Learning |
X |
X |
|
AUDI Q5/A4/A5 2015-2017 Read PIN/CS |
With UP400 |
X |
|
BMW FEM/BDC Key Learning and Adaption |
X |
X |
|
Mercedes Key Learning |
With UP400 |
X |
Tech supportfrom:http://rtqobd2.ivoire-blog.com/archive/2018/09/11/otosys-im100-will-work-like-auro-im600-how-to-do-474379.html
Contact with
2.Email:sales@OBDexpress.co.uk
4.WhatsApp:+86-18750906257
Posted by: OBDexpress.co.uk at
03:51 AM
| No Comments
| Add Comment
Post contains 185 words, total size 35 kb.
September 10, 2018
Post contains 944 words, total size 25 kb.
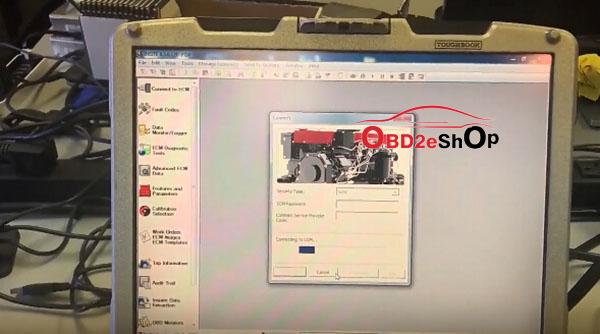
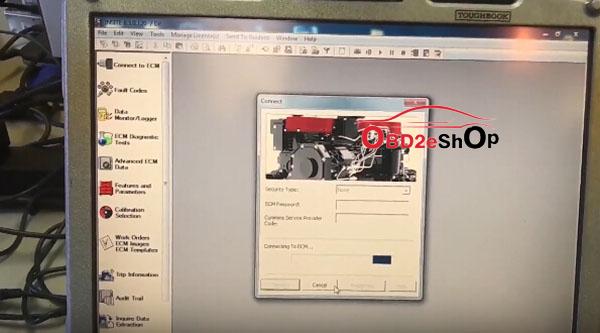
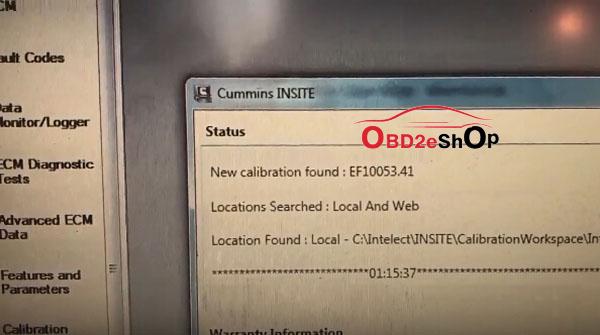
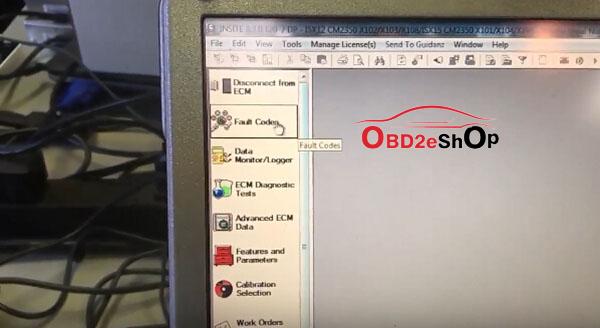
Here is the three using tips ofCummins INLINE 7 Insite8.3,Cumminsinline 7 data link adapter v2.1.0013 Setup on win7 win10, Cummins inline 7insite8.3 diagnosis.
Part 1: Cummins INLINE 7 Insite 8.3 using tips
Part 2: Cummins inline 7 data link adapter v2.1.0013 Setup
Part 3: Cummins inline 7insite8.3 diagnosis
Part 1: Cummins INLINE 7 Insite 8.3 using tips
- INLINE 7 can run the driver of INLINE6.
- Insite 8.3 Crackactivation:
The user has to use thesupplier's Insite 8.3 Crack software to submit andwaitthe server to authorize tillsucceed,so it may take some time, after success, the software is combined with your computer.
- Do not directly open the Inline 8.3 after installed, you need to go through the supplier's software and use Inline 8.3.
- AfterInline 8.3 is authorized successfully, the user can use 3 years for free for 70 times,generallythe user is supposed to get authorization every month (that is within 3years,after the times is used up, the user can get authorization by themselves). After 3 years, the user will be charged.
- After activation, the user is disallowed to change motherboard, memoryandCPU. If you change them, you have to submit the Inline 7 serial number to the seller for activation.
- The Calibrations in the Inline 7 U disk can be used for 6 months, after 6 months later you can search"Inline Calibrations"on Google and download to use.
- If you install Chineseinsite8.3, then you have to use the Chinese "Cummins License Configuration tool"; if you choose the other language to installinsite8.3, then use the English "Cummins License Configuration tool", because the dealer code is not the same.
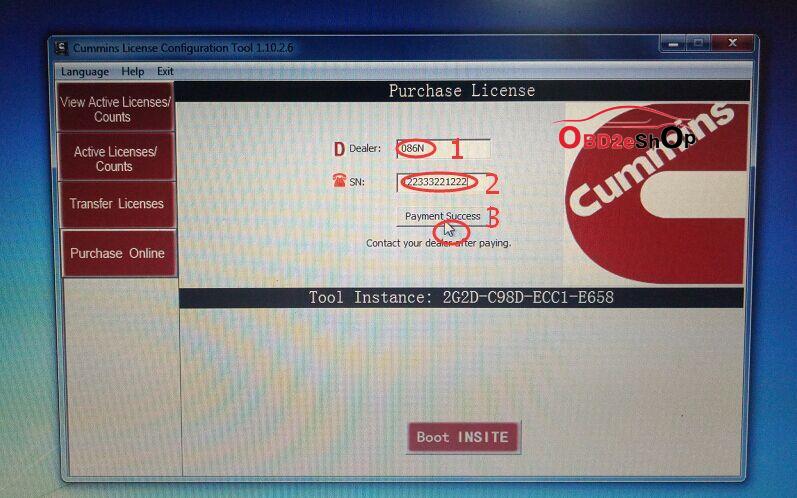
Chinese dealer code: 010C
English dealer code: 086N
- After input Dealer code and serial number, please click on " Payment success", then provide the dealer with the serial number for processing in the server, again you click on " Payment success" and you will receive a message indicating success.
Part 2: Cummins inline 7 data link adapter v2.1.0013 Setup
- Extract zip and Double-click on the setup.exe file to run the install.
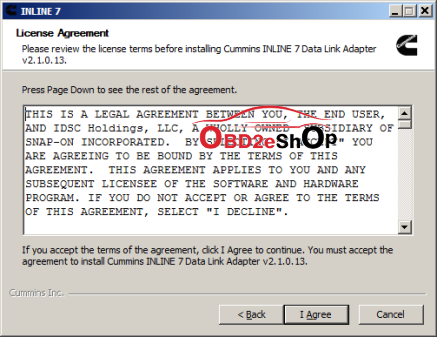
- The Welcome to INlINE7 Setup screen is displayed and please carefully read the information to follow the recommendations. Then click Next.

- Read all the allinformationon this screen, then click I Agree
- Carefully read the warning message, and disconnect all RP1210 adapters to which your laptop or PC might be connected prior to proceeding with the installation.
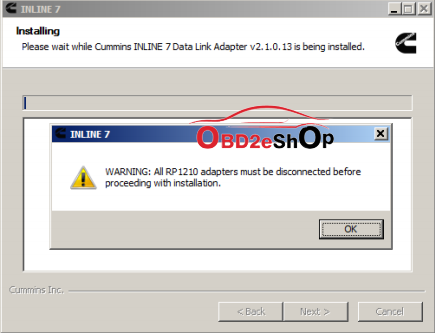
- Once you have complied with the requirements of the warning message, click OKto continue.

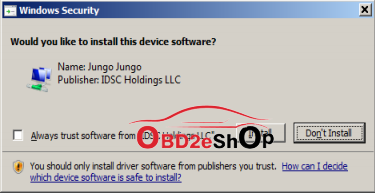
- If you are running Windows 7 or Windows 8, the following Windows Security dialog may be displayed.Click install to continue.
- Click Next when the Installation Complete screen is displayed.
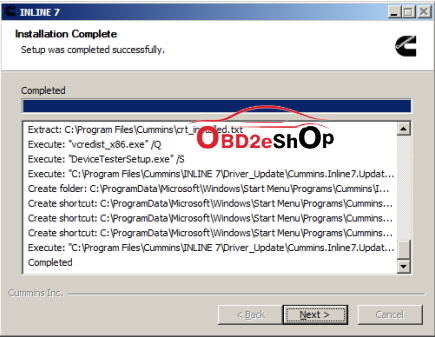
- Click Finish to finish installing
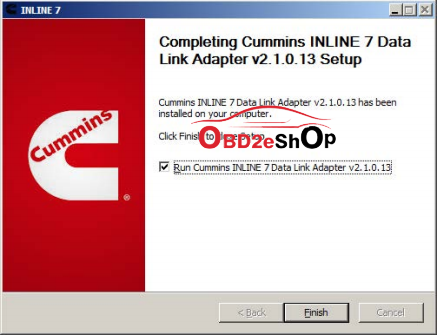
Cummins INLINE 7 Data Link Adapter driver has been installed on your computer that you can use all services of Cummins INLINE 7 on your vehicle.
Part 3: Cummins inline 7insite8.3 diagnosis
Cummins inline 7insite8.3 is tested ok to read & clear trouble codes.
Software version: Insite 8.3.0.120
Cummins Inline 7insite8.3 get ready
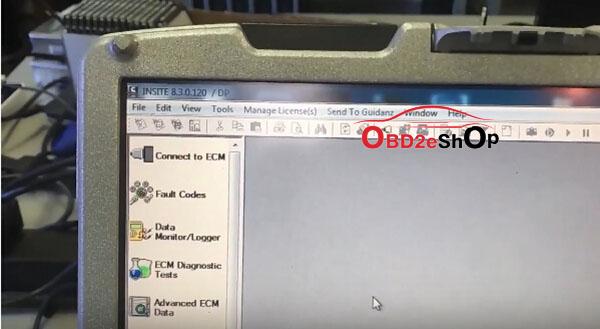
Cumminsinsite8.3fault codes:
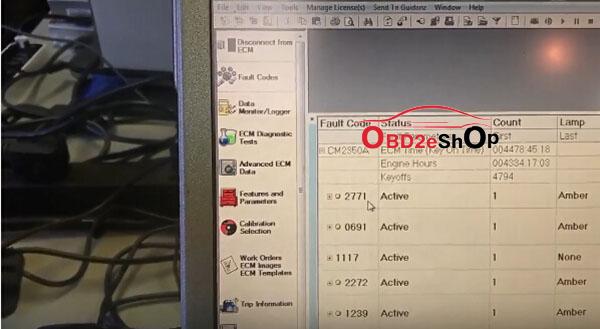

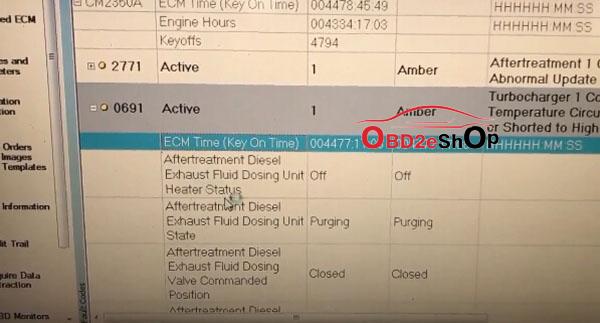
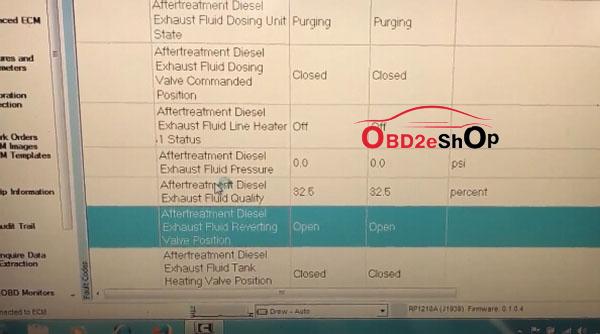

Fault codes are Cummins way of letting you know that your engine has a problem. Every sensor and circuit on your engine has acertainexpected reading and voltage signal. These signals are monitored constantly by the Cummins ECM. If values rise above or below expected, the ECM will log a code.
If the error has occurred but is not happening at the time of diagnostics, it is known as an Inactive Fault. If the error is happening while you diagnose, it is known as an Active Fault.
All codes can be classified as either Active or Inactive, and their status can be determined by flash codes or through the Insite Electronic Service Tool.
the ECM will log a code.
If the error has occurred but is not happening at the time of diagnostics, it is known as an Inactive Fault. If the error is happening while you diagnose, it is known as an Active Fault.
All codes can be classified as either Active or Inactive, and their status can be determined by flash codes or through the Insite Electronic Service Tool.
What is new of Fault Codes in Cummins INSITE version 8:
– Fault Codes window displays an engine's fault data
– Fault Codes include both engine faults and engine protection faults
– Each fault is represented by a Cummins fault code
- Indicates a specific malfunction or abnormal condition within the controller, subsystem, or
engine
– Ability to link to Fault Information System for Troubleshooting Information

What’s new in Fault Codes Sorting inCummins INSITE 8:
Fault Codes can be sorted by either thecolumn,or by right click for multiple column sorting
The Fault Code data can be sorted by clicking on the column header for a single column sort
The data will be sorted based on the selected column in ascending order. Click on the column header again to resort the data in descending order
Note: Sorting can only be used on the Fault Code, Status, Count, or Lamp columns
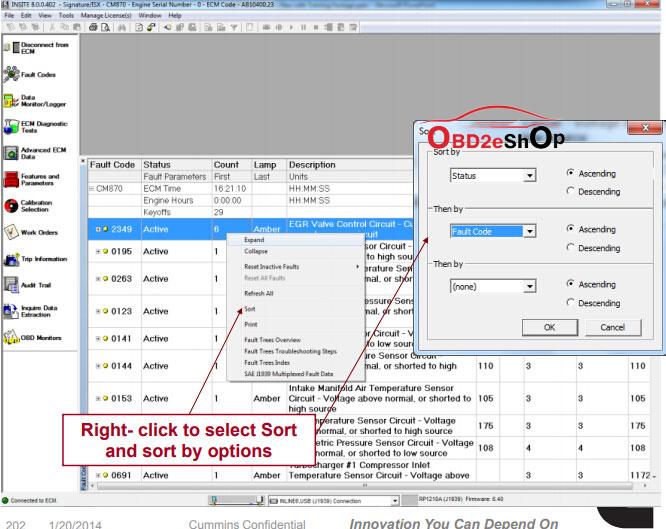
What’s new in Fault Codes Wrap Up in Cummins INSITE 8:
 Fault Codes window shows active and inactive Fault Codes
Alternate click
– Link to Fault Information System for Troubleshooting information
– Clear Inactive Faults
 Links to Troubleshooting available in the Fault Information System
Related Posts:
- Cummins Inline 6 VS Inline 7 in software and hardware (3)
- Comparison between Cummins Insite 8.1 Basic, Lite and Pro Versions (2)
- How to solve ECM Connection Error 5204 5202 5201 5200 ofCummins Insite (2)
- Free download 2017.06 Cummins INCAL Calibrations (2)
- What to do when Cummins Insite 8.1 Registration Error occur (2)
Source:
Posted by: OBDexpress.co.uk at
01:59 AM
| No Comments
| Add Comment
Post contains 935 words, total size 28 kb.
September 07, 2018
How-to:installBMW INPA 5.0.6 softwareon Windows 7 or Windows 8 32 bit or 64 bit to get it to work with a K+DCAN cable.
Software version: INPA 5.0.6
Operation system:
Windows 7 32 or 64 bit
Windows 8 32 or 64 bit
Installation tips and guides:
STEP 1: INSTALLING BMW STANDARD TOOLS
STEP 2: INSTALLING INPA
STEP 3: INSTALLING NCSEXPERT IN ENGLISH
STEP 4: INSTALLING &CONFIGURATINGDCAN INPA CABLE
STEP 5: CHANGING THE OBD.INI
STEP 6:SPDATENFILES
In detail...
STEP 1: INSTALLING BMW STANDARD TOOLS
Download and install BST 212
Since BST (BMW Standard Tools) was designed for Win XP 32bit operating
Systems, users have faced issues with tools like WinKFP and NCSExpert since Win
7 64bit systems have been introduced. Running in XP compatibility mode just
wasn't enough. Presenting you with several errors or not running at all.Only
solution was to install ona XPsystem or like me... XP VMware. Well that all
changed with BST 2.12 which works on 32 or 64bit systems.
WIN 7/8, 32/64bit OS
STEP 2: INSTALLING INPA software
(will need it after coding certain modules such as DME for CAS
or EWS Alignment)
Download and install my version of INPA 5.06 with Fxx Support by simply
replacing the existing folders with the folders provided in the
Replace C:\EC-Apps\INPA
Replace C:\EDIABAS
STEP 3: INSTALLING NCSEXPERT IN ENGLISH
Download and install NCSEXPER32_ENG.zip
Copy and replace contents in the .zip file with contents inC:\NCSEXPER\BIN.Now
NSCExpert is in English but you will find the Hot Keys do not work. This is a bug a
fellow MHH member discovered and haven't really worked on trying to fix it so for
the time being just click on the F# key with your mouse.
Not done yet with NCSExpert. Need to import profiles to NCSExpert. How? well
download the PFL.zip and copy and replace all contents from PFL.zip
to C:\NCSExpert\PFL. (you will also find a lot more PFL's by searching for
NCSExpert profiles in Google)
Now you have a working WinKFP and NCSExpert with profiles loaded on your PC
we can continue to Step 4.
STEP 4: INSTALLING &CONFIGURATINGDCAN INPA CABLE
Configure your DCAN/INPA cable. If you followed my steps correctlythanyour
EDIABAS should already be configured to STD:OBDfor use with the INPA cable. If
not you can downloadediabas-konfiguratorfrom here if it is not already in
yourC:\EDIABAS\Ediabas-Konfiguratorfolder. This tool allows you to easily
change the ediabas.ini to your desired interface. So if you are switching
from INPA to E-Sys you could use this to switch from STD:OBDto ENET.
Now to set your COM Port we must first find which COM port is being used for
your cable.
Connect your cable to your PC (some may require a 12v supply to power the
cable)
Allow the device drivers to install (for best driver use the driver that came with
your cable. If not then let windows install the best suitable driver for it)
Navigate to Control Panel, Device Manager, and scroll to Ports (COM & LPT)...look at the pic

So in mycaseit's COM5. So we need to change this in the obd.ini file located in
thec:\ediabas\bin folder. But firstletsmake some changes to the cable.
Right click on your INPA cable driver for example mine islabelled"USB Serial
Port" and click on properties. Now in the property window click on the advanced
tab.

Now every driver is different but the important part is the settings such aslatency
timer and received and transmit bytes. See picbellowfor the ideal settings. You
may also change the COM port number here as well fortutorialI left it at 5. Once
your changes are done we can proceed by clicking OK to accept the changes. No
close all windows to return to the desktop.

STEP 5: CHANGING THE OBD.INI
Navigate toC:\EDIABAS\BINand find file obd.ini and open it with an editor such
asnotepad.
First 3 lines will look like this...
[OBD]
Port=Com1
Hardware=USB
So we need to change the Port to reflect our INPA cable which in our case is COM
port 5. So change it to look like this...
[OBD]
Port=Com5
Hardware=USB
When done click File -> Save and exit out.
Very important to remember which USB port you connected your cable to as
plugging it into a different USB port will allocate the INPA cable to a different
COM port and neither tool will see the cable until the original USB port is used
again or changed in device manager and obd.ini as mentioned above.
Now to test if your cable installed correctly. Plug it into the vehicle's OBD port and
open INPA. You should look like this...
If not follow the above steps again and correct your error.
STEP 6:SPDATENFILES
Download and install SPDaten files of your choice (always recommend the latest)
in thiscaseit is 51.2. Once downloaded you can now follow the instructions
provided bellowlabelled"How_to_start_WinKFP.pdf" this will explain how to
import the SPDaten files to WinKFP.
Edit to update:
For NCSExpert to install or update thedatenfiles, copy the files fromSP-daten-
E##\datento theC:\NCSEXPER\DATEN\E##\(where E## is whatever chassis
you're updating). You will also want to copy the files fromSP-daten-
E##\SGDATtoC:\NCSEXPER\SGDAT(they're not separated into different chassis
in NCS Expert, so you just want to copy and paste everything to that directory.
Overwrite everything it asks about). Then copy the files fromSP-daten-E##\ECU
to C:\EDIABAS\ECU
After copying thedatenfiles to c:\NCSEXPER\DATEN\E## copy the following files
to the following locations:
copy C:\NCSEXPER\DATEN\E##\*.000 C:\NCSEXPER\DATEN\
copy C:\NCSEXPER\DATEN\E##\*.DAT C:\NCSEXPER\DATEN\
copy C:\NCSEXPER\DATEN\E##\*.ASC C:\NCSEXPER\DATEN\
Who Like This Article Also Viewed:
Posted by: OBDexpress.co.uk at
08:22 AM
| No Comments
| Add Comment
Post contains 952 words, total size 17 kb.
September 06, 2018
Post contains 211 words, total size 25 kb.
Ford IDS 110 download FREE:

FORD IDS 110.01 & cal 91 Native install 2018
IMPORTANT: Ford IDS 110 above has NOT been tested by real professionals.
If you are looking for IDS with security and relief, this is what you should haveï¼›
You can find that Ford IDS 110 is updated there.
Confirmed to work withVCM2 SP177-C1andVXDIAG VCX NANO Ford
How to installFord IDS 110 software:
Ford IDS 110 Install – Video Help:
Important: INSTALL V110, WITH THE INTERNET CONNECTED ON YOUR COMPUTER
SETUP V110 WILL DOWNLOAD AUTOMATICALLY, C98 CALIBRATION FOR DATABASE
Step by step installFord IDS 110:
1- Install the ids 86 before changing the date to 1 07 2015
(hold the
every time you restart your computer, check
2- install patch ( choice option 2 )
3- Make a backup of your windows system (I recommend, this is optional)
4- Open the program with the
5 – create a restore point
6 – Okay, now install the new version, v110.01
7- After installing, go back to the restore point, which you created in step 5, activate this restore point, and then open the program
8- Finally, install FordExtendProgram (click right mouse button click on, run as administrator)
Done, will work in the new version
Posted by: OBDexpress.co.uk at
07:42 AM
| No Comments
| Add Comment
Post contains 267 words, total size 30 kb.
September 04, 2018
I bought
Sometimes I feel that I’m actually even smarter than most techs that work in the service departments at dealerships. And if I’m not any smarter, at least I’ll care more, and take the time to figure it out because it’s my own vehicle.
I had looked through lots of diagnostic tools
I received the tool withTIS2000 CDfor TECH2 GM Car Model Software which can support for till2007year GM car programming.
The Tech 2 unit (handset) can be used to interrogate the various management modules on the car (ECU) to report status, fault codes and perform manual activation and monitoring in the event of fault occurrences/engine management light occurrences. This in itself is incredibly useful, but it is also possible to reprogram modules within the car to change various functions and add or replace faulty modules
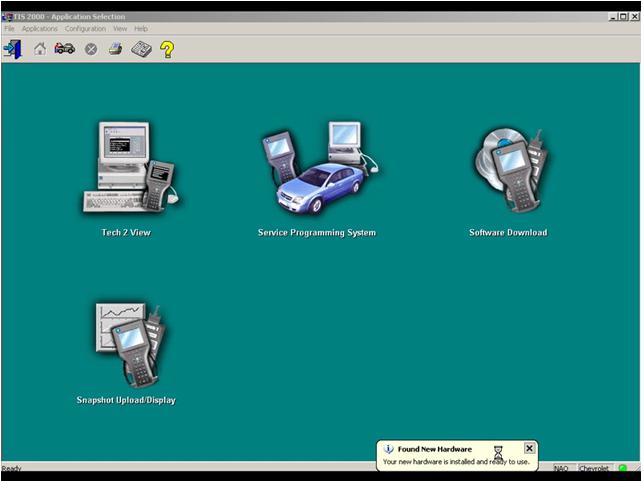
Software installed:
Install the GM TIS2000 application (needs to be Windows XP, 32-bit operating system). There are normally two discs. One is the app, the other is the GM update disc, which is not required. If this is the case, install the first disc only but don’t run up the application on completion. If you didn’t get it with a clone, you can get a copy with the USB dongle. If prompted to select a registration method, select USB Key and OK the prompts.
All that is now required is to activate the software to get security access (enable Tech 2 programming). To do this you’ll need a USB key and patch available from the same sources as the clone Tech 2 units.
There is a video:
Hardware issues:
You can check you have RS232 COMMS using theGM TIS2000install and going into the Tech 2 View option. Don’t mess about with serial port settings etc as if there is a physical connection there it will work without interference. pins 4 and 5 of the RS485&RS232 socket are actually used.
Source:https://gm-tech2-china-clone.blogspot.com/
Posted by: OBDexpress.co.uk at
08:23 AM
| No Comments
| Add Comment
Post contains 415 words, total size 15 kb.
September 03, 2018
VCM 2 SP177-
I have one of my VCM 2 SP177C that doesn't read voltage
It does power up, but when trying to program, I get a message saying vehicle battery is low. Voltage going into vcm2 is steady 13.9v as I always use my Schumacher battery charger while programming.
The problem is inside the vcm2. Either the processor doesn't see voltage or sees a lower voltage than what comes in.
Anyone has some sort of electrical schematic of
Thanks
Possible solution:
If you have new ids then car's battery needs to be like 14v.!
Get into runtime folder and edit file "batterymonitor"
Something like this::::
BatteryMonitor
[BatteryLevels]
MaxLowVoltage = 11600
MinMediumVoltage = 11500
MaxMediumVoltage = 12000
MinHighVoltag = 12800
Then try again.!
Source:http://blog.obdexpress.co.uk/2018/09/03/vcm-2-sp177c-cannot-read-voltage-on-obd-pin-16-solved/
Posted by: OBDexpress.co.uk at
09:32 AM
| No Comments
| Add Comment
Post contains 146 words, total size 2 kb.
32 queries taking 0.118 seconds, 147 records returned.
Powered by Minx 1.1.6c-pink.

