


December 27, 2016
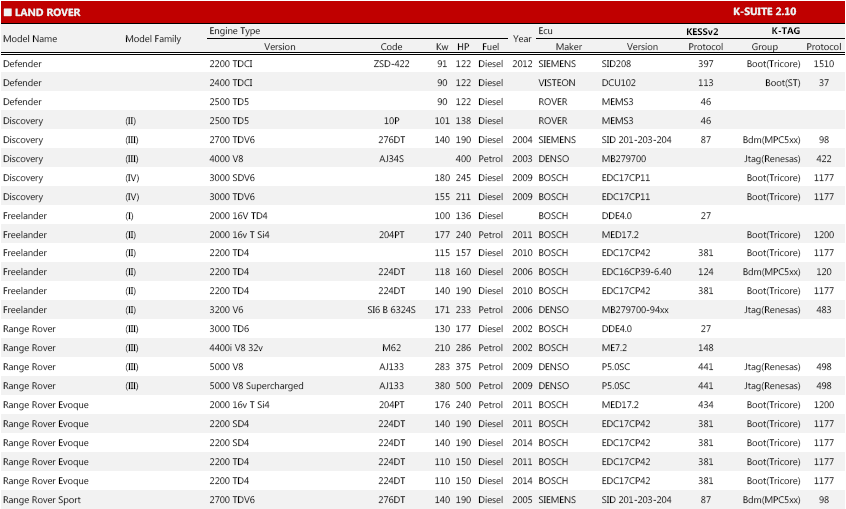
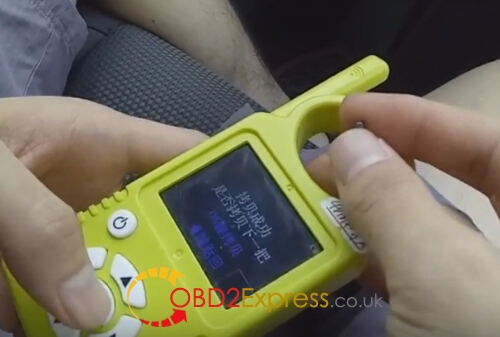
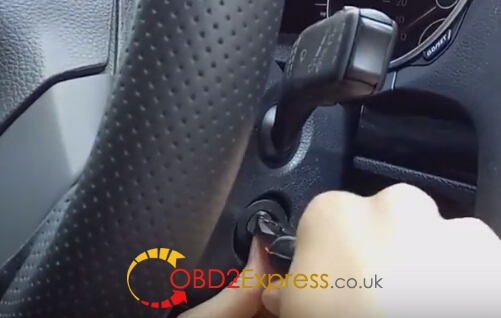
kessv2supportsobd2boot
ktagsupportsbdmj-tagboot


Posted by: OBDexpress.co.uk at
08:40 AM
| No Comments
| Add Comment
Post contains 623 words, total size 11 kb.
December 23, 2016

Posted by: OBDexpress.co.uk at
02:58 AM
| No Comments
| Add Comment
Post contains 182 words, total size 2 kb.
December 22, 2016
- How to set up the Galletto 1260 tool?The best place to buy the Galletto 1260 ECU Chip tuning tool isobd2express. This costs
€13.5
– then Connect the Galletto inferface to the car’s diagnostics port and Connect the USB side to the laptop.
-Open the program named ‘NEW_SERIAL’.
-Switch on the ignition key to two clicks (don’t start the engine) until the test lights illuminate
-Select ECU data. You will then see a code such as 0281010362. This means that the tool has connected to the ECU successfully.
-Now select read data. You can name and save the ECU data. The file format should be **.bin (e.g. Peugrot-edc-15.bin)
-When reading is complete wait for the message and follow the instructions: Switch off the ignition and then click ok -> Wait ten seconds -> switch on the ignition and click ok.
-Now You should have a copy of your original ECU data file on your laptop.
-This file can be sent over to remap.
-Open the program named ‘NEW_SERIAL’.
-Switch on the ignition key to two clicks (don’t start the engine) until the test lights illuminate
-Select ECU data. You will then see a code such as 0281010362. This means that the tool has connected to the ECU successfully.
-Select ‘Open file’, and then select the new remapped file which you wish to load to the ECU.
-Select download file.This step can not be interrupted, so Make sure there is no other software running and don’t knock the cable etc, it’s best to remain completely still to eliminate any possible risk.
-Afterwards, when the program prompts, switch off the ignition once the lift pump has stopped. Then press ok and wait ten seconds. You will then be prompted to switch it back on. Do as instructed and the process is complete.
Posted by: OBDexpress.co.uk at
02:48 AM
| No Comments
| Add Comment
Post contains 639 words, total size 5 kb.
December 19, 2016
This is a working solution ofFord vcm2 clo
with the error message "Not Connected to VCM II†after successful IDS installation. Try to flash / reset vcm2 to solve the issue of low firmware versions.
Vcm2 connection error:
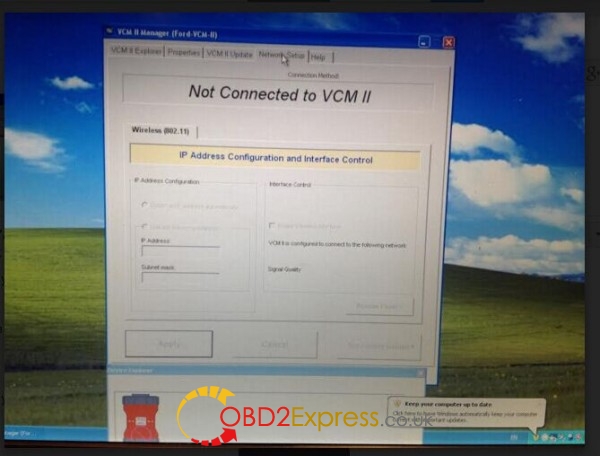
Working solution from pros work forobdexpress.co.uk:
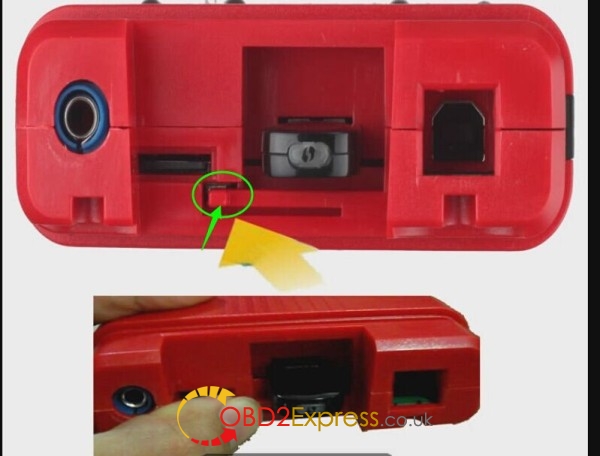
Find out the reset button on theVCM2 cloneunit
Press the reset button for a while
Connect the vcm2 to the laptop via the USB cable
DO NOT use the OBDII cable for the connection to car
Unpress/loosen the button when all lights turn on
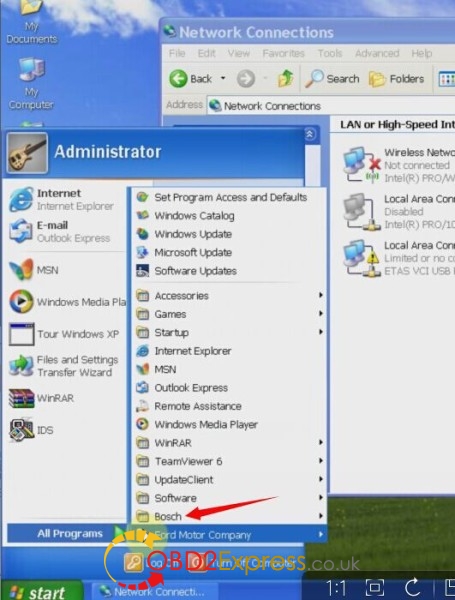
The find out Bosch the the start menu
Open fordvcm2manager to flash and reset the ford
Note: solutions above only works fine with vcm2 at OBD2EXPRESS
Good luck and enjoy diagnosis with vcm2!
Posted by: OBDexpress.co.uk at
09:29 AM
| No Comments
| Add Comment
Post contains 136 words, total size 4 kb.
December 17, 2016


2.Click to download:Autel MaxiSys MS906TS Wireless TPMS user manual
1.Wireless TPMS & Advanced Diagnostics System
Operating on the Android navigation system, the MS906TS provides amazingly fast sensor programming and diagnostic scan functions with its powerful running speed and large 32 GB solid state hard drive. The system also features the latest AutoVIN technology to identify vehicles in one touch as well as its exclusive AutoScan function. These features allow you to easily acquire vehicle information, scan all ECUs and run diagnostics on selected systems.
| OperatingSystem | Androidâ„¢4.4.2,KitKat |
| Processor | SamsungExynosT52606-CoreProcessor (1.3GHzquad-coreARMCortex-A7+1.7GHzdual-coreARMCortex-A15) |
| Memory | 2GBRAM&32GBROM |
| Display | 8.0″LEDcapacitivetouchscreenwith1024x768Presolution |
| Connectivity | Wi-Fi(802.11b/g/n),USB:2.0,MiniUSB2.0,WirelessBTV2.1+EDR,Class1,HDMI1.4a, SDCard(supportupto32GB) |
| Camera(rear) | Rear-facing,8.0Megapixel,AFwithFlashlight |
| Sensors | GravityAccelerometer,AmbientLightSensor(ALS) |
| AudioInput/Output | Microphone,SingleSpeaker,3-Band3.5mmstereo/standardheadsetjack |
| PowerandBattery | 10,000mAh3.7Vlithium-polymerbattery,Chargingvia12VAC/DCpowersupply |
| InputVoltage | 12V(9-35V) |
| PowerConsumption | 5W |
| OperatingTemperature | -10to55°C(14to131°F) |
| StorageTemperature | -20to70°C(-4to158°F) |
| Housing | Rubberizedouterprotectionandruggedinternalhousing |
| Dimensions(WxHxD) | 270.8mm(10.0â€)x176.0mm(6.9â€)x36.0mm(1.4â€) |
| Weight | NW:1.10kg(2.42lb.) |
Here is a comparison table of Autel TPMS diagnostic tools, incl. Autel MaxiTPMS series andMaxiSys MS906TS.
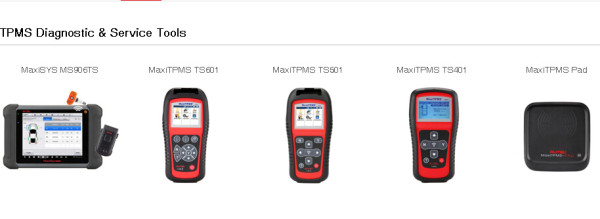
| Comparison | MaxiSys MS906TS |
Autel TS601 |
TS501 | TS401 | MaxiTPMS PAD |
| TPMS function | |||||
| Activate TPMS sensors | √ | √ | √ | √ | √ |
| Read sensor data | √ | √ | √ | √ | √ |
| Program new MX-sensor | √ | √ | √ | √ | √ |
| Scan OE sensor ID and copy OE ID into MX-sensor | √ | √ | √ | √ | √ |
| Manual input OE ID into MX-sensor | √ | √ | √ | √ | √ |
| TPMS status, one page for all the information | √ | √ | √ | ||
| program sensor by OBD function | √ | √ | √ | ||
| Relearn by OBD function | √ | √ | √ | ||
| Relearn procedure guide on the tool | √ | √ | √ | √ | |
| Advanced function | |||||
| OBD read/clear TPMS DTC | √ | √ | √ | ||
| Read TPMS ECU information | √ | √ | |||
| Read TPMS live data | √ | √ | |||
| Reset engine light | √ | √ | |||
| Display I/M readiness status | √ | √ | |||
| On-Screen code definitions | √ | √ | √ | ||
| Show OBDII live data graphing | √ | √ | |||
| Advanced diagnostic function | √ | √ | |||
| Check Key FOB | √ | √ | |||
| Tool features | |||||
| Built-in rechargeable li-ion battery | √ | √ | √ | √ | |
| Strong housing with protective rubber boot | √ | √ | √ | √ | |
| Print TPMS sensor data via PC | √ | √ | √ | √ | |
| Internet updatable | WIFI | SD card | SD card | USB | USB |
| Multilingual support | √ | √ | √ | √ | √ |
| Historical test records | √ | √ | √ | ||
| Software Update | 1 year free | free | free | free | free |
| Limited one year warranty | √ | √ | |||
Posted by: OBDexpress.co.uk at
09:12 AM
| No Comments
| Add Comment
Post contains 632 words, total size 13 kb.
December 15, 2016
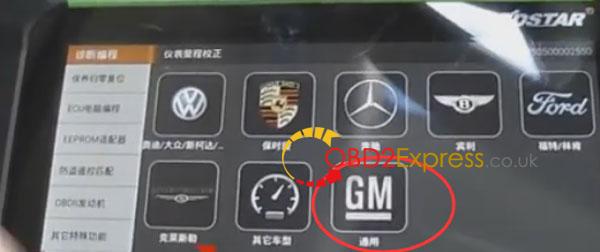
New arrival and powerful tool-OBDSTAR X300 DPcan support not only immo,OBDII,but alsoodometer adjustment,EEPROM/PIC adapter,ABS,TPS,SRS reset, TPMS(low tire)reset,Steering angle reset,CVT learning/Value reset, EPB+ Oil/service reset,Battery matching,Diagnosis(Japanese and Korean serials).
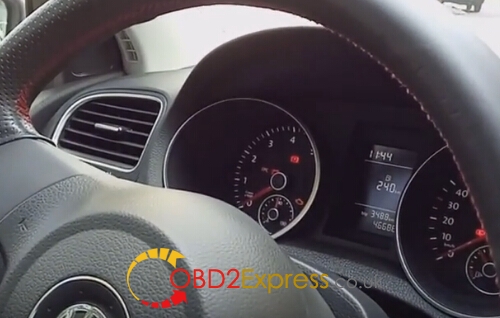
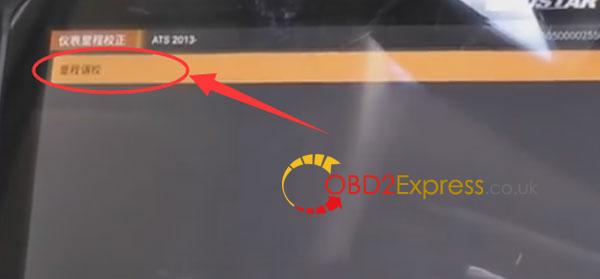
How to useX300 DP odometer adjustment on cars ?Here is theexample ofOBDSTAR X300 DP change mileage onCadillac ATSL 2016.
Enjoy!
Vehicle:
-Cadillac ATSL 2016
Step1: Prepare
ConnectX300 DPwith vechile and open X300DP
Press on START button
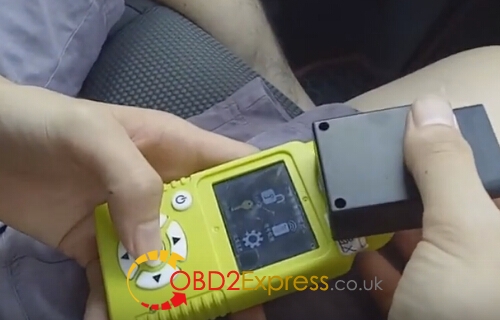
Step2: Choose vehicle information
Choose "Mileage adjust†option and click on GM
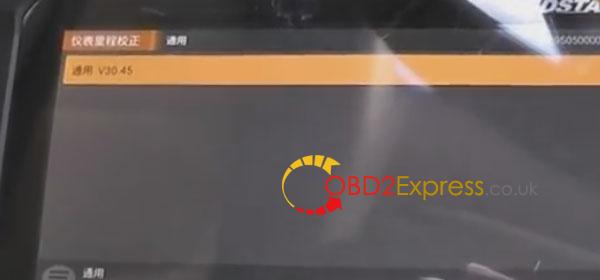
Choose GM V30.45 to go on
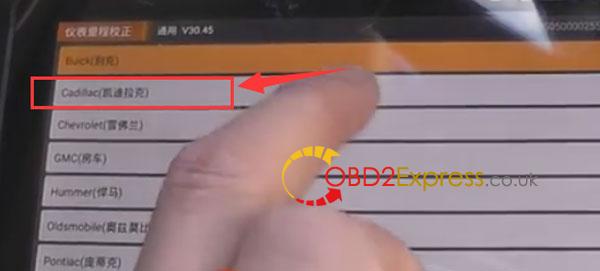
Then choose Cadillac
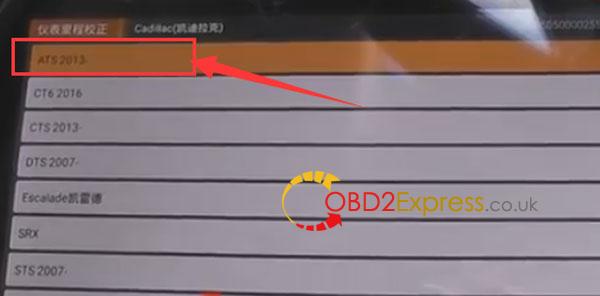
Choose ATS2013-
Mileage adjustment (correction)
It is communicating...
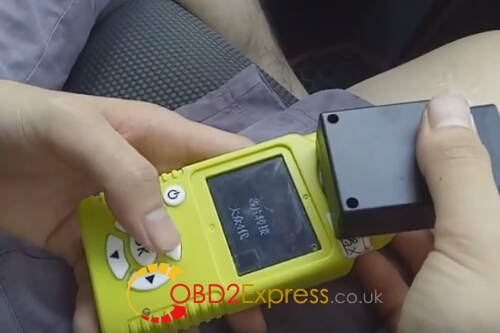
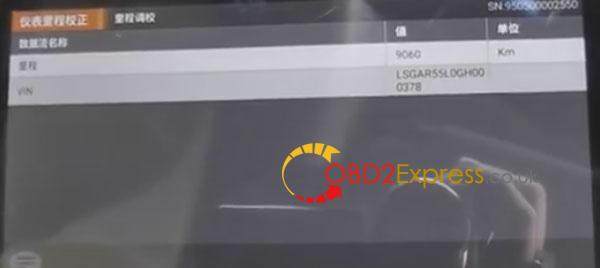
Step3: Adjust mileage
The current mileage information
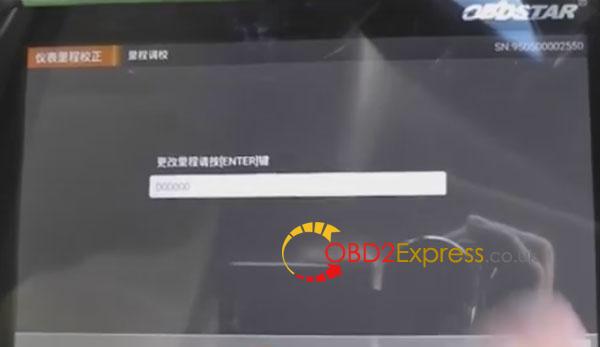
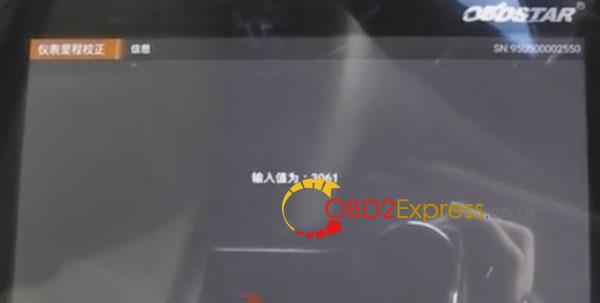
Input the new mileage and press ENTER to continue
Value: 3061
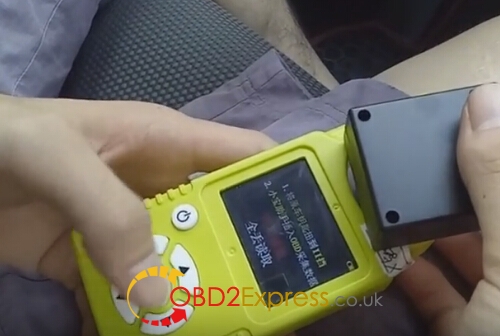
It is communicating...
The mileage value at presant
Done! Successfully change mileage for Cadillac ATSL 2016
Posted by: OBDexpress.co.uk at
08:43 AM
| No Comments
| Add Comment
Post contains 137 words, total size 9 kb.
December 12, 2016
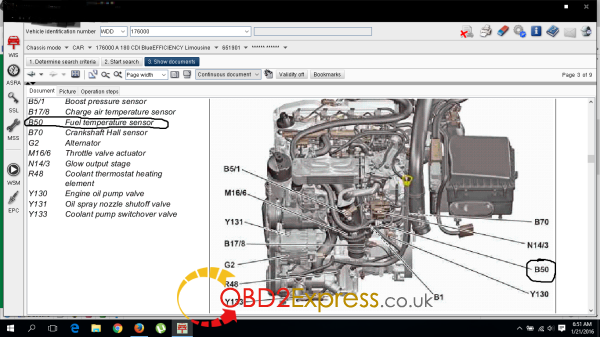
Here are all tips for Mercedes-benz w176 Class A with fault P0180 "Fuel temperature sensor, excessive voltageâ€.
What’s the model?
Mercedes w176 Class A
How to scan the w170?
Via the machineMB star sd connect c4and
What about the diagnosis result?
P018017 reading with the machine MB star.
with DELPHI appears P0180: Fuel temperature sensor, excessive voltage.
It may be connection problems
Tip on error P0180:
What the P0180 code means?
P0180 is a generic OBD-II code that is triggered by a malfunctioning fuel temperature sensor ‘A.’ This could indicate that the sensor is not within specification, or that the fuel temperature or fuel rail is too hot or too cold.
What causes the P0180 code?
The engine control module (ECM) sets the P0180 code to memory when it detects a malfunctioning sensor circuit; the sensor input is either below or above the specified range designed for the sensor
The fuel could be too hot or too cold?
The fuel tank or fuel rail temperature sensor could be out of sensor range, or the connector could be corroded
In diesel engines, the ECM monitors the temperature of the diesel fuel when the fuel heater is activated, and will set the P0180 code if the temperature is out of range
What are the symptoms of the P0180 code?
The vehicle will not start if the fuel is frozen from extreme cold, or if there is water in the fuel
The vehicle will not start, or may lose power and stall, if the fuel gets too hot and boils off
Excessive additives in the fuel can cause erratic sensor readings and cause the fuel to boil off at lower temperatures, causing the sensor to malfunction
How does a mechanic diagnose the P0180 code for Mercedes?
Scans codes and documents the freeze frame data, then clears the codes to verify code returns
Does a visual check of all the wiring and connections to the sensor, checking for breaks in the wiring or loose connections
Disconnects the connection to the sensor and checks to see if the sensor is testing within specifications
Takes a fuel sample to compare the actual temperature of fuel to the sensor input
Tests the diesel fuel heater for proper operation to make sure it is working to heat the fuel, without overheating the fuel
Common mistakes when diagnosing the P0180 code
Follow these simple guidelines to prevent misdiagnosis:
Do a visual check of the connections to the sensor to make sure they are making good contact with the fuel heater and fuel temperature sensor
Check the fuel for excessive additives that can cause sensors to malfunction
How serious is the P0180 code?
The vehicle will not start if excessive water is in the fuel, the ambient temperature is below freezing, and the fuel heater is defective due to the temperature sensor
The engine may misfire, hesitate, and stall if the fuel temperature exceeds normal operating temperatures due to temperature sensor circuit malfunction, or if the fuel rail gets too hot.
What repairs can fix the P0180 code?
Testing the fuel temperature sensor and replacing it if it is out of specifications
Repairing or replacing a defective connector or wiring to the sensor
Replacing the diesel fuel heater assembly with the temperature sensor
Additional comments for consideration regarding the P0180 code
The code P0180 is used on diesel engines with fuel heaters and on gasoline engines to monitor the fuel temperature in the fuel tank or at the fuel rail. Follow the manufacturer’s recommended testing procedures for the vehicle and type of fuel you are working on.
Where to getMB star sd connect c4?
E-mail:sales@obdexpress.co.uk
Skype:
bdexpress.co.uk">obdexpress.co.uk
http://blog.obdexpress.co.uk/2016/12/12/read-repair-mercedes-error-p0180/
Posted by: OBDexpress.co.uk at
06:46 AM
| No Comments
| Add Comment
Post contains 615 words, total size 6 kb.
December 09, 2016
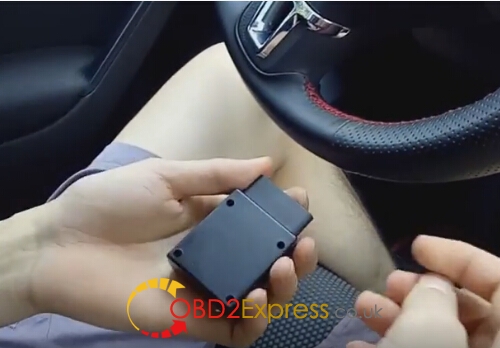
Something interesting here… JMD assistant obd adapter and
This is the new obd adapter JMD assistant
And the JMD48 chip, and the key to be programmed
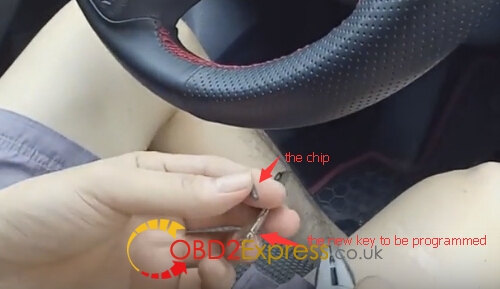
Insert the key to switch and put the chip close to it
The dashboard status
Then remove the JMD48 chip away
Connect the JMD assistant adapter to the OBD port under the dashboard
The dashboard status
Disconnect the JMD assistant and put it on the coil of the Handy baby
Chip transfer
Chip generate and authorize

Insert the key and turn to II
JMD adapter collect data
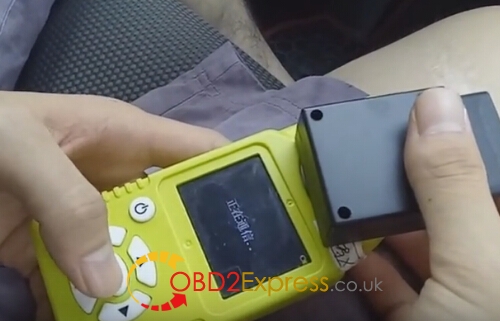
Data collection success and put the JMD48 chip
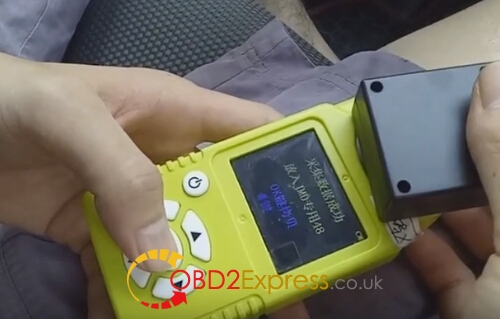
Copy by JMD48 chip push OK
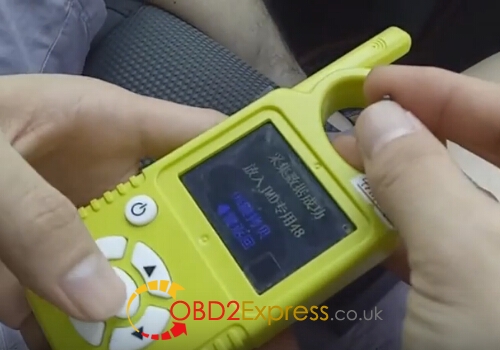
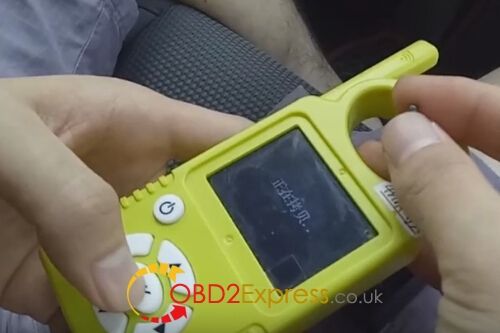
Copy data success!
Test it on the car and it’s working.
For details, i refer to
http://obd2-diag.blogspot.com/2016/12/handy-baby-jmd-assistant-copy-chips-and.html
The tutorial is very clear to learn.
Posted by: OBDexpress.co.uk at
02:39 AM
| No Comments
| Add Comment
Post contains 187 words, total size 6 kb.
December 05, 2016
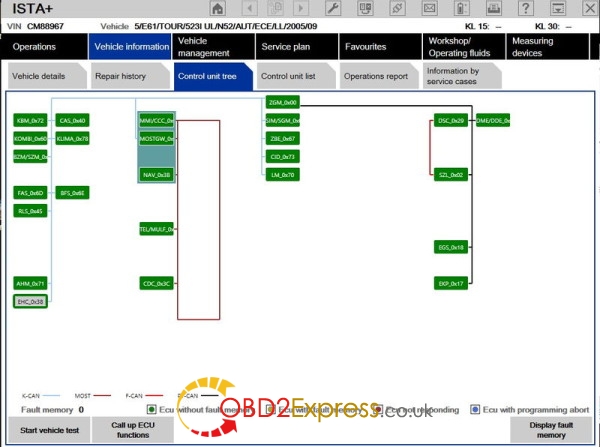
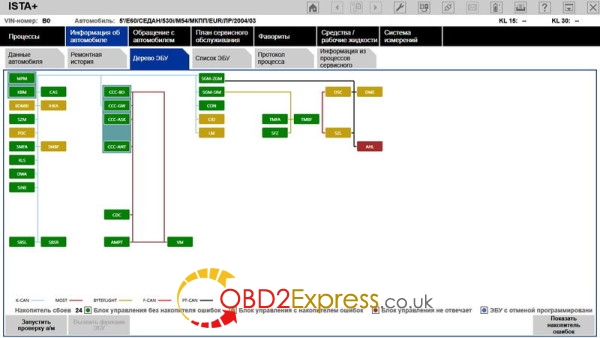
I gotISTA BMWsoftware up and running, where it would read data from my car, but it shows every module as okay with no faults, but i know for sure I have faults on my EHC module (because i have read faults of EHC in inpa and Dis).
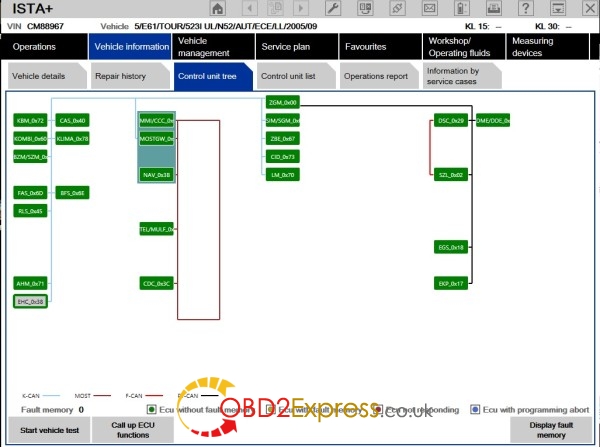
I researched this issue for hours on end and read through nearly every single thread regarding this issue. And luckily, I resolved it, with help of a member @kestum at http://cartechnology.co.uk/
Here are the customer solution. (try on your own risk)
Change in file ISTAGUI.exe.config
<add key=â€TesterGUI.EcuTree.ExpertMode†value=â€falseâ€/>
to
<add key=â€TesterGUI.EcuTree.ExpertMode†value=â€trueâ€/>
And look for this values
<add key=â€TesterGUI.HideBogusFaults†value=â€true†/>
<add key=â€TesterGUI.HideUnknownFaults†value=â€true†/>
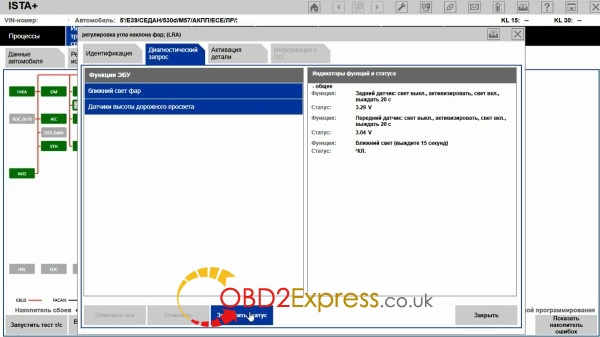
It does not open a separate unit, which here appears somethingwith interface, the program do not read the entire module, including the engine module, do not know whether the DME or DDE (other forum members say they have sometimes problems with
this works good
Posted by: OBDexpress.co.uk at
06:08 AM
| No Comments
| Add Comment
Post contains 209 words, total size 5 kb.
December 01, 2016
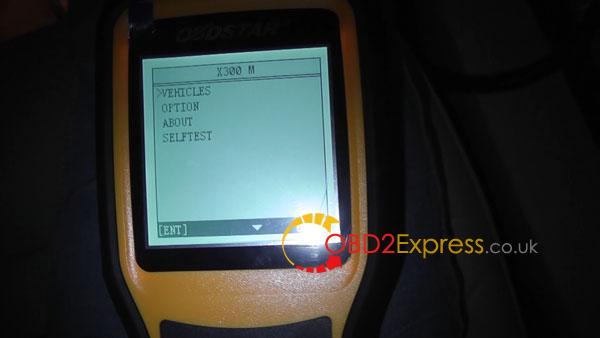
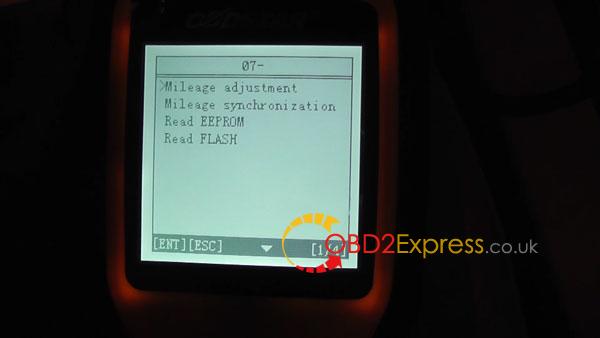
Obdstar X300M is the most professional
Main setup display:
Connect the car ,then openObdstar X300Moo
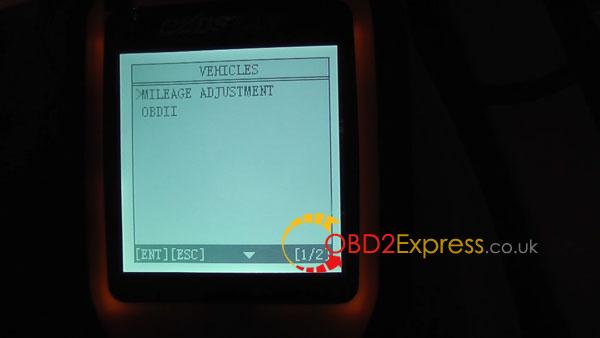
VEHICLES
MILEAGE ADJUSTMENT
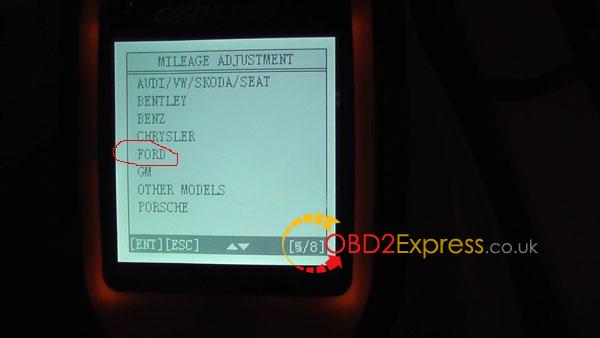
Choose"FORD"
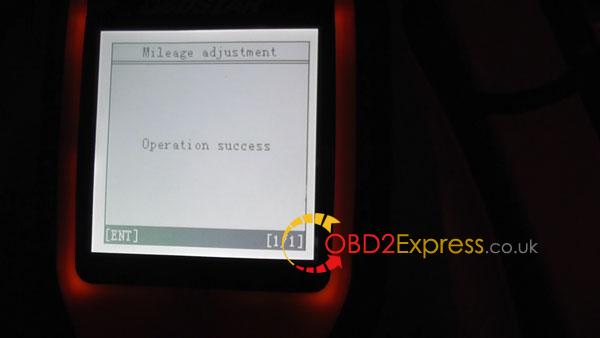
Operation success
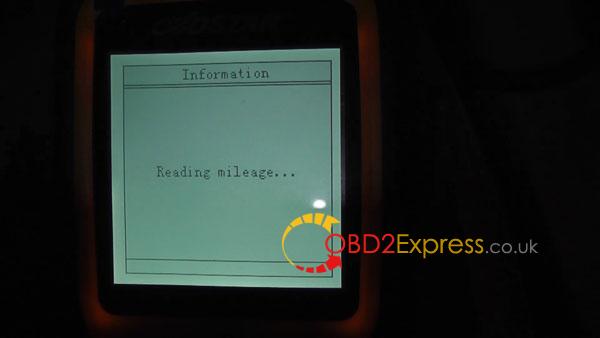
Mileage adjustment
Reading mileage ...
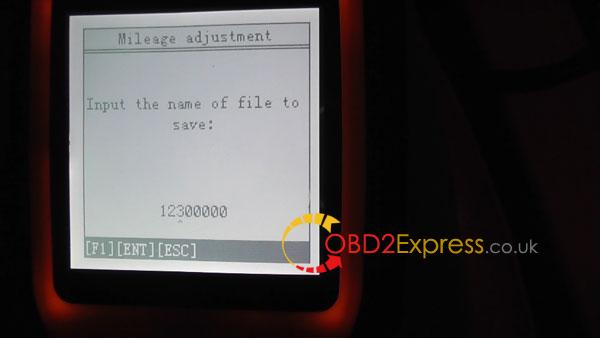
Input the name of file to sane:1230000
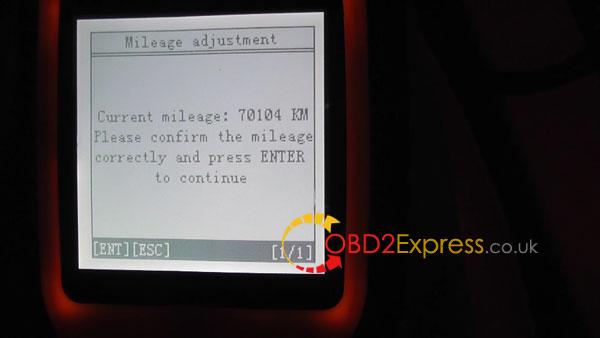
Current mileage:70104 KM
Please confirm the mileage correctly and press ENTER to continue.
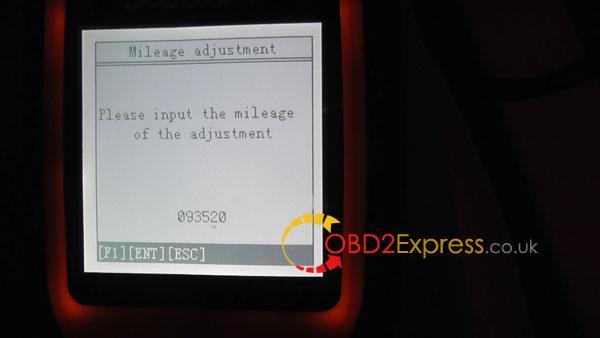
Please input the mileage of the adjustment
0935200
Then waiting....
X300MsupportsFORD models:
C-MAX
2012
Ecosport
type 1
type 2
Edge
2015-(Big color meter)
Expedition
2007-2010
Explorer
2007-2010
Focus
2013-
2009-(Multifunctional screen)
-2008(Smaller screens)
Fiesta
2013-
type 1
type 2
-2012
Kuga
2012
2010
2012-
Color meter
Monochrome meter
Mondeo
2011-2013
Monochrome screen meter
2 pointer color meter
2007-2010
Monochrome screen meter
4 pointer color meter
Navigator
2007-2010
New Mondeo
Big color meter
Small color meter
Monochrome screen meter
S-MAX
2007-2010
Taurus
2015-(Big color meter)
http://www.mileageprogrammer.com/obdstar-x300-change-mileage-on-ford/
Posted by: OBDexpress.co.uk at
07:11 AM
| No Comments
| Add Comment
Post contains 160 words, total size 8 kb.
32 queries taking 0.0536 seconds, 129 records returned.
Powered by Minx 1.1.6c-pink.

