


April 28, 2017
R290/r280/r270 software download:
R290 programmer software download:
R280 programmer software download:
R270 programmer software download:
http://www.mediafire.com/?f5jjhzmnfyxrcku
R290 cas4+ programmer= R280 +Porsche/BMW 2016
R280 bdm programmer = R270 + CAS4+ + Porsche5M48H/1N35H
So, this is the 2017R290 cas4+ programmer, wins in newPorsche&BMW 2016 programming.
2017 R290 cas4+ programmer price: €618
Software language:
Only English is available in R290 programmer software
Operation system:
R290: Windows XP, Windows7/ 8/ 10…. 100% working!
Function:
R290 CAS4+ BDM programmer covers all functions of R280/R270 programmer , and works well with the new Porsche/ BMW the 2016 year.
R290 = R280 +Porsche/BMW 2016
R280 = R270 + CAS4+ + Porsche5M48H/1N35H
TIP- About 2017 R290 programmer
. R290 CAS4+ supports the latest BMW and Porsche Motorola MC9S12XEP100 chip (5M48H/1N35H).
. Motorola microcontroller dedicated programmer. Automatically read/ input/ edit odometer. No need take apart EEPROM chip.
. Read and write arbitrary D-FLASH /P-FLASH data
. Support the new BMW Porsche: modify frame number, decryption security, automotive computer repair, data recovery, data adjustment and other professional electronic maintenance engineers dedicated tools.
R290 programmer car list: (forPorsche 2016 & BMW 2016)
R290 programmer supports Porsche up to 2016 & BMW 2016
R280 programmersupports BMW pre-2016
R270 programmersupports BMW 2001-2009
Porsche (newly added)
Porsche Cayenne se-hybrid – 2016
Porsche Panamera se-hybrid – 2016
Porsche Panamera – 2016
Porsche Cayenne – 2016
Porsche Macan – 2016
Porsche Boxster – 2016
Porsche Cayman – 2016
Porsche 911 – 2016
BMW
BMW 1 series – F20, F21 chassis – 2016
BMW X1 series – E84 chassis – pre 2016
BMW 3 series – F30, F31 and F35 chassis – 2016
BMW X3 series – F25 chassis – 2016
BMW 5 series – F10, F11 and F18 chassis – 2016
BMW X5 series – F15 chassis – 2016
BMW 6 series – F13 DMEM/F12 chassis – 2016
BMW X6 series – F16 chassis – 2016
BMW 7 series – F01, F02, F03, F04 chassis – 2016
BMW GT series – F07 chassis – 2016
In summary,
R290 CAS4+BDM Programmeris the most powerfulMotorola microcontroller dedicated programmer (regardless of the cost),which supports the latest BMW, Porsche Motorola MC9S12XEP100 chip (5M48H/1N35H) (up tothe-2016-year cars). it can automatically search and display the address mileage mileage, without removing the chip, the number of kilometers directly input data directly visible, can be arbitrary edit; read and write arbitrary D-FLASH /P-FLASH data, the other to support the new BMW; Porsche modify frame number. R290 programmer is powerful, decryption security, automotive computer repair, data recovery, data adjustment and other professional electronic maintenance engineers dedicated tools.
source:
Posted by: OBDexpress.co.uk at
06:27 AM
| No Comments
| Add Comment
Post contains 435 words, total size 33 kb.
April 27, 2017
2017Opcom firmware v1.65andOpcom firmware v1.70updated! This is how to step by step installOpcom firmware v1.65 v1.70 VAUX-COM 120309a on Windows 7.
Free downloadVAUX-COM 120309a software:
Demo: How to install Opcom v1.65 v1.70 VAUX-COM 120309a
1.Install VAUX-COM Software
Open Computer
Open VAUX-COM-120309a DVD/CD-RW Drive or open free software file

Open VAUX-COM-120309a software

Accept license agreement

Click "Install†to install software
Installation progress, extracting file to C:/VAUX-COM-120309a+131223d file
2. Install Driver
Click "Extract†to extract FTDI CDM Drivers

Connect op-com cable with computer, system will install driver automatically

Right click Computer>>Manage>>Device Manager>>Universal Serial Bus controllers>>USB Serial Converter to check if opcom driver is well installed

3.Configure VAUX-COM
Right click VAUX-COM120309A+131223d GB software on desktop, select "Run as Administratorâ€

Loader has been installed into target
Open VAUX-COM 2012V software
Click "Settings†option

Select Interface type: VAUX-COM Revision B, B+
Then click "Test Interface†button

Then software will display firmware version, interface test ended successfully
Press "Save Config†to save settings
Press "OKâ€

4.Diagnose with OCPOM
Connect Opcom interface with vehicle
Back to VAUX-COM main menu
Select "Diagnosticsâ€
Select "Automatic Vehicle Identificationâ€

Select "KWP-2000†and diagnostic connector
Open will auto detect and display vehicle information

Start to diagnose your vehicle.
Posted by: OBDexpress.co.uk at
03:01 AM
| No Comments
| Add Comment
Post contains 208 words, total size 17 kb.
April 25, 2017
Here is the Free downloadVAG CAN PRO v5.5.1 patch on Mega:
https://mega.nz/#!zFgQgCbB!rOdRRC2W00u8Ribmbxz7zqiVrfDMvq0UgnN6YY2qajk
crack
no password required
without USB dongle
never expired
Windows XP, Windows 7.. all OK
Then, How to installVAG CAN PRO 5.5.1crack on Windows xp
Open disk E: VCP6
Copy folderDriver VCP
Paste it on Desktop
Open foldervcp6and unzip
Openvagcanpro properties
Find target:
Opensp275 patchon Desktop
CopyPSA.dll & SCard.dll
Replace files with the 2 application on C:\VCP6
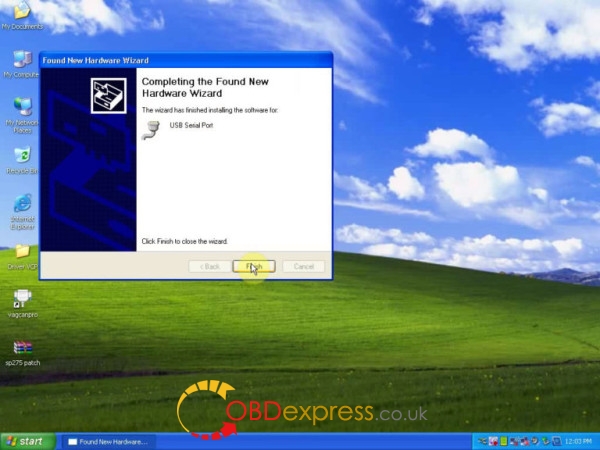
This wizard helps you install software for FT245R USB FIF0
Select: Install from a list or specific location (Advanced)
Click on Next
Select: Include this location in the search
Browse: Desktop/Driver VCP
Next
Finish installation of USB Serial Converter

This wizard helps you install software for USB Serial Port
Select: Install from a list or specific location (Advanced)
Click on Next
Next
Finish installation of USB Serial Port
Connect thevag can procable for use
Open vagcanpro on Desktop

It’sVCP+K v5.5.12016 version
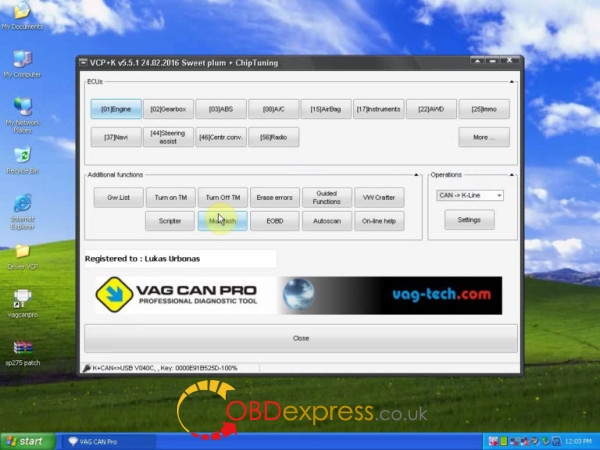
Go to diagnosis, (better thanVAS 5054A-vag pro runs FASTER than 5054a)
Can coding and programming


NO need engineer codes for coding or programming
Posted by: OBDexpress.co.uk at
02:26 AM
| No Comments
| Add Comment
Post contains 182 words, total size 5 kb.
April 21, 2017
Free download2017 ElsaWinVW, Audi, Skoda, Seat 6.0 and 2016 Elsawin 5.3, Elsawin 5.2, Elsawin 4.0, with elsawin user guide.
What is elsawin?
ELSAWINis the Service & Repair Workshop software actually used by the Audi main dealers and factory technicians around the world, it covers cars (with varying amount of informations) from 1947 till today. It provides Servicing Guides, Workshop – Repair Manuals, Electric Schemes – Wiring Diagrams, Body Works.
Elsawin download free:
(newest) elsawin 6.0 download on Mega:
https://mega.nz/#!lsQywayI!2H8X3uUhiI6qPStE93xeHGIYAP5rVycXjFVR3G3FeR4
elsawin 2016/ elsawin 5.3 download:
http://blog.obdexpress.co.uk/2016/09/05/free-download-2016-elsawin-5-3-vw-audi-electronic/
(tested) elsawin 5.2 crack: 100% working, never expire
http://www.obdexpress.co.uk/wholesale/elsawin-52-electronic-service-information-vag.html
(tested) elsawin 4.0 crack: 100% working, never expire
http://www.obdexpress.co.uk/wholesale/audi-vw-skoda-seat-elsawin-obd2express.html
* elsawin 6.0 supports Windows NT4.0 / 2000 / Xp Pro / 2003/7/2008 64bit, said the developer
* elsawin 5.20 & 4.0: NO need elsawin username password
How to use Elsawin 6.0:
there is a set of installation files for installingElsaWin 4.0and all its subsequent updates to version 6.0 (directories with numbering from 1 to 7).
Also in the distribution is added the full version of the installer ElsaWin 6.0 (catalog number ![]() .
.
The main requirement before starting the installation of ElsaWin version 4.0 is the presence of Adobe Reader installed in the system. The minimum version is 5 or newer.
The order of installation is simple:
1. Install setup 4.0 and, if desired, all subsequent updates to 6.0 (optional), or install at once setup 6.0.
2. Install the database.
IMPORTANT!
Base VW 01.2017 is compatible with versions of ElsaWin 4.x – 6.x.
Also, you need to install SVGView.exe – it is needed to display the wiring diagrams.
Login name / password: admin / admin
Detailed instructions for installing ElsaWin 4.0 and 4.1 from say2108 – in the Documentacia directory
How to install Elsawin 5.3:
http://blog.obdexpress.co.uk/2017/03/24/install-elsawin-5-3-on-windows-7/
Elsawin questions and answers (FAQs):
– I’m not using the VIN field because when I do, the SW says that I have to launch a query, then opens an IEwindow, which leads to a non existent web site, and then a "login failed†error message.
– it is limited to the the information already on your pc, you need a dealer code to get through to the website and get more information, that said there is still alot of data in there
to make it work, put your Vin number in, and fill out the rest of the fields, to get the right information you can use theaudicodes printed on the inside cover of your service schedule booklet
click on developpe (on your version and double click the vehicle.
you can then access the correct information for your car.
–When installing elsawin 5.30, I immidiatly get the error "msxml2.domdocument 3†not found or version too old.
– I can not help much with the installation of version 5.X.
I only use version 4.1 because of the exaggerated disk space used by version 5.
You installed the Skoda Data DVD and Replaced the original Skoda Data DVD files:rl.C.en-GB.caband all other languages:rl.C.xx-XX.cab?
Version 5 does not install with these original files. If this is the case, you need these modified files.
– is there any possibility of installing Elsawin 5.3, with databases and functionalities?
I know that skoda only exists until 2012..but in elsawin 4.1 I can see them all
– Yes! You can install 5.X versions. But you need to edit the filesrldal.C.xx-XX.mdbThat are inside the filesrl.C.xx-XX.cabor edit directly after installing version 4.x of the SKODA brand the filesrldal.C.xx-XX.mdbin folderC:\Elsamin\Data\
Use PassD2F224C3to open/edit the filesrldal.C.xx-XX.mdb
Some tables in .mdb files have some missing columns. Add these missing columns.
You can search for the missing columns in comparison with the files of the other brands (VW, AUDI or SEAT)
You can also use the programStarInix Database Compareto compare the differences.
Posted by: OBDexpress.co.uk at
02:36 AM
| No Comments
| Add Comment
Post contains 629 words, total size 6 kb.
April 18, 2017
JLR SDD V149updated! Here is the instruction shows you how to step by step install JLR SDD V149 on your computer.
JLR SDD V149 system requirement:
Windows XP..............confirmed
Windows 7.............confirmed
Windows 8.............confirmed
Windows 10.............confirmed
JLR SDD V149 abilities:
Obdii diagnosis.............confirmed
Key programming.............confirmed
Ecu programming .............confirmed
Engineer mode.............confirmed
How toJLR SDD 149on Windows XP for JLR SDD2 diagnostics:
Open computer/D:/JLR V149
Open SDD V149.00_FULL application to install
Select a setup language for the installation
Preparing setup...
Accept the software agreement
Accept the license agreement to EULA
Read and understand the firewall compatibility
Next
....
OK to install Adobe Reader
Next
...
Click on Install to begin the program installation
Installing...
Yes to activeCGM to be the default TID views
Installing...
Install MOXA UPort 1110/1130/1150 Windows driver vers1.6
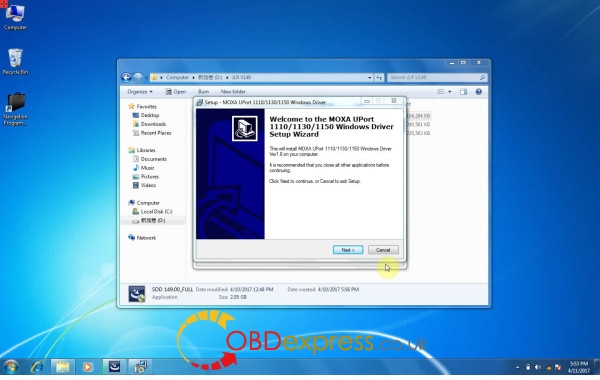
Next
...
Install
Installing...
Finish installation of MOXA UPort 1110/1130/1150 Windows driver
Continue installing SDD 149.00....
Successfully installing JLR SDD 149
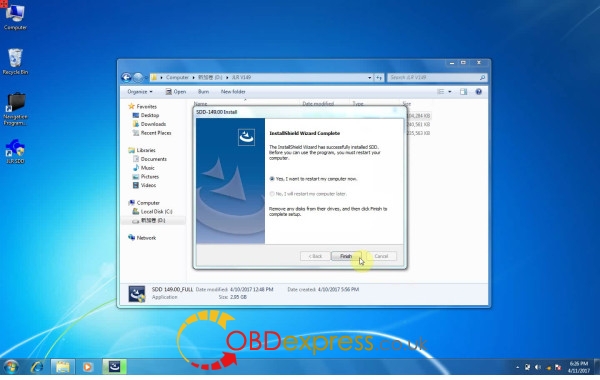
Open computer/D:/JLR V149
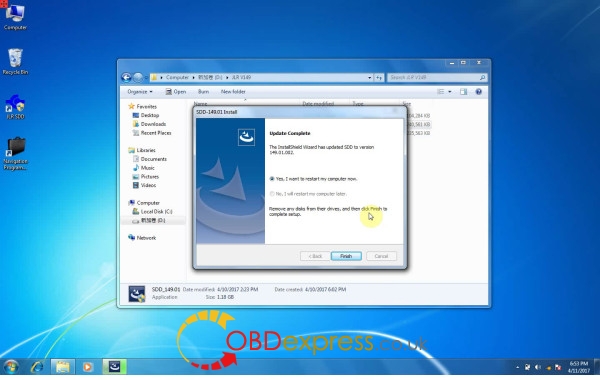
Open SDD_V149.01 application to install
Preparing setup...
OK to install Adobe Reader
Installing...
Updated SDD to version 149.01.002
Open computer/D:/JLR V149
Open Terminator software v3.7 application
Select a setup language: here: English
Next
....
Install (ready to install FVDI2 based software list on your pc)
Installing...
Select a language
Next
....
Extract to unpack version 2.125.16 of FTDI’s Windows driver package and launch the installer
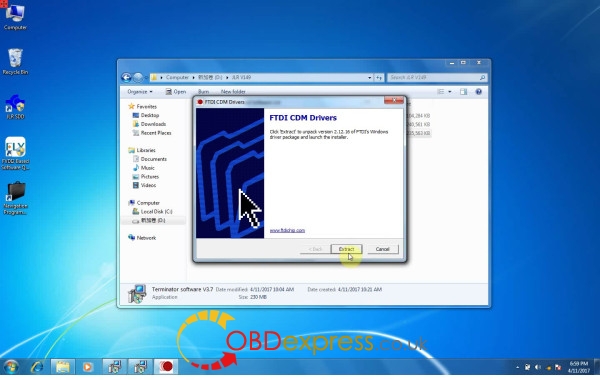
Extracting...
Installing...
The wizard helps you install the software drivers
Accept the agreement
Installing...
Successfully installed the drivers
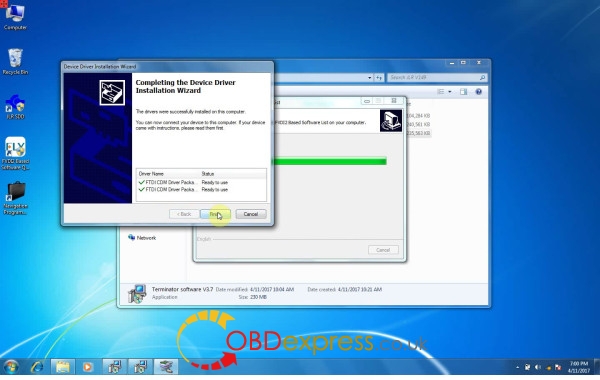
Installing...
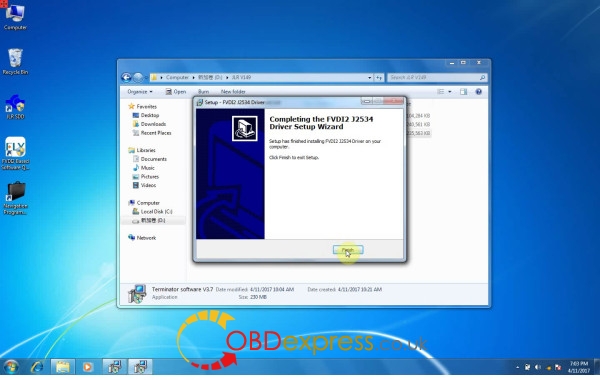
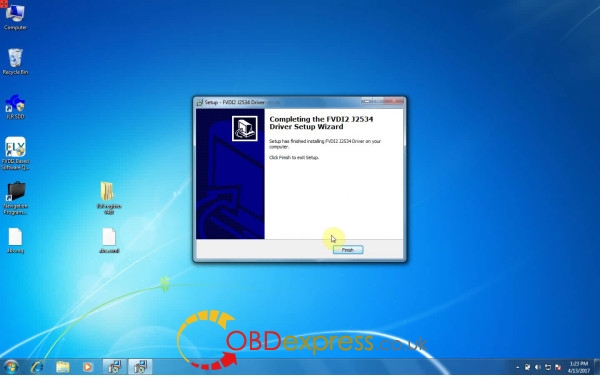
Finish installing FVDI2 J2534 driver
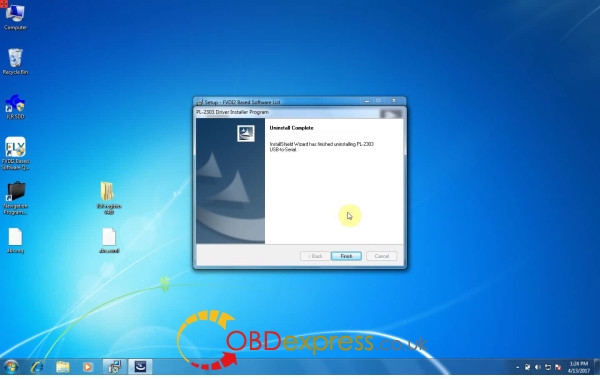
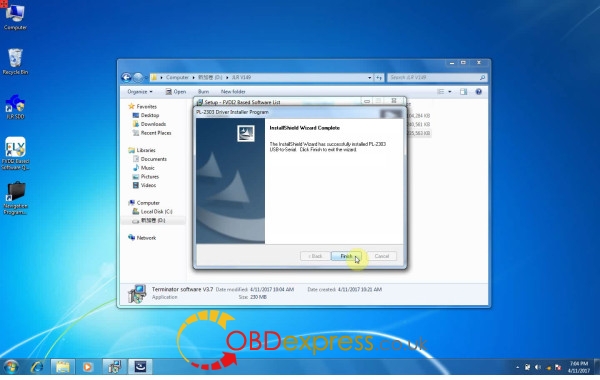
The installshiedl wizard will install PL-2303 USB-to-serial
Installing...
Successfully installed PL-2303 USB-to-serial
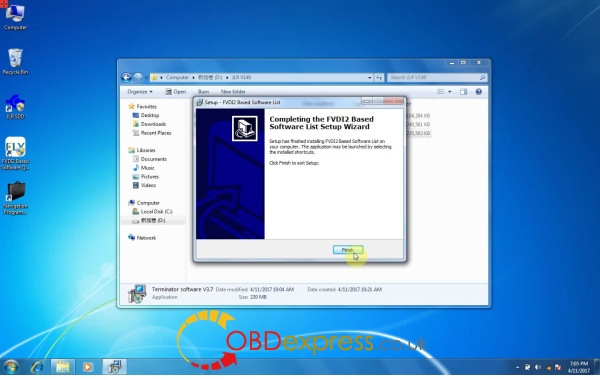
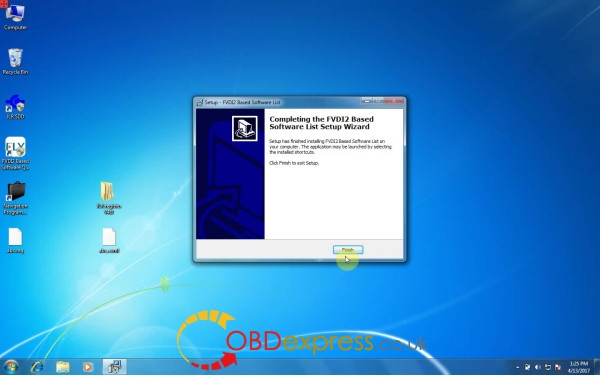
Finish installing FVDI2 based software list
Copy JLR register v4.0 in the removable disk F:
Paste it on Desktop
Open JLR register v4.0 on Desktop
Then open the folder JLR Register
Copy app.war
Paste in Computer/C:/Program files/JLR/SDD/SDD, copy and replace
Then open JLRRegister application in the folder JLR Register
Generate register request file
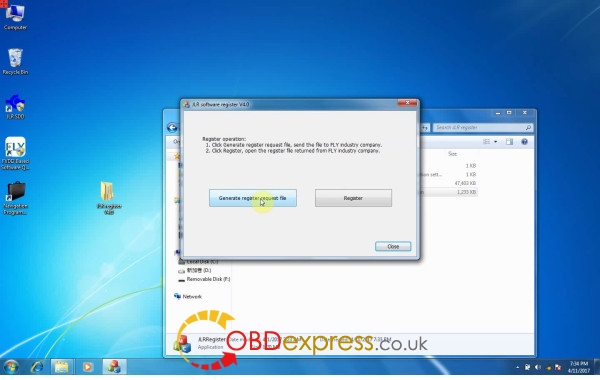
Save as "abc†on Desktop
Close JLR register v4.0
Copy abc.exml in F:
Paste it on Desktop
Again, run JLRRegister application in Desktop/JLR register v4.0/JLR Register
Register
Open abc.exml on Desktop
Register finished!
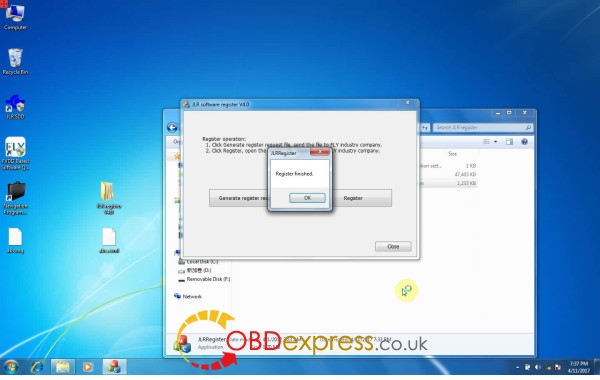
Close JLRRegister application
Open FVDI2 based software quick loader on Desktop
Update
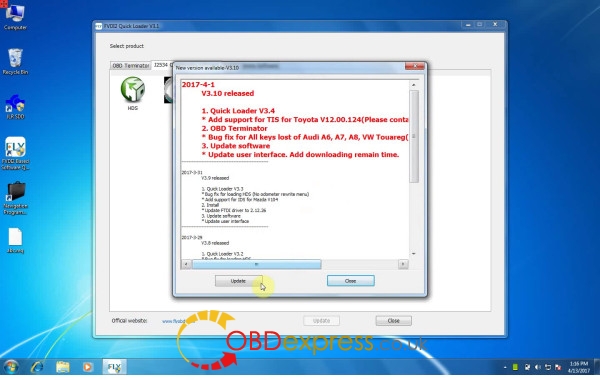
Download the latest version
Downloading files...
Install
Select a setup language
Next
....
Installing FVDI2 based software list....
Select a setup language during installation
Next
....
Installing FVDI2 j2534 driver....
Finished installing FVDI2 J2534 driver
Installing...
Yes to confirm uninstall PL-2303 driver
Finished install PL-2303 usb-to-serial
Finish FVDI2 based software list
Open FVDI2 based software quick loader on Desktop
Select JLR
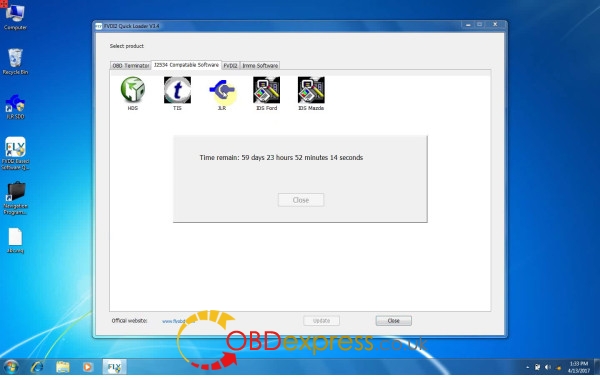
Warning: continue
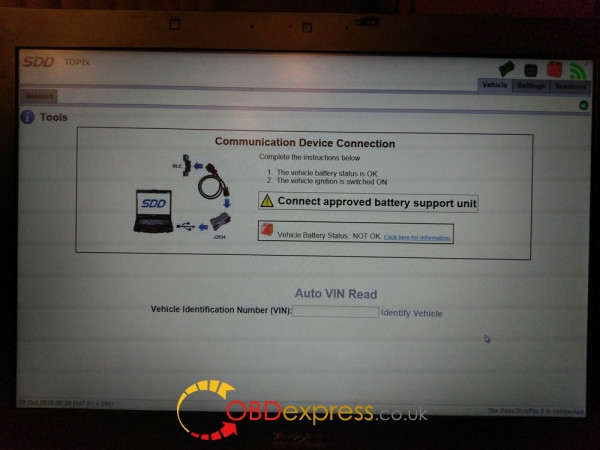
Enter vin, then identify vehicle
Select low line instrument cluster, then save
Go to Diagnosis
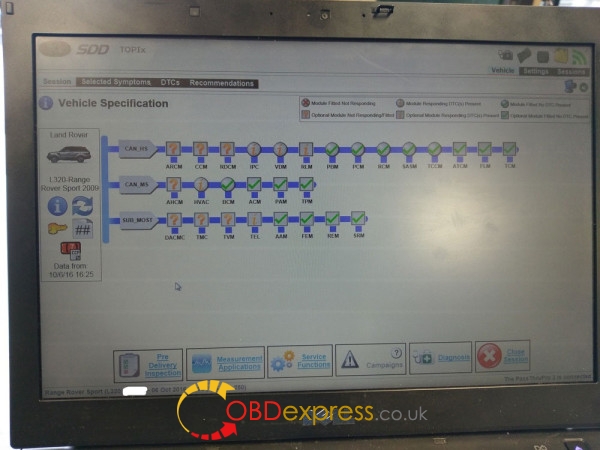

JLR SDD2 V149success!
Source form the OBDexpressOBD2 TOOL Center Official blog :http://blog.obdexpress.co.uk/2017/04/18/how-to-install-jlr-sdd2-v149-on-xp-win-7810/
Posted by: OBDexpress.co.uk at
03:41 AM
| No Comments
| Add Comment
Post contains 449 words, total size 30 kb.
April 13, 2017
This is the introduction manual of how to mileage corretion on Buick GL8 via OBD
Here you go...
Purpose: OBD odometer correction for a Buick GL8 car
Tool used:Obdstar X300 DP

The dashboard shows the mileage: 447183

Go to Diag Program

Mileage adjustment-> GM

Obdstar x300 dp tablet GM V30.50 (newest)

Select the model: GM->Buick->GL8->Old GL8


Current mileage value: 447226km

Input the mileage of adjustment; here: 445000

comfirm
The new mileage value: 445166km

The dashboard displays the new mileage: 445156

OBD change mileage successfully!
Source:http://www.mileageprogrammer.com/x300-dp-adjustment-ok-on-buick-gl8/
Posted by: OBDexpress.co.uk at
07:35 AM
| No Comments
| Add Comment
Post contains 93 words, total size 10 kb.
April 11, 2017
Here is the newest test report ofObdstar X300 DPodometer correction, tested on Jeep Compass 2008-.
This is the test procedure...
Tested by technicians working for
Edited by Laura

The Jeep Compass 4X4 Limited
The current mileage: 93867


Go to Diag Program
Mileage adjustment->CHRYSLER

Obdstar x300 dp Chrysler v30.24 software

Compass 2008-


Mileage adjustment

X300 DP reads out the vehicle mileage: 93833km


Input the new mileage to adjust: 94837


Mileage adjustment completes!

The dashboard displays km: 94867

The mileage value is almost the same as that inObdstar x300 dp
Result: Jeep Compass mileage correction success!
Posted by: OBDexpress.co.uk at
07:48 AM
| No Comments
| Add Comment
Post contains 106 words, total size 18 kb.
April 10, 2017
Carprog manual... Here you go... about how to read Motorola MC68HC05 using a CarProg programmer?
What basic info you need to know?
You need recognize Motorola (Freescale) MPU by maskset;
This MPU maskset is 3D33J;
Before programming, always select right processor type according maskset.
Which version ofCarprogdo you need?
First, Carprog full original or Carprog clone?
It depends on your budget. But Carprog programmers china clone now can work without issues with Motorola MC68HC05, especially inCarprog airbag.
You have optional solutions:
Carprog v8.21: it’s the perfect online version
andCaprog 9.31: the newest china version
How to connect to a CarProg programmer?
For HC05 programming use A10 cable 7 color wires:
YELOW – communication signal from MPU;
GREEN – communication signal to MPU;
BLUE – Reset signal to MPU;
ORANGE – MODB signal to MPU, low level;
BROWN – GND (ground);
RED – switched +5V;
VIOLET - switched +12V;


Troubleshooting: ERROR messages in CarProg:
• Communication error
- no communication between CarProg and Motorola processor
- check MPU type, try to select quartz frequency manually.
To understand better onboard MPU programming problems, you can use table with right programming signals and voltages, described in table. If you can’t read or write MPU with CarProg, check:
- did you was select right MPU type;
- did quartz resonator Q is the same in circuit board and in CarProg options;
- did all programming signals have right form and voltage;
A10 cable has 8 color wires:
YELOW – communication signal from MPU;
GREEN – communication signal to MPU;
BLUE – Reset signal to MPU;
ORANGE – PD4 signal to MPU, normally low level, but can by high;
GREY – PD3 signal to MPU, normally high level;
BROWN – GND (ground);
RED – switched +5V;
VIOLET - switched +12V;

1. MC68HC05B6, MC68HC05B8, MC68HC05B16, MC68HC05B32


MPU: MC68HC05B6 Mask Set: 0B91T 1C14H, 2C14H 0F10V 1E50H
MPU: MC68HC05B8 Mask Set: 0B83T 3D33J 0D54J
MPU: MC68HC05B16 Mask Set: 0D20J, 1D20J, 2D20J, 3D20J
2. MC68HC705B16, MC68HC705B16N, MC68HC705B32


MPU: MC68HC705B16 Mask Set: 0D28J F56K
MPU: MC68HC705B32 Mask Set: G41V 3G96A K20C D40J D59J
3. MC68HC05X16, MC68HC05X32, MC68HC705X32

4. MC68HC05E6

5. MC68HC05P3

6. MC68HC705P3

7. MC68HC05H12

MPU: MC68HC05H12 Mask Set: 0H57A
Have fun with Carprog reading Motorola MC68HC05
Source:
Posted by: OBDexpress.co.uk at
07:54 AM
| No Comments
| Add Comment
Post contains 374 words, total size 15 kb.
Carprog manual... Here you go... about how to read Motorola MC68HC05 using a CarProg programmer?
What basic info you need to know?
You need recognize Motorola (Freescale) MPU by maskset;
This MPU maskset is 3D33J;
Before programming, always select right processor type according maskset.
Which version ofCarprogdo you need?
First, Carprog full original or Carprog clone?
It depends on your budget. But Carprog programmers china clone now can work without issues with Motorola MC68HC05, especially inCarprog airbag.
You have optional solutions:
Carprog v8.21: it’s the perfect online version
andCaprog 9.31: the newest china version
How to connect to a CarProg programmer?
For HC05 programming use A10 cable 7 color wires:
YELOW – communication signal from MPU;
GREEN – communication signal to MPU;
BLUE – Reset signal to MPU;
ORANGE – MODB signal to MPU, low level;
BROWN – GND (ground);
RED – switched +5V;
VIOLET - switched +12V;
Troubleshooting: ERROR messages in CarProg:
• Communication error
- no communication between CarProg and Motorola processor
- check MPU type, try to select quartz frequency manually.
To understand better onboard MPU programming problems, you can use table with right programming signals and voltages, described in table. If you can’t read or write MPU with CarProg, check:
- did you was select right MPU type;
- did quartz resonator Q is the same in circuit board and in CarProg options;
- did all programming signals have right form and voltage;
A10 cable has 8 color wires:
YELOW – communication signal from MPU;
GREEN – communication signal to MPU;
BLUE – Reset signal to MPU;
ORANGE – PD4 signal to MPU, normally low level, but can by high;
GREY – PD3 signal to MPU, normally high level;
BROWN – GND (ground);
RED – switched +5V;
VIOLET - switched +12V;
1. MC68HC05B6, MC68HC05B8, MC68HC05B16, MC68HC05B32
MPU: MC68HC05B6 Mask Set: 0B91T 1C14H, 2C14H 0F10V 1E50H
MPU: MC68HC05B8 Mask Set: 0B83T 3D33J 0D54J
MPU: MC68HC05B16 Mask Set: 0D20J, 1D20J, 2D20J, 3D20J
2. MC68HC705B16, MC68HC705B16N, MC68HC705B32
MPU: MC68HC705B16 Mask Set: 0D28J F56K
MPU: MC68HC705B32 Mask Set: G41V 3G96A K20C D40J D59J
3. MC68HC05X16, MC68HC05X32, MC68HC705X32
4. MC68HC05E6
5. MC68HC05P3
6. MC68HC705P3
7. MC68HC05H12
MPU: MC68HC05H12 Mask Set: 0H57A
Have fun with Carprog reading Motorola MC68HC05
Source:
Posted by: OBDexpress.co.uk at
07:54 AM
| No Comments
| Add Comment
Post contains 374 words, total size 15 kb.
April 08, 2017
Here is our customer experience of how to installFGTech Galletto V54correctly with Windows 7
(Big thanks to Mr.Tim Thiessen ,good info to share with FGTech Galletto users in obd2express.co.uk)
Here is the error when he was installed theFGTech Galletto V54 on Windows 7

Solution :
Hello, I would like to explain to you step by step how to install your FGTech Galletto V54 correctly with Windows 7. To do this, you must first uninstall the already installed software and the drivers.
Then we start with step:
1. Run "FGTech Galletto Edited v1.0.exe†as an administrator. Important: Do not create a desktop icon and run the program yet.
2. Next, connect the Galletto device to the power supply and then connect it via USB. The automatic driver installation fails. But do not worry, the installation is done manually.
3. Right-click on the "Computer†icon and select "Manageâ€. As soon as the window opens, click on Device management and select the USB port "FGTechâ€. Here you have to click "Update driver softwareâ€. And then click "Browse the computer for driver softwareâ€, then "Select from a list of device drivers on the computerâ€, then "Have Disk†and "Browseâ€.
4. Now look for the folder of "FGTech†on drive C. Here you open the folder "fgtech_new_driver†and select the following file: "fgtibus.infâ€! Confirm everything, wait for the installation, and close all windows.
5. Run "FGTech Galletto Edited v1.0.exe†again as an administrator. Important: Do not create a desktop icon and run the program yet.
6. Run "Galletto win7.exe†as administrator. Create and install the desktop icon. If the installation is complete, start the program as an administrator.
7. Ignore the next two windows with hints and confirm with OK. FINISHED!!!
Hopefully this guide is understandable.
Posted by: OBDexpress.co.uk at
01:47 AM
| No Comments
| Add Comment
Post contains 315 words, total size 10 kb.
Here is our customer experience of how to installFGTech Galletto V54correctly with Windows 7
(Big thanks to Mr.Tim Thiessen ,good info to share with FGTech Galletto users in obdexpress.co.uk)
Here is the error when he was installed theFGTech Galletto V54 on Windows 7

Solution :
Hello, I would like to explain to you step by step how to install your FGTech Galletto V54 correctly with Windows 7. To do this, you must first uninstall the already installed software and the drivers.
Then we start with step:
1. Run "FGTech Galletto Edited v1.0.exe†as an administrator. Important: Do not create a desktop icon and run the program yet.
2. Next, connect the Galletto device to the power supply and then connect it via USB. The automatic driver installation fails. But do not worry, the installation is done manually.
3. Right-click on the "Computer†icon and select "Manageâ€. As soon as the window opens, click on Device management and select the USB port "FGTechâ€. Here you have to click "Update driver softwareâ€. And then click "Browse the computer for driver softwareâ€, then "Select from a list of device drivers on the computerâ€, then "Have Disk†and "Browseâ€.
4. Now look for the folder of "FGTech†on drive C. Here you open the folder "fgtech_new_driver†and select the following file: "fgtibus.infâ€! Confirm everything, wait for the installation, and close all windows.
5. Run "FGTech Galletto Edited v1.0.exe†again as an administrator. Important: Do not create a desktop icon and run the program yet.
6. Run "Galletto win7.exe†as administrator. Create and install the desktop icon. If the installation is complete, start the program as an administrator.
7. Ignore the next two windows with hints and confirm with OK. FINISHED!!!
Hopefully this guide is understandable.
Posted by: OBDexpress.co.uk at
01:47 AM
| No Comments
| Add Comment
Post contains 315 words, total size 10 kb.
April 05, 2017
It’s a customer solution of Star Finder Mercedes Benzsetup on Windows Vista or Win7, 64bit.
Free download ETMviewer.zip
https://mega.nz/#!bYR1ELiA!epv4790nIPaNSA6zgOZoVox3RIgfZ2UL4hmqFYVFwlQ
STAR Service Manual Libraries on CD and DVD
Workaround for Compatibility Issues with 64-Bit Version of Windows Vista and Windows 7
GETTING YOUR CD or DVD to WORK with 64-Bit
This also applies to CDs/DVDs that are not listed as being compatible with Windows Vista and Windows 7.
Step 1
The first step is to prevent the WHIP! application from starting. This is possible by adding an "Autodesk WHIP!†key to the Windows Registry. This will prevent the WHIP! application from installing, which prevents program start when canceling.
Continue to Step 2 to enable access to wiring diagrams.
Step 2
Go to the Autodesk web site and download Design Review software. Click to Link to Site.
Installation instructions:
Step 3
Because of the now missing Autodesk WHIP! Plug-in, the wring diagrams on CD/DVD are inaccessible. The workaround for this is a separate "ETM Viewer†application that uses Autodesk Design Review and updated wiring diagrams.
Get the required files:
– Unpack the ETMviewer/zip and webetm***.zip files.
– Move the "webetmâ€folder and "start.html†file into the empty "ETMviewer/webetm†folder.
http://blog.obdexpress.co.uk/2017/04/03/how-to-setup-star-finder-mercedes-on-windows-64bit/
Posted by: OBDexpress.co.uk at
02:08 AM
| No Comments
| Add Comment
Post contains 207 words, total size 2 kb.
32 queries taking 0.0724 seconds, 133 records returned.
Powered by Minx 1.1.6c-pink.

