


March 30, 2017
But aparently none of them described how to do this exatcly, i mean how to write withmppsin bootmode. Everyone was saying that is "simple, just write in bootmodeâ€, "MPPS can recover almost any EDC15 ECUâ€, "I’ve done many times†an so on.
I found this very hard to do, and while searching decided that if i succeed to recover i will do a simple instructions how to do it without asking too many dumb questions.
So here it is in very short description, with pictures.
Note: You do this on your own, and i cant be responsible for mistakes you make!
- Remove the ECU. Warm it a little bit up, there is a sealnt which holds the housing halves pretty strong, so after warming will be easier to open it. Dont heat it too much, just to be hand warm. Here is the picture, this is what you will probably see inside the ECU case.

- 29F400 Location and bootmode pin 24. For now you have to solder a wire to the pin. To the other end of the wire connect 5k resistor. That’s it for now. Here are the picture of the chip, and the pin to be used.

- Prepare all the connections to the ecu andMPPS cableas shown on the picture below.

MPPS Cable Pinout: (it’s mpps v12, but out of date; now ismpps v18)

- Pin16 =+12v
- Pins 4&5 = Ground
- Pin 7 =K Line
- When all done and checked twice, connect your MPPS cable to PC, open software and locate the BOOTMODE wirte function. This was tricky for me, but finally i got to this point and after that everything was a peace of cake. Before connectin the +12v power supply to the proper cable as you have seen in the pictures above. And before connecting the negative wire be sure to ground the bootmode pin 24 thru a 5k resistor, and remove it after aprox 15 seconds, but do not disconnect the ecu and MPPS power connections.
- Navigate to where you choose brand and choose not VW or Audi etc. but chooseGENERIC. I found this Hardly noticable, and found only after a hint in the internet after 16 hours of searching.

After that choose your ECU as stated in the List that opens after you chooseGENERIC

- Click Checksum Open the file that you want to checksum, the open the file that you have read from your car before making any mods. Above the progress bar you will see something written in GREEN color, and you’re good to go. Then click Write, choose the file to write and wait fo a while for the progress bar to reach 100% and you are done, and as happy as i was that i have saved some $$ on buying programmers, or used ECU’s, or sending to a tuner for a fix.
source:http://obdexpress.blog.af/2017/03/30/mpps-v18-bootmode-recovery-edc15/
Posted by: OBDexpress.co.uk at
06:17 AM
| No Comments
| Add Comment
Post contains 477 words, total size 7 kb.
March 29, 2017
Why you need rework the PCB ofMPPS V18 china clone?
Because there are two versions of Mpps china clone. One comes with missing componentsand different resistors are installed with red marks below:

Working mpps v18 clone should be like this:

Available inhttp://www.obdexpress.co.uk/wholesale/mpps-v18-main-tricore-multiboot-breakout-tricore-cable.html
So, some cheap MPPS china need rework.
For the mpps above:
D1 = PESD1CAN ESD protection
U4 = PRTR5V0U2X
Zoom on it and see what’s missing.

this schematic if it also helps
In summary, not all china good! and you get what you paid for.
Good luck with china clones.
Posted by: OBDexpress.co.uk at
07:22 AM
| No Comments
| Add Comment
Post contains 101 words, total size 8 kb.
Why you need rework the PCB ofMPPS V18 china clone?
Because there are two versions of Mpps china clone. One comes with missing componentsand different resistors are installed with red marks below:
Working mpps v18 clone should be like this:
Available inhttp://www.obd2express.co.uk/wholesale/mpps-v18-main-tricore-multiboot-breakout-tricore-cable.html
So, some cheap MPPS china need rework.
For the mpps above:
D1 = PESD1CAN ESD protection
U4 = PRTR5V0U2X
Zoom on it and see what’s missing.
this schematic if it also helps
In summary, not all china good! and you get what you paid for.
Good luck with china clones.
Posted by: OBDexpress.co.uk at
07:22 AM
| No Comments
| Add Comment
Post contains 101 words, total size 8 kb.
March 27, 2017
I was playing around with myMB Star C4and Xentry 2016 developer mode
and I might have found a alternative to delete the ABC warning lights without a module.
Tested on 2003 Mercedes-Benz CL600 Base Coupe 215.376 5.5L V12
FOR THOSE WHO WANT TO CONVERT TO COIL-OVER and remove ABC suspension forever
So, here is what I found, someone can test it but you have to haveDAS Xentrywith developer mode.
I can’t test it as I already have the module installed and no time right now
If nobody can test it, I will do it one of these days
follow this:
Go to Control unit

->body

->CGW(cental gateway)

->development data

->control unit adaptations

->control unit adaptations (variant coding)

->globale variantencodierung

->nicht vorhanden

(giving a 1000 thx to pmercury in the mbworld)
This article is fromobdexpress.co.ukofficial blog :http://blog.obdexpress.co.uk/2017/03/27/xentry-developer-mode-delete-abc-dash/
Posted by: OBDexpress.co.uk at
03:19 AM
| No Comments
| Add Comment
Post contains 147 words, total size 15 kb.
March 23, 2017
| ODOMETER V10.48 Diagnostics List(Note:For reference only) | |||
| Make | Model | Year | |
| CHRYSLER | 200 | 2010- | |
| 300C | -2010 | ||
| New Sebring | 2007- | ||
| Sebring | 2010- | ||
| 2007-2009 | |||
| Journey | 2008- | ||
| Avenger | 2010- | ||
| 2007-2009 | |||
| Caliber | 2010- | ||
| 2006-2008 | |||
| Charger | 2004- | ||
| Durango | 2011- | ||
| 2007-2010 | |||
| Magnum | 2004- | ||
| Aspen | 2006- | ||
| RAM | 2011- | ||
| 2009- | |||
| 2006-2008 | |||
| Caravan | 2012- | ||
| 2011 | |||
| Voyager | 2015- | ||
| 2008 | |||
| Liberty | 2008- | ||
| AUDI | A6 | up to 2008 | |
| FORD | FOCUS | 2013 | |
| GM | BUICK | ENCLAVE | 2007-2013 |
| CHEVROLET | Equinox | 2007-2009 | |
| PONTIAC | Torrent | 2007-2013 | |
| SATURN | Outlook | 2007 | |
| CHINESECAR | ROEWE | 750 | 2012-2013 |
| 950 | 2012-2013 | ||
| MG | MG 7 | 2012-2013 | |
| Note:ALL description rights reserved by LAUNCH TECH.CO.,LTD |
|||
Posted by: OBDexpress.co.uk at
09:08 AM
| No Comments
| Add Comment
Post contains 154 words, total size 4 kb.
March 20, 2017
Renault CAN CLIP V166 software is working now? Free download CAN CLIP V166 for Renault on Mega and try on your own risk:
So can you use CLIP V166 safely?
NO! Have better not.
Can clip v166 download links are shared individually in some communities like forum.
No tested by professionals yet. but our engineers are testing now… wait for the result if you wanna the newest CLIP software.
For sake of SECURITY, go for atestedversion of Renault can clip diagnostic software. Here you go…
Post: Renault Can CLIP V165 Test Report


Source: Renault Can CLIP V165 software
http://www.obdexpress.co.uk/wholesale/cd-software-for-renault-can-clip-v139-14609.html
Note: CLIP V165 is a crack version, tested towork 100% with renault can clip diagnostic interface china clone:
Four versions available: cheapest, best-quality, good quality, most populous
Renault CLIP buying guide:
http://obd2-diag.blogspot.com/2016/12/how-to-choose-renault-can-clip.html
best-quality CAN CLIP chips without communication issues:
most populous Renault CAN CLIP in U.K.:
It’s necessary to get the details if you wanna buy a working renault can clip diagnostic tool from china.
Source:http://blog.obdexpress.co.uk/2017/03/20/download-renault-can-clip-v166/
www.golotool.com
Posted by: OBDexpress.co.uk at
02:37 AM
| No Comments
| Add Comment
Post contains 176 words, total size 14 kb.
March 18, 2017
OBDSTAR F104 new arrived atobdexpress.co.uk,This tool is a professional key programmer specially designed forChrysler, Jeep and Dodge. It is good at key programming, odometer adjustment and pin code reading for most vehicles under Chrysler. With portable size and industrial-level design, it can be widely applied in automotive aftermarket and service industry.
OBDSTAR F104Models Included
All types are under Chrysler, Jeep and Dodge. Detailed models, please kindly refer to our car list attached.
All types are under Chrysler, Jeep and Dodge.
Detailed models, please kindly refer to our car list attached.
OBDSTAR F104 IMMO Support car list:
CHRYSLER200/300/300C/300M/Old CONCORDE 300/ASPEN/GRAND VOYAGER/LHS/NEON/PACHIFICA/PT CRUISER/
SEBRING/TOWN & COUNTRY/VOYAGER
Detail information about support car list clickobdstar f104 immo car list
DODGEAVENGER/CALIBER/CARAVAN/CHALLENGER/CHARGER/DAKOTA/DART/DURANGO/GRAND CARAVAN/IN TERPID/
JOURNEY/MAGNUM/NEON/NITRO/RAM/STRATUS
OBDSTAR F104 mileage support car list:
CHRYLLER & DODGE:1500/200/2500/300C/300M/3500/Aspen/Avenger/Caliber/Caravan/Charger/Cherokee/Commander/Compass/
Concord/Dakota/Durango/Grand Cherokee/Interepid/Journey/Lhs/Liberty/Magum/Neon/New Sebring/Nitro/
Pacifica/Patriot/Pt Cruiser/RAM/Sebring/SRI/SX/TJ/YJ/CJ/Voyager/Wrangler/
Detail information :
CHRYLLER & DODGE
1500
2002-2005
2000-2001
200
2015
2010-
2500
2003-2005
300C
2011-
-2010
300M
2001-2004
1998-2000
3500
2003-2005
Aspen
2006
Avenger
2010-
2007-2009
Caliber
2009-
2006-2008
Caravan
2012-
Charger
2011-
2004-
Cherokee
2015
Commander
2005-
Compass
2008-
2005-2007
Concord
2001-2004
1998-2000
Dakota
2004-
2001-2003
Durango
2014-
2011-
2007-2010
2004-2006
2001-2003
Grand Cherokee
2014-
2011-
2005-2010
2002-2004
Tnterepid
2001-2004
1998-2000
Journey
2008-
LHS
2001-2004
1998-2000
Liberty
2008-
2002-2007
Magnum
2004-
Neon
2001-
1999-2001
New Sebring
2007-
2003-2006
Nitro
2006-
Pacifica
2007-
2003-2006
Patriot
2006-
PT Cruiser
2006-
2002-2005
1999-2001
RAM
2011-
2009-
2006-2008
Sebring
2010-
2009-
2006-2008
SRI
SRI-5 2005-
SRI-4 2005-
SRI-3 2005-
SX
SX-2.0 2001-
TJ/YJ/CJ
2007
2003-2005
Voyager
2015-
2008
2001-2007
Wrangler
2007-
2003-2005
source:http://blog.obdexpress.co.uk/2017/03/17/obdstar-f104-imm-oodometer-car-list/
Posted by: OBDexpress.co.uk at
01:32 AM
| No Comments
| Add Comment
Post contains 258 words, total size 4 kb.
March 15, 2017
Received theXhorse ELV Emulatorfor my Mercedes 204 for a few days. Have used it with VVDI MB BGA Tool. And the test report, here you go…
1.Successfully usedELV emulatorin W204:
1). EIS: read data by OBD from EIS/EZS …… OK
2). EIS: get erase password ……. OK
3). password calc.: get key password through calc. process and 1 token used ……OK
4). EIS: save all data of EIS ……. OK
5). EIS: renew EIS/EZS through IR ……. OK
6). EIS: load back saved data …….. OK
7). EIS: write data to EIS/EZS …… OK
![]() . EIS: personalize ELV emulator in EIS/EZS unit – success….. OK
. EIS: personalize ELV emulator in EIS/EZS unit – success….. OK
9). EIS and ELV now working and car start
10). ELV emulator/simulator from Xhorse have sound (unlock and lock job) almost as original ELV
After all this steps still missed VIN in EIS/EZS, and fault in ESP because not see VIN from EIS,
then finished with XENTRY and write VIN to EIS/EZS in EIS/EZS unit finished…. OK
erase all faults ….. OK
I renewW204 ELV emulatoronly through 2x click…no need any data or passwords.
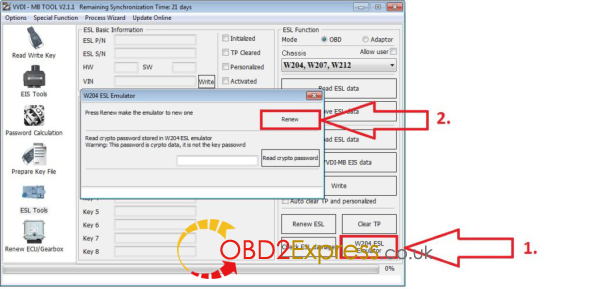
Original metalic W204 ELS/ELV unit renew is different process and steps…there you need erase passwords to have.
I unlock NEC from 3x blocked W204 ELV, i think it take 3-5 attempts, each delay 100-1000 times cca, don’t know exactly now…
only try….failed…try….failed….try….success.
2.The process to renew EIS for ESL/ELV personalizes described inVVDI MB BGAmanual:
ESL Tools
Support read ESL data via OBD (K-Line) …… tested OK
Support renew ESL, make 2nd hand ESL to new one (online) ……. tested OK ( online get only erase pass )
Support replace ESL, you can write original ESL or EIS data to new ESL …… tested OK ( but key password is needed to have too )
Support write new VIN …… tested OK ( i write there 999999 and OK )
Support clear TP
Support auto personalized ESL, no need renew EIS ……not tested yet
Support check ESL damage status …… tested OK
Support repair W204 ESL NEC chip(fatal error: 0xAA) and Motorola ESL chip …… tested OK ( NEC chip only yet )
Support renew VVDI-MB W204 emulator …… tested OK
and on next page is:
Special Instructions (2016.05.29)
The newest cars after 2015 with FBS4 EIS don’t support read data and password, we are researching it
Renew EIS and renew ESL require erase password.
We are building a new server for erase password. It will support all erase password after new server finished
Auto personalized ESL: Now only support auto personalized ESL with key password all 00,
we will support all the passwords in future (You can use "Personalize W204 ESL†instead before we publish new version).
In ESL window, you can input crypto password for auto personalize (no need renew EIS).
Crypto password need calculate with other tools
Posted by: OBDexpress.co.uk at
02:58 AM
| No Comments
| Add Comment
Post contains 474 words, total size 4 kb.
March 13, 2017
Look into remote key programming of Audi A1 and Q3.
Tools with:
VCDS
Experience:
I’ve tried using VCDS and going into module 09-Central Electronics but do not have Channel 01 for Remote Control Matching.
Question:
Is it possible to program remote separately withvvdi2 key programmer? Would be good if this could be added.
Possible solution:
reading an earlier thread around this issue, a user suggested to learn the keys using the immo data and then the remote programming will be enabled. if the key is added directly into the immo then the remote will not work.
So steps to follow will be here:
- Read and Save Immo data.
- Prepare Dealer Key
- Reset Instrument
- Add Key -> Learn key with immo data
i will try steps above and report the result here.
Edit:
This afternoon.professionals at obd2express help me confirm thatvvdi2 vagsoftware does work with audi a1 and q5…can program keys no issues.
attach 4th immo system list:
- Instrument – CDC3217/CDC3297/CDC3272 + 24C32
- Instrument – NEC+24C32
- Instrument – NEC+24C64
- Instrument – NEC+24C64 (2013-)
- Instrument– NEC+24C64 (2012 TFT color display)
- Instrument– NEC+24C64 (2013 TFT color display)
- Instrument– NEC35xx
- Instrument– NEC+95320
- Instrument– Motorola 9S12XHZ512(Golf6 MM7 – 2011)
- Instrument– NEC+95320(Johnson Controls)
- Instrument– NEC+95320(JCI – 2013 Bora/Jetta)
- Instrument– Visteon
- VW Passat B6/B7/CC Key Learn
- Touareg/Phaeton/A8/Cayenne/Bentley 4th immobilizer
- Audi A1 – NEC+24C64
- Audi A3/TT/R8 – CDC3217/3297 + 24C32
- Audi A4 – instrument Crypto RB4 (2001+)
- Audi A4 –instrument Crypto RB8 (2004+)
- Audi A6/Q7/Allroad – EZS-Kessy
- Audi Q3
Make key steps for 4th immobilizer cluster:
1) Diag to detect login type for cluster, if can’t auto detect login type, just choose
logint type manually
2) Read EEPROM and Save (IMPORTANT!!!)
3) Read Immo Data and Save (IMPORTANT!!!)
4) Make Dealer Key. There are 2 type, normal dealer key and OEM dealer key.
OEM dealer key: The OEM dealer key support enter workshop for online
adaptation (ODIS, VAS5054). Make OEM dealer key need special MEGAMOS
48 transponder that support change ID. OEM dealer key must
select one original key position. If you don’t know which one is lost, you can
insert having working key and run "Check working key positionâ€, the having
working key will become gray once detected. The not grayed position is the
lost key. You can select one to make OEM key. After OEM key make success,
it can start engine directly, don’t need step 5)
5) Add Key. Support 3 methods:
- Add dealer key to immobilizer directly: Input dealer key to VVDI2
programmer before continue. Keyless key don’t use this method, require
learn
- Learn key with read CS bytes: Input learn key number, read immo data via
OBD, learn key with the read immo data
- Learn key with immo data: Input learn key number, load immo data, learn
key with immo data support
Hopefully, it’s helpful to someone.
Source:http://blog.obdexpress.co.uk/2017/03/13/audi-key-programming-with-vvdi2/
Posted by: OBDexpress.co.uk at
06:21 AM
| No Comments
| Add Comment
Post contains 475 words, total size 5 kb.
March 11, 2017
Does not konw how to changeAudi Q5 2010 odometer mileage?
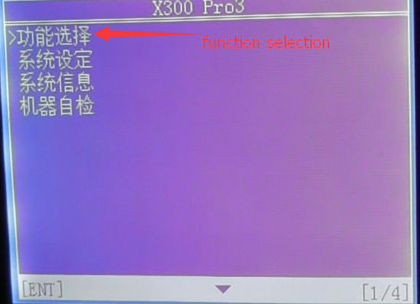
Here has a step-by-step tutorial on changAudi Q5 2010 KM withmileage programmer OBDSTAR X300 Prog3via OBD2.
Video:
Vehicle:Audi Q5 2010
Device Use:OBDSTAR X300 PRO3
Mileage Adjustment Procedure:
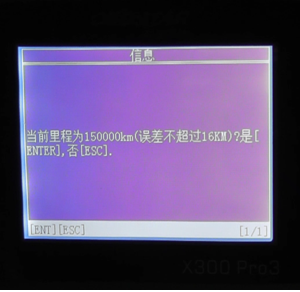
The current mileage is 150000 km.
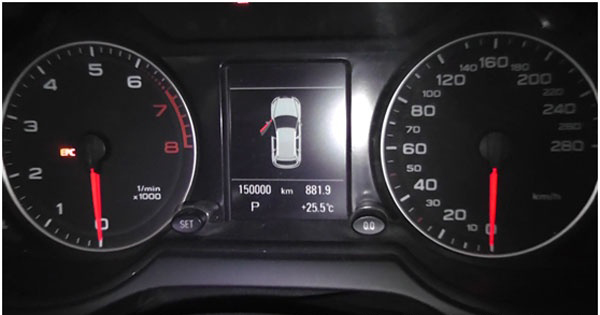
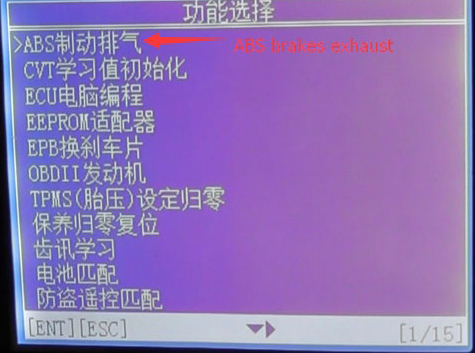
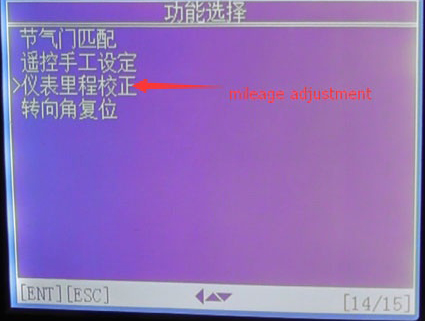
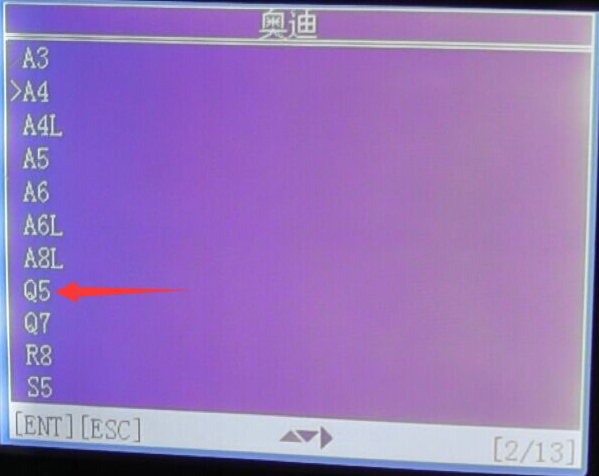
Choose "Function Selection†→"ABS brakes exhaust†→"Mileage Adjustment†→select the cat model "Q5 2008-2012â€
Choose "ABS brakes exhaustâ€
Choose "Mileage Adjustmentâ€
Select car model "Audi Q5 2008-2012†and press "ENTER†to continue
The current mileage of 150000 km (error does not exceed 16km), press "ENTERâ€
Input the mileage of the adjustment, here input"167091†as an example. This step may cost you about 10-60mins.
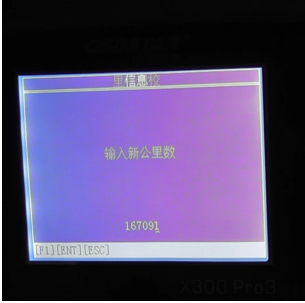
Adjustment complete
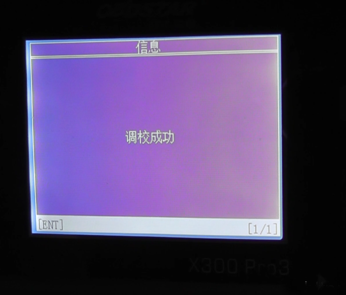
The mileage turned into 167090km
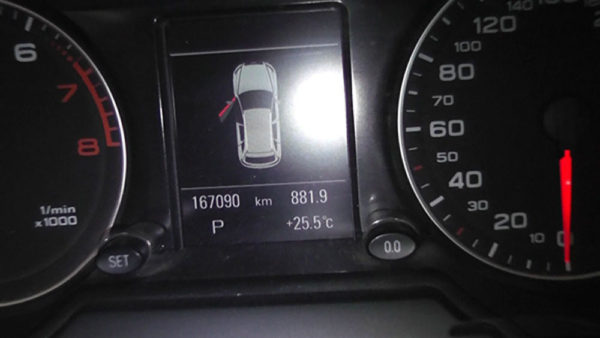
Done ! Successfully changed the mileageï¼
That’s all for OBDSTAR X300 PRO3 Mileage Adjustment on Audi Q5 2010 Hope it can help you!
Posted by: OBDexpress.co.uk at
09:00 AM
| No Comments
| Add Comment
Post contains 152 words, total size 17 kb.
March 10, 2017
Here tested Carprog V8.21two function on Golf VI 2011 :Immobilizer and odometer ajustment.
1.Carprog V8.21 change Golf VI 2011 mileage just 1 step!
Click "Change KM†and it will show the old value both in KM and ML. Choose "ML†option and enter a new value then click "Changeâ€. In this way, Carprog V8.21 change mileage for Golf VI 2011 easily!

Carprog V8.21 read& write Golf VI 2011 Immo data in 3 steps
Step1. Open Carprog V8.21 software then choose "DASHBOARDâ€â†’ "VW†→ "GOLF 2009 ONLINE DIAG V0.2â€.

Click "Read Immo†and wait its connecting.

Create a txt file on desktop named "Immo-Data-for-Golf- VI†as below:

When Carprog read out the Immo data, copy the VIN, PIN, CS and MAC to txt file "ori-cluster-2011†section.

Step2. Go to main menu and choose "TRANSPONDER†→ "VAG NEC KEY V0.1â€.

Choose "VW (TP23)â€, click the third button at top then click "Writeâ€.

Click "OK†to start write then write OK.
Click the first button at top to open folder "VW-Golf- VI-2011â€, choose "Immo-Data-for-Golf- VI-2011-carprog-read†then click "Openâ€.

Click "Write†then write OK.

Write key to Immo file: Choose "Key 3†then click "OKâ€. Choose "Immo-Data-for-Golf- VI-2011-carprog-read†file and change the file name as "Immo-Data-for-Golf- VI-2011-carprog-read-with-key-3â€. Click "Saveâ€.

Step3. Back to "DASHBOARDâ€â†’ "VW†→ "GOLF 2009 ONLINE DIAG V0.2â€.
Click "Openâ€
Open "Immo-Data-for-Golf- VI-2011-carprog-read-with-key-3â€

Click "Write Immoâ€, click "OK†then wait it OK.

Source:http://www.mileageprogrammer.com/carprog-v8-21-read-write-immo-data-change-km/
Posted by: OBDexpress.co.uk at
08:41 AM
| No Comments
| Add Comment
Post contains 244 words, total size 11 kb.
March 09, 2017
http://www.obdexpress.co.uk/wholesale/cd-software-for-renault-can-clip-v139-14609.html
Posted by: OBDexpress.co.uk at
03:19 AM
| No Comments
| Add Comment
Post contains 139 words, total size 17 kb.
March 07, 2017
This is a how-to guide of Daytime Running Lights (DLR) programming and Underhood Electrical Center (UEC) adding with aTech 2 scan tool.
Model: 2004 Saab 9-3 sport (9440)
Tool:Tech 2 clone scanner
Purpose: add a UEC control module
Process here:


Source:http://obd2all.blogspot.com/2017/03/tech-2-program-dlr-add-uec-module-manual.html
Posted by: OBDexpress.co.uk at
02:36 AM
| No Comments
| Add Comment
Post contains 52 words, total size 19 kb.
March 02, 2017


Posted by: OBDexpress.co.uk at
06:38 AM
| No Comments
| Add Comment
Post contains 129 words, total size 13 kb.
March 01, 2017
Autel scanner comparison:

Autel scanner ds808:

Autel maxidas ds808 update:
 " border="0" height="378" src="https://4.bp.blogspot.com/-aSKlEgL6gZ0/WLPwAmJulMI/AAAAAAAACHQ/uJUuloBSphELMQlEODHok58dMYbieXQyQCEw/s640/autel-scanner-ds808-ds708%2B%25288%2529.jpg" title="" width="640" />
- Make sure the Display Tablet is connected to a power source with
- Tap the Update application button from the MaxiDAS Job Menu; or
- Check all available updates:
- Tap the Pause button to suspend the updating process. When you
- When the updating process is completed, the firmware will be
Autel ds808 diagnostics:
- Auto Scan – starts auto scanning for all the available systems on the
- Control Units – displays a selection menu of all available control units of


- Establish communication with the test vehicle.
- Identify the test vehicle by selecting from the menu options.
- Select the Diagnosis section.
- Locate the required system for testing by Auto Scan or through
- Select the desired diagnostic function from the Function Menu
Here isAutel maxidas ds808 review
Posted by: OBDexpress.co.uk at
02:05 AM
| No Comments
| Add Comment
Post contains 737 words, total size 12 kb.
32 queries taking 0.0803 seconds, 139 records returned.
Powered by Minx 1.1.6c-pink.

