


August 31, 2019
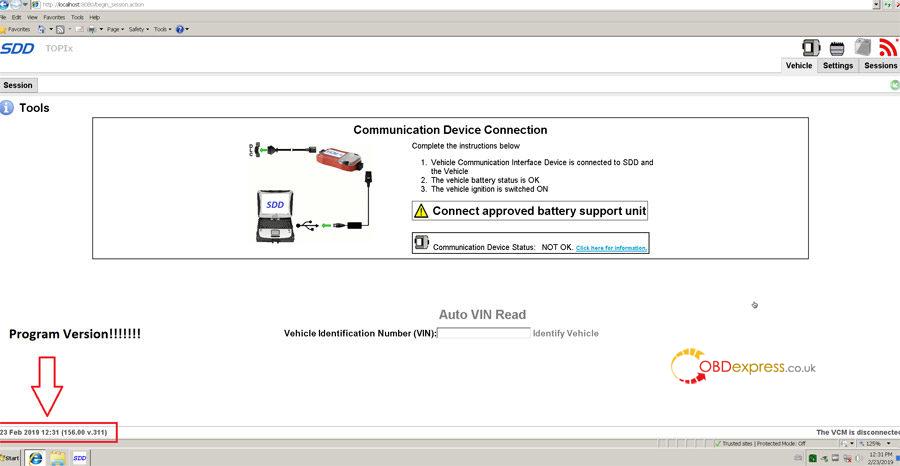
Land Rover-Jaguar SDD VMware. Activated, not tested with interface.
Please use Vmware 15 , when open first time click I moved.
Free for all.
https://mega.nz/#!dFVF3CqD!wPsCBxQWmAhkgumPkqSCEImJ4GTDTiRc1vOXkDRgWi8
8.09 GB
look at screeshot for the version number.
vmware 15 cracked:
https://mega.nz/#F!5Zsw0KLI!GI88kqwLmRJo8iiOA4i0FA
Application: have the old v12 and cannot find a crack version of it v15 to make the vmware work. I cannot run it on vm v12, you need vmware 15 cracked.
Test reports:
Works brilliantly. Some features seem to have problems though, such as configuring the Transmission Control Valve / Transmission Control Body, this seems to cause the software to crash.
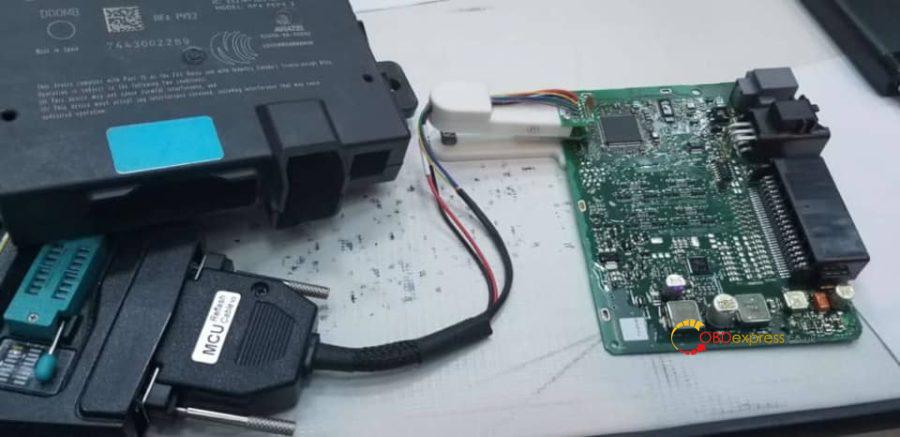
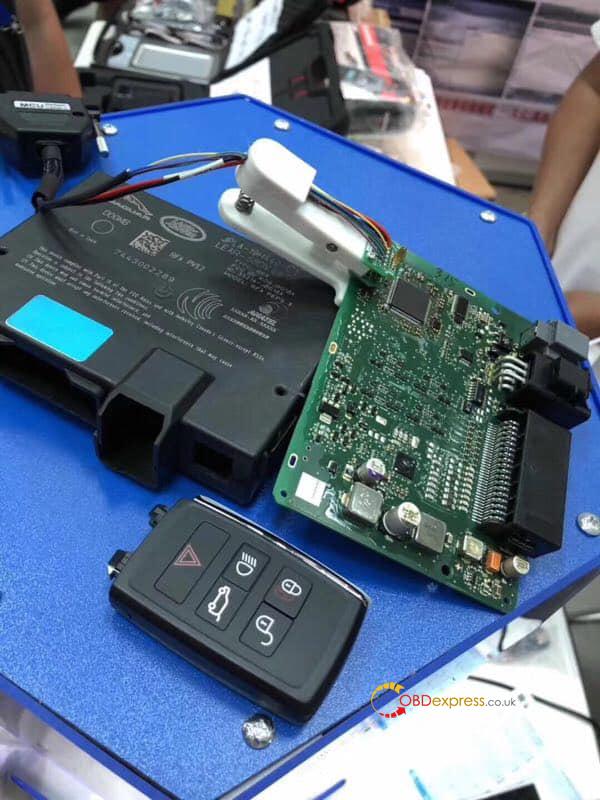
As I understand it on modern JLRs you can't program keys to existing modules. You have to replace the KVM and can only program keys to a new module.
There are 3 tool kits can program keys on Jaguar with KVM module.
- The 1st one is Mart tool
(Do 2015 FK72 KVM All Key Lost On Range Rover)
- The 2nd one is ACDP plus JLR Module 9
ACDP Program LANDROVER KVM Add Keys &All Keys Lost
- The 3rd one is VVDI PRO plus KVM adapter.
Land Rover most after 2015 year car models need to replace the new KVM module, or refresh the data. But read or write data process may cause problems as the wiring. VVDIProg will help you solve the problem, and now has one Special Clip Adapter for VVDI-Prog to Read Land Rover KVM NO Need Soldering.
http://blog.obdexpress.co.uk/2019/08/31/land-rover-jaguar-sdd-vmware-activated/
Posted by: OBDexpress.co.uk at
07:22 AM
| No Comments
| Add Comment
Post contains 250 words, total size 4 kb.
August 30, 2019
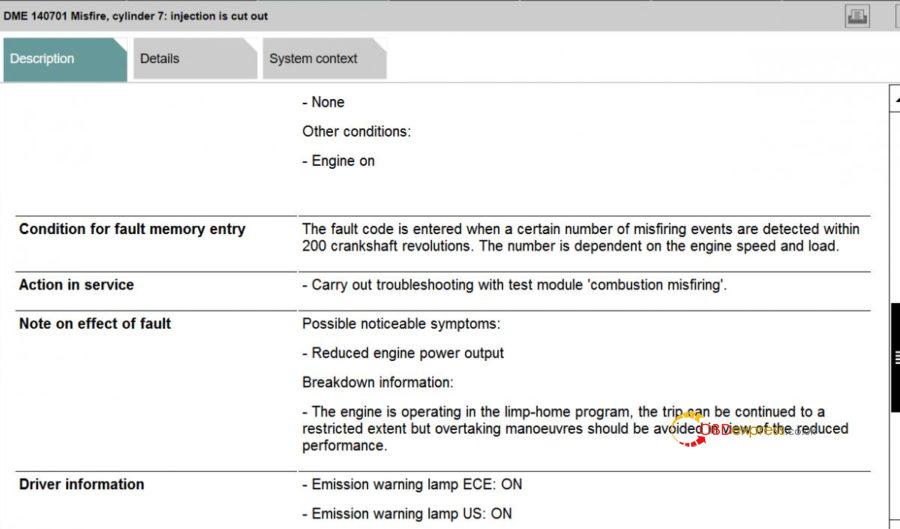
Have one BMW ICOM with ISTA software to scan a 2012 BMW 7 series N63 engine, the car runs rough and I get the fault, "malfunction powertrain". I thought it was my ignition coil so I replaced number #7.
Suggestion from one professional:
Did you have the CCP (Customer Care Package ) done and were the injectors replaced at that time? I think you should have an extended warranty on the injectors for 10 years/120K miles, so that is the problem, you should go back to the dealer and have it fixed under warranty.
Did you run the misfire test module? Before replacing anything, you can rule out the coil by swapping it to another cylinder and see if the misfire is still on #7.
Have the dealer check your VIN to see if the CCP has been done (there will also be a sticker on the driver's door jamb if it was done). Take a look here for more info:
https://static.nhtsa.gov/odi/tsbs/2015/SB-10057338-7462.pdf
It's just a guess about the injectors, as they are a common cause of drivetrain malfunction. There are multiple revisions of the injectors, so if they aren't the latest, the dealer will swap them out.
Bank 1 passenger side front to rear, 1, 2, 3, 5
Bank 2 Drivers side front to rear, 5, 6, 7, 8.
You should have INPA software loaded on your PC, it works better when testing the cylinders & injectors with the engine running. You can run Analog, or Digital component test. You cannot damage anything with INPA, it is just diagnostic Test.
Here is one INPA software for free:
https://www.4shared.com/zip/VWi1bzg2ee/EasyBMWTools_Mikes_.html
Google "bmw k+dcan cable switch" to buy the cable, actually, as to the INPA software, you will get it on a CD when you buy that cable., and then you don't need to take risk to download the free software with virus.
Fact:
My car has had the CCP ( customer service package) done in 2015. I had the dealership send me the report of service and they replaced all the injectors at that time along with many other parts except the timing chain. I'm hoping my problem is in a coil and/or spark plug. I'm going to run the INPA program and test those items.
Then I was told that:
Injectors have a 10 year 120,000 miles warranty.
It does not matter if they have been replaced in the past. If they are bad again, then the Dealer will replace them free of cost and keep replacing them until the warranty period is over.
UPDATE:
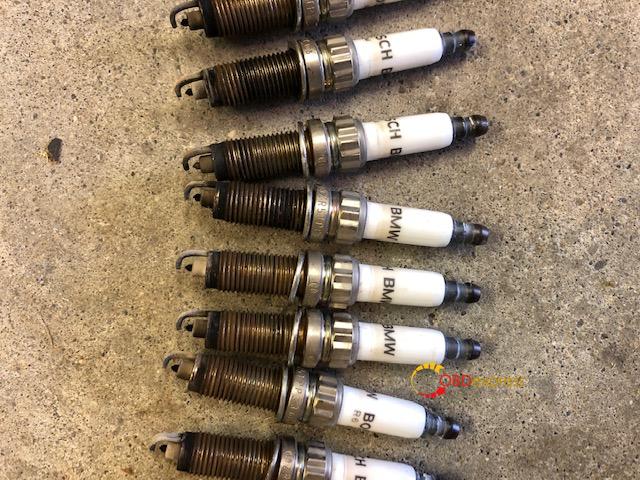
Replaced all my spark plugs which were original I'm expecting based on how they looked and I had no record they were ever changed. My fault was cleared by the ISTA program and the car runs well again. So no injector issue, even though my fault reading through ISTA said number 7 injector misfire, it was a spark plug. I tried using the INPA program, but I couldn't get the program to run, it kept coming up with an error in German.
Thanks.
Posted by: OBDexpress.co.uk at
02:22 AM
| No Comments
| Add Comment
Post contains 529 words, total size 5 kb.
Have one BMW ICOM with ISTA software to scan a 2012 BMW 7 series N63 engine, the car runs rough and I get the fault, "malfunction powertrain". I thought it was my ignition coil so I replaced number #7.
Suggestion from one professional:
Did you have the CCP (Customer Care Package ) done and were the injectors replaced at that time? I think you should have an extended warranty on the injectors for 10 years/120K miles, so that is the problem, you should go back to the dealer and have it fixed under warranty.
Did you run the misfire test module? Before replacing anything, you can rule out the coil by swapping it to another cylinder and see if the misfire is still on #7.
Have the dealer check your VIN to see if the CCP has been done (there will also be a sticker on the driver's door jamb if it was done). Take a look here for more info:
https://static.nhtsa.gov/odi/tsbs/2015/SB-10057338-7462.pdf
It's just a guess about the injectors, as they are a common cause of drivetrain malfunction. There are multiple revisions of the injectors, so if they aren't the latest, the dealer will swap them out.
Bank 1 passenger side front to rear, 1, 2, 3, 5
Bank 2 Drivers side front to rear, 5, 6, 7, 8.
You should have INPA software loaded on your PC, it works better when testing the cylinders & injectors with the engine running. You can run Analog, or Digital component test. You cannot damage anything with INPA, it is just diagnostic Test.
Here is one INPA software for free:
https://www.4shared.com/zip/VWi1bzg2ee/EasyBMWTools_Mikes_.html
Google "bmw k+dcan cable switch" to buy the cable, actually, as to the INPA software, you will get it on a CD when you buy that cable., and then you don't need to take risk to download the free software with virus.
Fact:
My car has had the CCP ( customer service package) done in 2015. I had the dealership send me the report of service and they replaced all the injectors at that time along with many other parts except the timing chain. I'm hoping my problem is in a coil and/or spark plug. I'm going to run the INPA program and test those items.
Then I was told that:
Injectors have a 10 year 120,000 miles warranty.
It does not matter if they have been replaced in the past. If they are bad again, then the Dealer will replace them free of cost and keep replacing them until the warranty period is over.
UPDATE:
Replaced all my spark plugs which were original I'm expecting based on how they looked and I had no record they were ever changed. My fault was cleared by the ISTA program and the car runs well again. So no injector issue, even though my fault reading through ISTA said number 7 injector misfire, it was a spark plug. I tried using the INPA program, but I couldn't get the program to run, it kept coming up with an error in German.
Thanks.
Posted by: OBDexpress.co.uk at
02:22 AM
| No Comments
| Add Comment
Post contains 529 words, total size 5 kb.
August 29, 2019
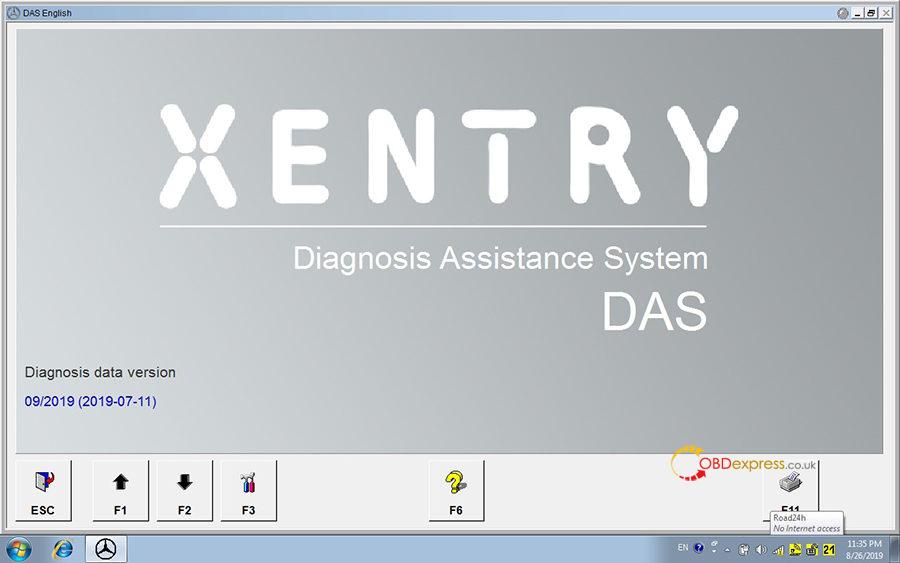
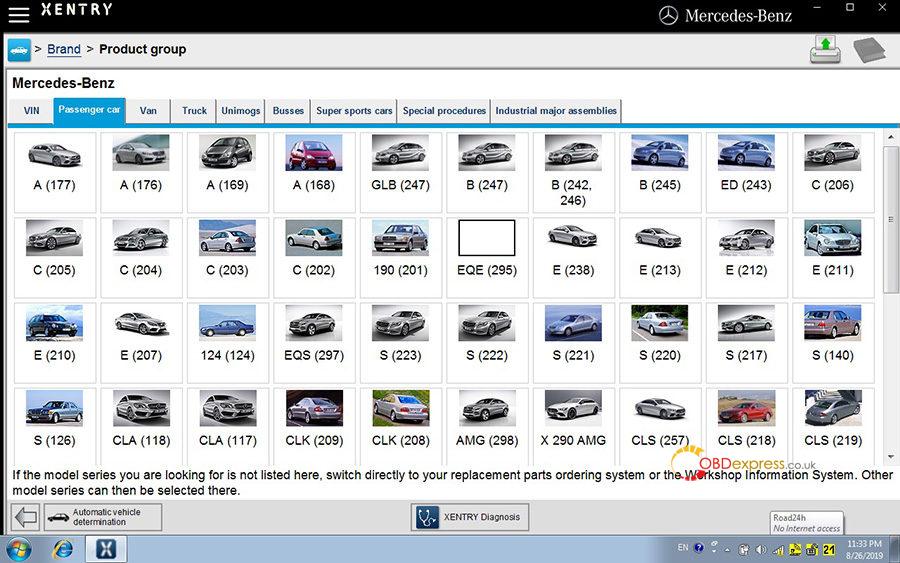
Offer the free source of XENTRY Diagnostics OpenShell ( 09-10-11/2019 ).
XDOS (09.2019) MEGA
https://mega.nz/#!8ihngYSQ!IMsb3TQBtFkUDnQJSMMDfJpXKaM3OpRo1Mq9vQoLdpU
XENTRY Diagnostics OpenShell 2019.09-Torrent
https://mega.nz/#!dZhRGA4A!yianrox2nSNSU41Kt7pscIoEZfzmujqVYfUPItWpCks
Torrent Link : No Pass
- System need Special Secure Solution for SCN Account not to Blocked !!!
( Daimler Server checking your HWID + Key + System Info if it is not original than SCN account will be Banned on Server )
Test reports of Benz Xentry.OpenShell.XDOS 2019.09 downloaded from the free source:
- Question:
When i run XS i can open 1 time
Right now not open
‘’ no access authorization code. You must contact the user help desk’’
Answer:
You will need to install key again.
Once you have done that. go to "programdata" folder then to "LIc" folder. Copy Lic_.key file and paste it in
"C:\Program Files (x86)\Mercedes-Benz\Xentry\bin"
if your system is 32bit then location is
"C:\Program Files\Mercedes-Benz\Xentry\bin"
Then you should be able to run the xentry without any problem . I have tried and tested it. I have been using it for months now. No issue.
- This release is much slower than the 07.2019, even using the same computer and SSD HD.
I tried it in Simulation and on cars, it's very slow.
No Update, Fresh win 7 Ultimate 64bit and Only Fresh Xentry installation no other programs, it works fine but very slow.
SSD version of Mercedes-Benz Xentry.OpenShell.XDOS 2019.09:
http://www.obdexpress.co.uk/wholesale/2019-9-mb-star-software-ssd.html
Security: 100% safe
No need time to download
No need to install
Need only active by following the quick guide on the desktop.
Software includes:
Xentry 09.2019
DAS 05.2019
EPC 11.2018
WIS 11.2018
SDmedia
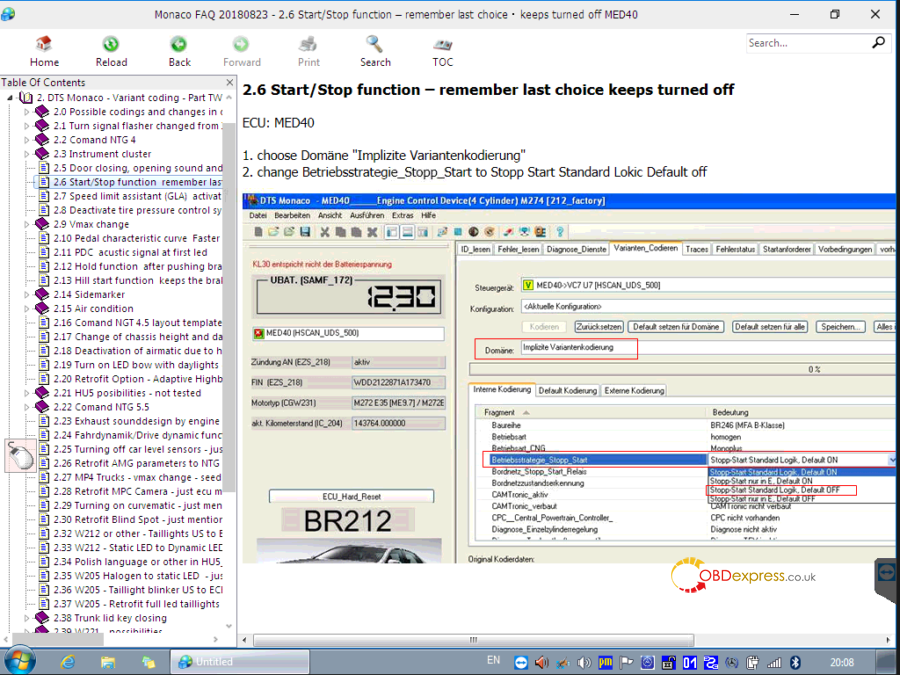
Vediamo
Vediamo Database
Star Finder 2008$2016
PL73
DTS
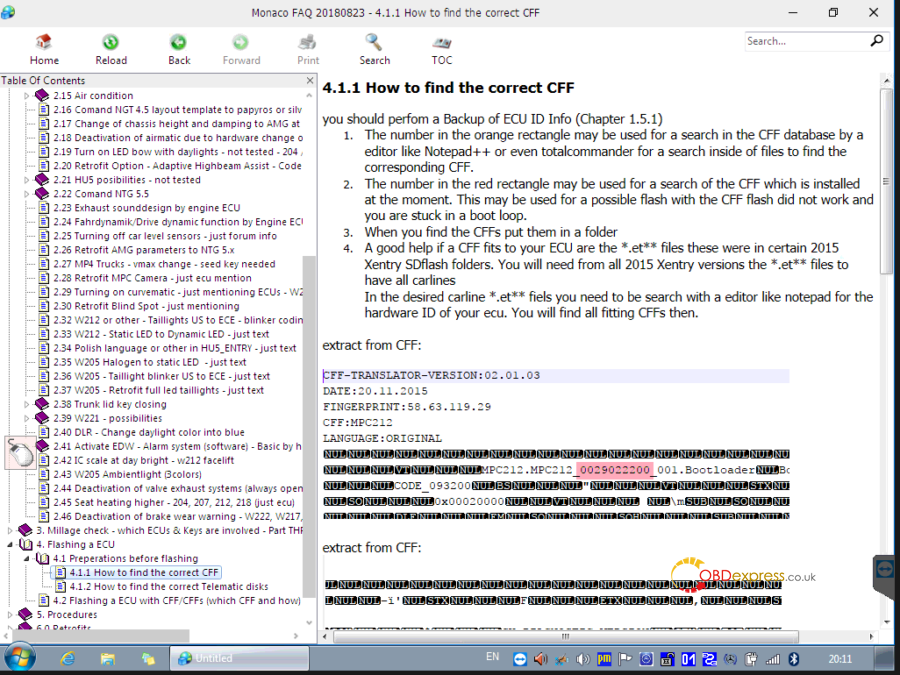
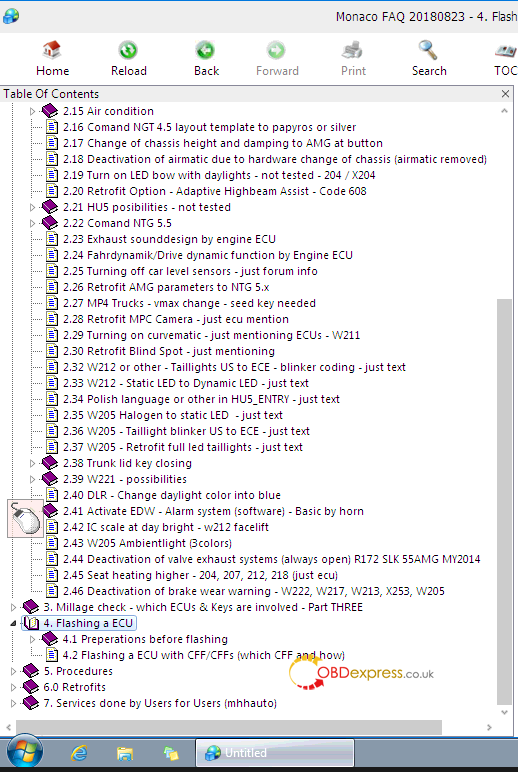
Several images of Monaco:

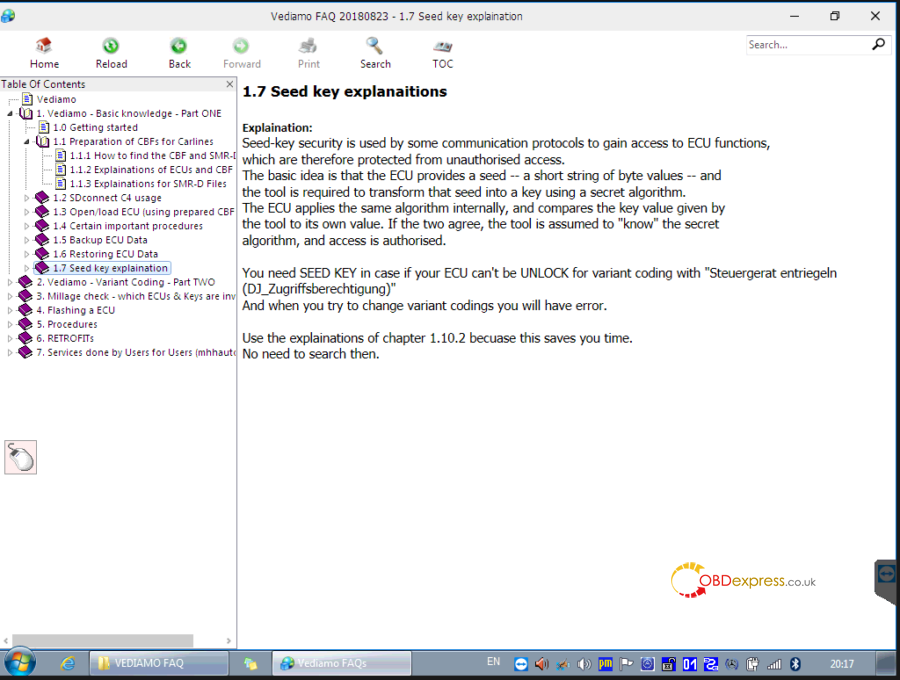
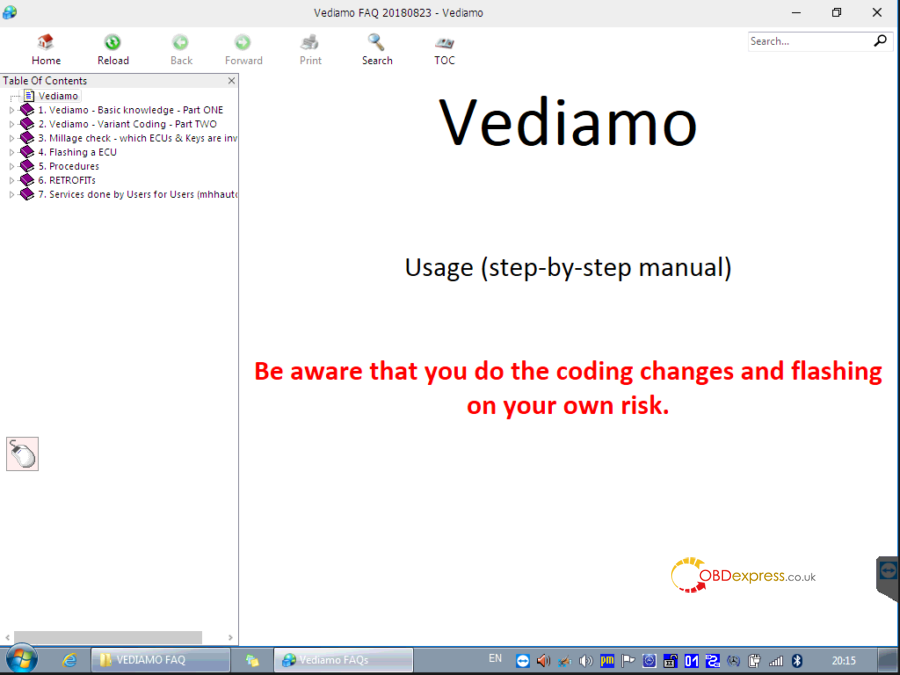
Several images of Vediamo:
Enjoy.
Posted by: OBDexpress.co.uk at
03:21 AM
| No Comments
| Add Comment
Post contains 282 words, total size 7 kb.
Offer the free source of XENTRY Diagnostics OpenShell ( 09-10-11/2019 ).
XDOS (09.2019) MEGA
https://mega.nz/#!8ihngYSQ!IMsb3TQBtFkUDnQJSMMDfJpXKaM3OpRo1Mq9vQoLdpU
XENTRY Diagnostics OpenShell 2019.09-Torrent
https://mega.nz/#!dZhRGA4A!yianrox2nSNSU41Kt7pscIoEZfzmujqVYfUPItWpCks
Torrent Link : No Pass
- System need Special Secure Solution for SCN Account not to Blocked !!!
( Daimler Server checking your HWID + Key + System Info if it is not original than SCN account will be Banned on Server )
Test reports of Benz Xentry.OpenShell.XDOS 2019.09 downloaded from the free source:
- Question:
When i run XS i can open 1 time
Right now not open
‘’ no access authorization code. You must contact the user help desk’’
Answer:
You will need to install key again.
Once you have done that. go to "programdata" folder then to "LIc" folder. Copy Lic_.key file and paste it in
"C:\Program Files (x86)\Mercedes-Benz\Xentry\bin"
if your system is 32bit then location is
"C:\Program Files\Mercedes-Benz\Xentry\bin"
Then you should be able to run the xentry without any problem . I have tried and tested it. I have been using it for months now. No issue.
- This release is much slower than the 07.2019, even using the same computer and SSD HD.
I tried it in Simulation and on cars, it's very slow.
No Update, Fresh win 7 Ultimate 64bit and Only Fresh Xentry installation no other programs, it works fine but very slow.
SSD version of Mercedes-Benz Xentry.OpenShell.XDOS 2019.09:
http://www.obdexpress.co.uk/wholesale/2019-9-mb-star-software-ssd.html
Security: 100% safe
No need time to download
No need to install
Need only active by following the quick guide on the desktop.
Software includes:
Xentry 09.2019
DAS 05.2019
EPC 11.2018
WIS 11.2018
SDmedia
Vediamo
Vediamo Database
Star Finder 2008$2016
PL73
DTS
Several images of Monaco:
Several images of Vediamo:
Enjoy.
Posted by: OBDexpress.co.uk at
03:21 AM
| No Comments
| Add Comment
Post contains 282 words, total size 7 kb.
August 28, 2019
Lost my second key from my e92 335 built in 2007 with CAS3, I already have a blank key. How to create a second key?
Tools to try:
- V2014/2015 FVDI: no success
- VVDI2: Success
Someone said CG Pro is the cheapest option, make key from dump, only make keys from dump, not OBD! Downgrade with Chinese tools carries significant risk.
A collegue of mine had his CAS bricked by CGDI/CG PRO.
I’ve had a cas3+ bricked by downgrading via OBD with VVDI2.
Just solder on the wires and use file make key.
It takes longer but is much safer.
If you’re good at soldering you’ll have the wires soldered on in 5 minutes or less.
Posted by: OBDexpress.co.uk at
06:46 AM
| No Comments
| Add Comment
Post contains 132 words, total size 9 kb.
August 26, 2019
Topic: How-To solve the error that 2010 Benz S550 got †Air Suspension malfunctionâ€. MB diagnostics like MB sd connect C5 /C4 will play its role.
What to do:
need to have someone check for fault codes using MB diagnostics likeMB sd connect C5 /C4while doing so also re-calibrate suspension. DIY – check all sensors/connections, revisit struts and control valve for connection problems/leaks, check compressor harness/connection. Worst case scenario possible strut internal leakage in which case it would need to be replaced.


Here comes one question:
One question I have is around Y36/6, I don’t see that in my vehicle or at least not in that layout. If I look at the closeup of the Y36/6 in the attached document, it does not match what I see in the picture below, in the attachment/closeup I see 6 white rubber/plastic tubes coming out and the location is color coded but if you look at the picture y36/6 has 4 metal tubes coming out on the side, is it because the closeup is shown after a cover has been removed?
Also, on mine, on top of the compressor there is a silver metallic block that has 4 metal tubes coming out from the top and not from the sides, is the difference due to mine not being 4Matic?
Last but not the least, all the diag and re-calibration you talk about, can those be done throughMB STAR Tool?
Here is the answer:
4matic does not matter, Y36/6 is the valve block @ compressor only thing that might appear different is labeling could be missing. STAR should accommodate re-calibration & diagnostics.

Finally, I purchased STAR C5 with SD disk, here is the link.
Compressor and valve unit are behind the bumper just in front of the right wheel. If you remove the right front wheel and the wheel well liner you will see the valve block.
Here’s the pic for quick reference

What’s the deal with jacking the car?
I typically follow the WIS procedures. For the suspension work you would normally want to release pressure from the struts in order to avoid damage to them or you. I’ve always done this viaXentry.
What type of lug?
After finally understanding how to locate and test the air leak at the valve, it turns out my wheels have special lugs all of them as opposed to one being the lock nut. It looks like flower, what gives??? I only have the usual MM impact wrench socket. What is it called and where to get it?
Reply: So, 17mm has been stock on many Mercedes for some time. The Convex (flower head) bolts appeared with the Maybach and then the W221 and are also on several other models. It is entirely possible that someone put 17mm hex head bolts on your car or even another size, do you have aftermarket wheels? You might just take a 17mm, 18mm, 19mm, etc. out to the car with you to see which one fits best. At the very least the lug wrench in the tool kit in the trunk should fit.
I fixed my Airmatic issues Friday, so relieved.
I replaced the valve block (which I suspect was actually fine) and as I was putting the lines back in, I noticed a very small crack on one of the strut air lines where it must have been bent around the brass fitting. I cut off the bad inch and reconnected the line to the fitting, and now the suspension works just fine. I drove it for 7 hours yesterday (road trip) and not a single problem manifested itself! I did a soapy water leak test but this must have been too small to see.
Regarding that additional pump/component in the fender: I was able to take off the torx bolts holding it to the bracket there and slide the part over to the right. It actually fit pretty nicely just resting on the bottom of the FR fender/bumper. Anyways, just sliding it out of the way gave me enough room to work on the valve block.
Basic steps:
Removed wheel and wheel fender liner
Removed 2 torx bolts holding that mystery part on then carefully slid it off the bracket and braced it against the bumper/fender. Be very careful not to mess with the pressure lines too much, I’m not sure how much flexing they’re rated for but it certainly isn’t much.
Use a 10 mm wrench to crack open all the fittings at the valve block and drain the air system (compressor fitting uses a 12 mm)
Unscrew the single screw holding the valve body on and then slide the whole thing out, vehicle right. A rubber fitting holds it on the other end, it just slides off
I am posting a youtube video on the process:
If you have the same problem, you might as well get the valve body JIC… and follow the video instructions.
Credits to @bshad74 and @cstevenson(mbworld.org/forums/)
Source:
Posted by: OBDexpress.co.uk at
03:52 AM
| No Comments
| Add Comment
Post contains 857 words, total size 34 kb.
Post contains 714 words, total size 26 kb.
August 23, 2019
Purpose:How to solveGM MDI GDS2 software"Days Remaining Until Lease Expires 1†and "GM MDI software is out of dateâ€.
Here you are:
Part 1: Solution to "GM MDI software is out of dateâ€
If any of the GM MDI (item no. SP163,SP163-C,SP163-D,SP163-E) got the error †GM MDI software is out of dateâ€.

Follow the 5 steps to do:
- Hold on the start button, ready to connect the power supply.

- Hold on this button, connect the power supply, the power light on, wait for 10 seconds.

- When all the lights turn on, release the button and the machine enters the recovery state.

- Connect the USB cable to the computer, ready to recover.

- OpenGM MDIManager and choose "Recoverâ€
Done.
Part 2: Solution to GM MDI GDS2 software "Days Remaining Until Lease Expires 1â€
Actually,GM MDI already fixed the bug that GDS2 software displayed "Days Remaining Until Lease Expires 1â€, that means the newest GM MDI won’t have this error any more.
Now:

Before:

In the paste, GM MDI user can follow the next steps to fix the problem.
There is a icon on the software desktop, open this icon to follow the operation guide, it will tell how to adjust the time.
They way to activate GM MDI GDS2 software:
- Reset computer time/date
1) Run "lease time†in the computer’s start menu, if GDS2 is pre-installed


2) Click on "Stop ALGM Serviceâ€, change data and time in "Date†and "Time†column. Make sure the date and time are correctly set.
3) Check and confirm the "Leasetime†is completely consistent with the computer system time, if not same, please change your PC date and time.

4) Select the date and time of the time zone (Your local exact time ).

2.Activate GM MDI GDS2 software
1) Connect your computer with network, browse to:
2) Select user account, then click on "okâ€.

3) Press "Continueâ€

4) Click on "OK†button when the system display new Tech2 version.

5) Click on "OKâ€.

6) Select "GDS2†Tab and then press on Run GDS2 button.

7) The system will install JAVA software automatically.

![]() After installing the JAVA, the system will automatically lease renewal.
After installing the JAVA, the system will automatically lease renewal.
9) After lease renewal, startMDI GDS software, the system will display the new lease the remaining days in the lower-left corner of software program.
Thanks.
Please enjoy.
Posted by: OBDexpress.co.uk at
09:11 AM
| No Comments
| Add Comment
Post contains 393 words, total size 45 kb.
August 22, 2019
Topic: How to use CG PRO do odometer reset for2010 BMW X1
Here you are:
Car Model:BMW X1 (imported version)
Year: 2010 model
Instrument tray table: 35080
Guard against theft:CAS3-0L15Y
Device:CGPRO
Operation: mileage repair
CG Operating tutorial:
1. View specific models

2. Record the original mileage.

3. The vehicle power off, remove the instrument module, view the style, determine the storage chip.


4. Remove the CAS module, view the style, and determine the storage chip


5. Open the specialCG PRO software
and enter the corresponding operation interface. First, clean the instrument chip, place it into the adapter and repair it into the target mileage.

6. Clean the glue on CAS module, use DB25 adapter wiring, and repair it into target mileage.


7. The instrument panel and CAS have been processed and loaded. Some will appear fault code, clear code can;
Some will display English, using CGDI will be the instrument code.
 2010 BMW X1 odometer correction withCG Pro 9S12 programmer,Successfulï¼
Source:http://www.mileageprogrammer.com/2010-bmw-x1-with-cg-pro/
Posted by: OBDexpress.co.uk at
09:26 AM
| No Comments
| Add Comment
Post contains 169 words, total size 11 kb.
August 21, 2019
OBDSTAR OBDPROG Key RT can easily renew key on a wide range of car brands. This article is available with Kia V2 (PCF7953) key renew procedure from the connection with the computer, to connect the chip according to the wiring diagram, to key renew successfully in one minute.
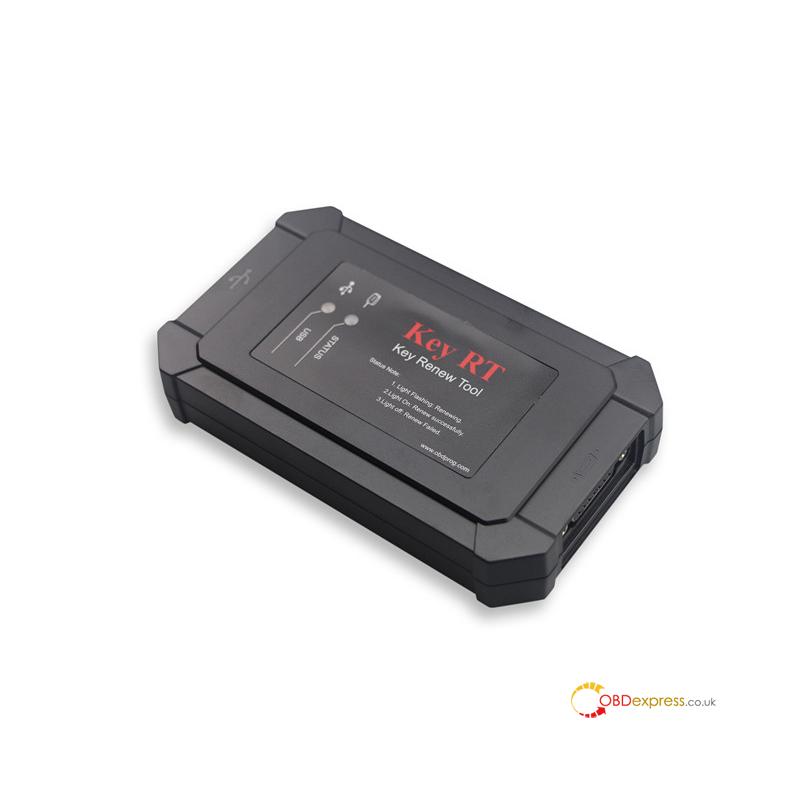
OBDSTAR OBDPROG Key RT Package:
Main unit
Main cable
W001
W003
PCF adapter
PCF 7953_38
PCF 7961
PCF 7952
PCF 7945AC
PCF 7941/7341
PCF 7953 (45)
Packing Box
Certificate

OBDPROG Key RT Vehicle keys coverage
Alfa Romeo
Audi
BMW
Cadillac
Chevrolet
Chrysler /Dodge
Citroen
Dacia
Fiat
Ford
Honda
Hyundai
Jaguar
Jeep
Kia
Lada
Land Rover
Lincoln
Maserati
Mini
Mitsubishi
Nissan
Opel
Peugeot
Porsche
Renault
Rolls Royce
Smart
Suzuki
Volvo
VW
Baojun
Beijing
Geely
Haval
Shanghai GM
Trumpchi
More details: OBDSTAR Key RT Car List

Use OBDSTAR OBDPROG Key RT for key renew on Kia in step by step:
Youtube vido demo:
- OBDPROG Key RT connection with the computer
Connect Key RT and PC via USB cable.
Connect Key RT power connector.
Key RT successfully connected with PC.


- Select a Kia Key.

- Open the Key RT software and find the related wiring diagram.
Click on "Kia", then "V2 (PCF7953)", then "Method 1", then "Method 2".


To Connect the chip according to the wiring diagram
1). Weld W001 and the key chip.


2) Select PCF adapter.


3). Connect PCF adapter with Key RT.

4) Connect W001 and the PCF adapter.


Make sure the circuit is connected.
- Key renew procedure with OBDPROG Key RT
Click on "Reset".


When you see 100% reset. It is finished.
OBDPROG Key RT tech support www.obdexpress.co.uk
OBDPROG Key RT update on the official site: http://www.obdprog.com
OBDPROG Key RT Key Renew Tool For sale :http://www.obdexpress.co.uk/wholesale/obdstar-obdprog-key-rt-renew-tool.html
Posted by: OBDexpress.co.uk at
09:31 AM
| No Comments
| Add Comment
Post contains 305 words, total size 10 kb.
OBDSTAR OBDPROG Key RT can easily renew key on a wide range of car brands. This article is available with Kia V2 (PCF7953) key renew procedure from the connection with the computer, to connect the chip according to the wiring diagram, to key renew successfully in one minute.
OBDSTAR OBDPROG Key RT Package:
Main unit
Main cable
W001
W003
PCF adapter
PCF 7953_38
PCF 7961
PCF 7952
PCF 7945AC
PCF 7941/7341
PCF 7953 (45)
Packing Box
Certificate
OBDPROG Key RT Vehicle keys coverage
Alfa Romeo
Audi
BMW
Cadillac
Chevrolet
Chrysler /Dodge
Citroen
Dacia
Fiat
Ford
Honda
Hyundai
Jaguar
Jeep
Kia
Lada
Land Rover
Lincoln
Maserati
Mini
Mitsubishi
Nissan
Opel
Peugeot
Porsche
Renault
Rolls Royce
Smart
Suzuki
Volvo
VW
Baojun
Beijing
Geely
Haval
Shanghai GM
Trumpchi
More details: OBDSTAR Key RT Car List
Use OBDSTAR OBDPROG Key RT for key renew on Kia in step by step:
Youtube vido demo:
- OBDPROG Key RT connection with the computer
Connect Key RT and PC via USB cable.
Connect Key RT power connector.
Key RT successfully connected with PC.
- Select a Kia Key.
- Open the Key RT software and find the related wiring diagram.
Click on "Kia", then "V2 (PCF7953)", then "Method 1", then "Method 2".
To Connect the chip according to the wiring diagram
1). Weld W001 and the key chip.
2) Select PCF adapter.
3). Connect PCF adapter with Key RT.
4) Connect W001 and the PCF adapter.
Make sure the circuit is connected.
- Key renew procedure with OBDPROG Key RT
Click on "Reset".
When you see 100% reset. It is finished.
OBDPROG Key RT tech support www.obdexpress.co.uk
OBDPROG Key RT update on the official site: http://www.obdprog.com
OBDPROG Key RT Key Renew Tool For sale :http://www.obdexpress.co.uk/wholesale/obdstar-obdprog-key-rt-renew-tool.html
Posted by: OBDexpress.co.uk at
09:31 AM
| No Comments
| Add Comment
Post contains 305 words, total size 10 kb.
August 20, 2019
New coming!!!Want to know whether the Porche key is working? Is remote working? TheYanhua PorcheBCMkeytesterwilltellyou
Here we are:
Youtube video demo:

Integrated interface board makes installation simple and efficient

It can detect whether the current key remote is working
Pressing the key button when the green light lighting, it indicates that the current key remote is working

Placing the key on the induction coil
Porsche BCM testercan detect whether the current key can start the car
Pressing: TEST


YANHUA BCM tester for Porsche source from:
Posted by: OBDexpress.co.uk at
02:20 AM
| Comments (1)
| Add Comment
Post contains 109 words, total size 12 kb.
New coming!!!Want to know whether the Porche key is working? Is remote working? TheYanhua PorcheBCMkeytesterwilltellyou
Here we are:
Youtube video demo:
Integrated interface board makes installation simple and efficient
It can detect whether the current key remote is working
Pressing the key button when the green light lighting, it indicates that the current key remote is working
Placing the key on the induction coil
Porsche BCM testercan detect whether the current key can start the car
Pressing: TEST
YANHUA BCM tester for Porsche source from:
Posted by: OBDexpress.co.uk at
02:20 AM
| No Comments
| Add Comment
Post contains 109 words, total size 12 kb.
August 16, 2019
How-to: Ford F150 2016 Key Programming step-by-step usingOBDSTAR X300 DP PLUSvia OBD
here you are:

Ford F150 2016


Youtube video demo:
OBD connect with the car

Select "Diag program"

Select"IMMOBILISER"

Select "FORD/LINCILN"

Select"FORD/LINCOLIN V32.43"->Click Enter


Select"FORD"->Click "Enter"

Select "Immobiliser"->Click"Enterâ€

Select"F150/250"

Select"2015-2019"

Select"key Number"->Click "Enter"

Communicating...

Make sure there are at least 2 keys

Insert the current car key


Switch ignition on, then click"Enter"

Communicating...

Make sure WIFI is connected, then click"Enter"

Reading date...


Insert a new key and switch ignition on, then click"Enter"

Configuring the system,pls wait...

Key program success!!!
OBDSTAR X300 DP PLU For sale:
http://www.obdexpress.co.uk/wholesale/obdstar-x300-dp-plus-key-master.html
Posted by: OBDexpress.co.uk at
09:21 AM
| No Comments
| Add Comment
Post contains 107 words, total size 20 kb.
Question:Thereisalotofupgrdaenowbutdoesn’tappearinmyX300DPthisnewupgrade,isthisupgradeavailableonlyforDPPlus?
Answer:Isyourdeviceexpired1yearfreeupdate?
Question:andhowmuchthepriceifthesubscriptionwasalreadyexpired?
Answer![]() lease click on here forobdstar X300DP plus yearly-upgrade subscription
lease click on here forobdstar X300DP plus yearly-upgrade subscription
For C configuration.
Make a payment
Leave your Machine Serial Number
obdstar customer service will help authorize.

Good to know: obdstar X300DP plus has one-year-free update since the day of registration. The update site iswww.obdstar.com
Posted by: OBDexpress.co.uk at
02:37 AM
| No Comments
| Add Comment
Post contains 56 words, total size 9 kb.
August 14, 2019
Good news!!!If you wait the Xhorse Condor Dolphin for a long time and can't get it, you can choose 2M2 Tank Machine to replace Condor Dolphin.

2M2 Magic Tank is very easy-to-use, Chinese and English menus are optional, with video operation.
Database version:2019.0612
Milling cutter spindle brushless motor, ball screw drive mechanism, cross roller guide, aluminum-alloy body structure, outer casing engineering plastic, 2 in 1 clamp,Mobile APP Android control interface, easy to operate, fast and accurate, easy to carry out work.With 4 guide pins, 2 milling cutters. Work in the outside can carry with a stable chassis.
2M2 Magic Tank Automatic Car Key Cutting machine Supported Vehicles:
Europe:
For LANCIA, For LAND ROVER, For LDV, For MAN, For MASERATI, For MERCEDES-BENZ, For MINI, For OPEL, For PEUGEOT,
For PORSCHE, For RENAULT, For ROVER, For SAAB, For SEAT, For SKODA, For VAUXHALL, For VOLKSWAG, For VOLVO
For MITSUBIS, For NISSAN, For SSANGYON, For SUBARU, For SUZUKI, For TOYOTA
How to Change Cutter and Probe for 2M2 Tank Machine?
Rotate the handwheel to move the middle clamp to the left.
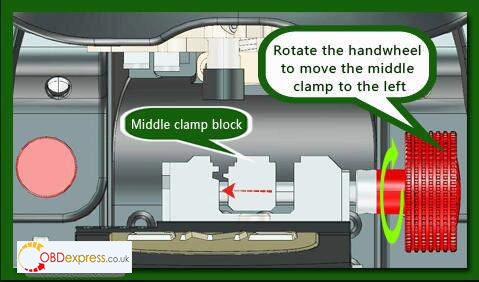
Let the middle clamp completely against the left clamp
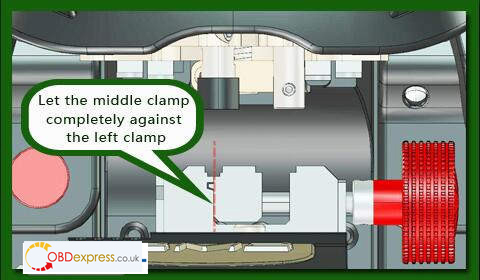
Insert the cutter/probe to the top
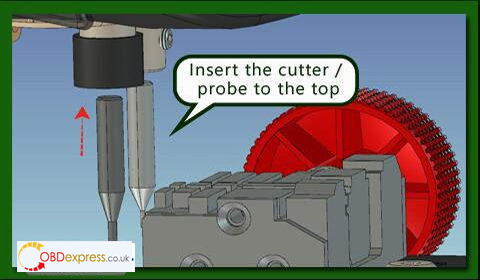
Let the middle clamp completely against the left clamp
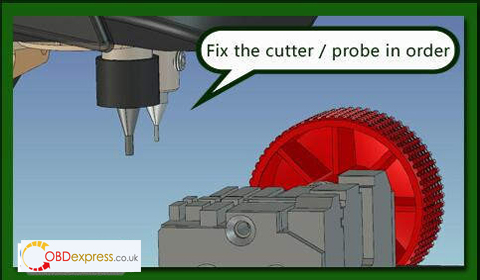
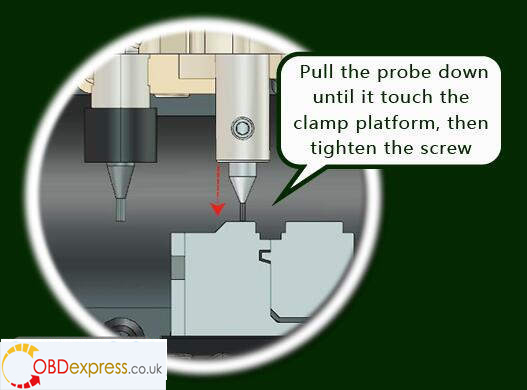
Loosen the fixing screw of the probe.pull the probe down until the clamp platform,then tighten the screw to complete the operation
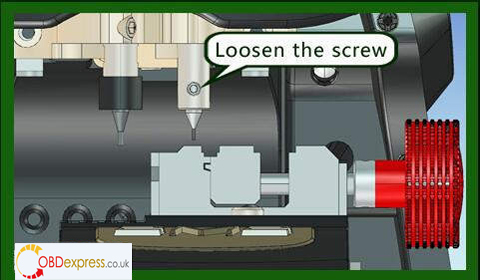
Pull the probe down until it touch the clamp platform,then tighten the screw.
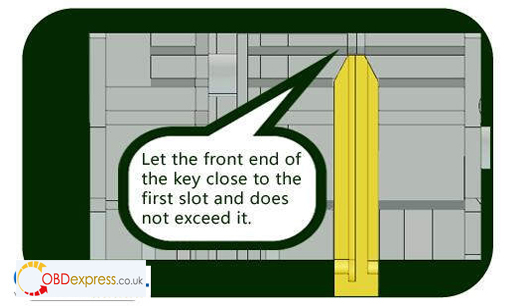
How to Fix Key on 2M2 Key Cutting Machine Clamp?
162-T Key:
Please set the key embryo in the left side
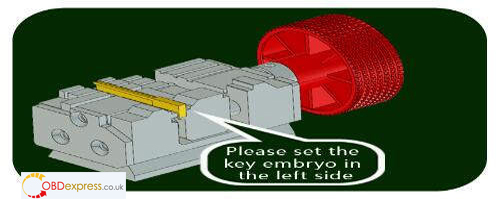
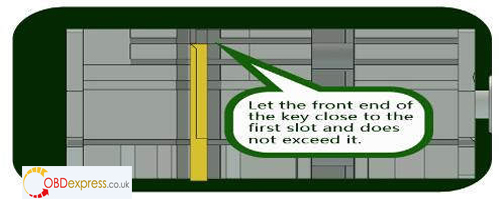
Let the front end of the key close to the first slot and does not exceed it.
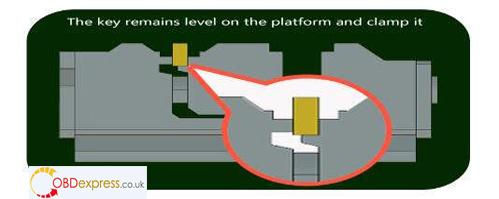
The key remains level on the platform and clamp it
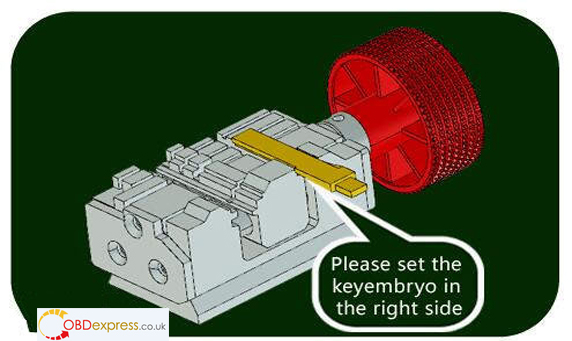
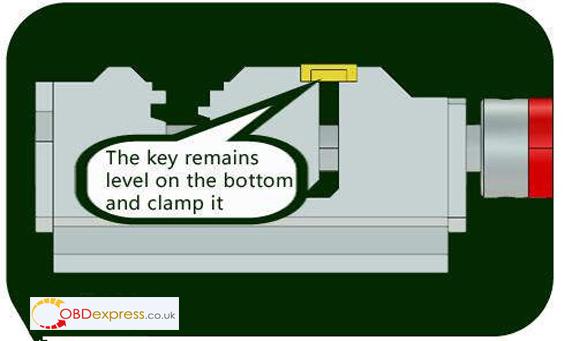
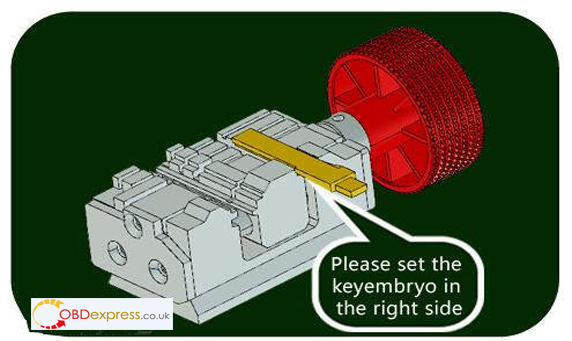
FLAT Key
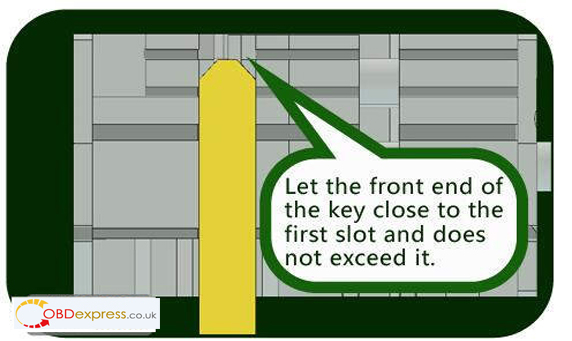
Please set the key embryo in the right side
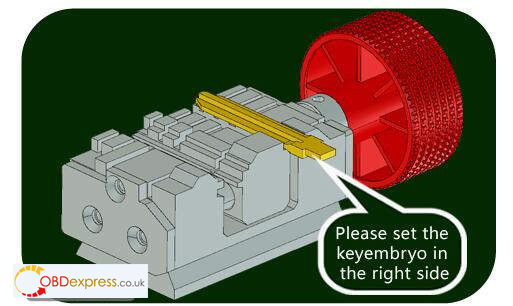
Left the front end of the key close to the first slot and does not exceed it
The key remains level on the bottom and clamp it

FLAT Key Shoulder:
Use the stop and insert it to the right slot

Block the key shoulder and clamp it.

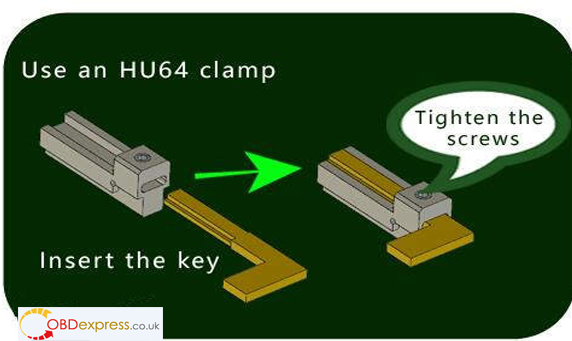
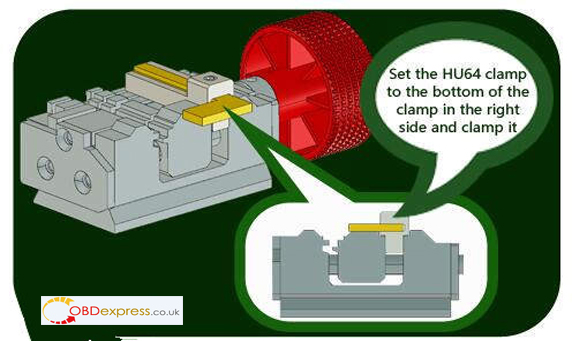
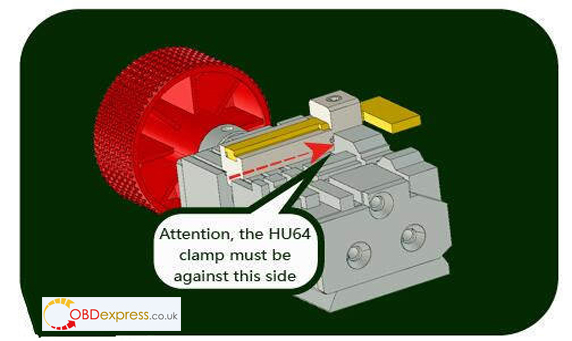
HU64 Key:
Use an HU64 clamp,insert the key and then tighten the screws
Set the HU64 clamp to the bottom of the clamp in the right side and clamp it
Attention,the HU64 clamp must be against this side
HU66 Key
Please set the keyembryo in the right side
Block the key shoulder with the edge of the clamp

The key remains level on the bottom and clamp it
LASER Key
Please set the keyembryo in the left side:
Let the front end of the key close to the first slot and does not exceed it
The key remains level on the bottom and clamp it

Laser Key Shoulder:
Use the stop and insert it the left slot
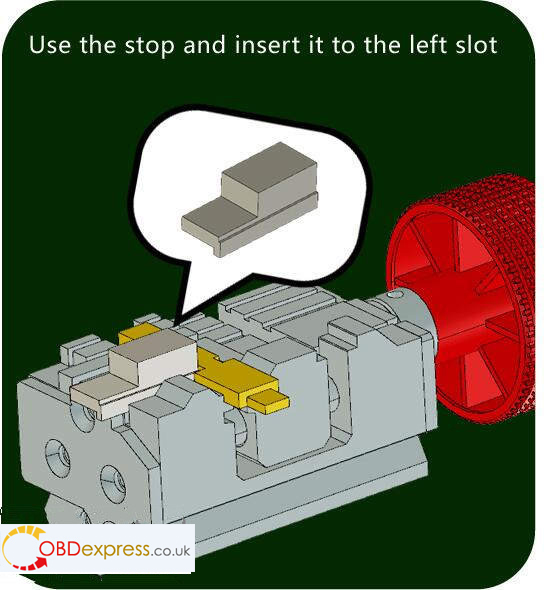
Block the key shoulder and clamp it.
2M2 Magic Tank Automatic Car Key Cutting Machine For sale :
http://www.obdexpress.co.uk/wholesale/2m2-magic-tank-key-cutting-machine.html
Posted by: OBDexpress.co.uk at
02:27 AM
| No Comments
| Add Comment
Post contains 543 words, total size 13 kb.
August 13, 2019
Experience with OBD2 solution for odometer correction on all makes at cheap & expensive price.
Cheap working ones:
- via OBD2
- obdstar x300m price drops to 209eur. And it can do what you paid.
- obdstar x300m reviews (during the past 6 months)
http://blog.obdexpress.co.uk/2019/08/09/obdstar-x300m-price-drops/
OBDSTAR DP Plus mileage correction feedback (from 7th October, 2015 to now and future)
https://www.digital-kaos.co.uk/forums/showthread.php/491145-OBDSTAR-Mileage-Correction-Feedback/
- Free download:obdstar x300m vehicle coverage
- Method: besides via OBD, it allows the user to change KM via Chip, Cluster & BCM, Tacho & BSI, Micro, EWS, etc.
- digiprog 3 4.94 coverage:
http://www.mileageprogrammer.com/digiprog-3-vs-obdstar-x300m-mileage-programmer/
- digiprog 3 4.94 reviews
http://blog.obdexpress.co.uk/2017/09/22/digiprog3-v4-94-mileage-correction-car-list/
Less expensive one:
OBDSTAR DP Plusis a full OBD2 solution for odometer correction on all makes. Go to the official sitehttp://en.obdstar.com/Function%20List.htmlyou are able to view the vehicle list.

Expensive ones:
- Enigma is probably the best on the long run
- DP4 its the best for this job diagpro4 but very expensive
Read article:DP4 or DP3, which one better
Conclusion:
Problem will start if you have only 1 tool and this fails. And if it damage the dash for example on VAG you will have problems with immo and keys too and each fail will cost you much time and most time money too.
You will need good programmer too to fix dashes if anything happens.
Just my opinion - buy some tools just for 1 brand and good programmer to start to work or better play at beginning.
Source:http://www.mileageprogrammer.com/need-universal-obd2-odometer-correction-tool/
Posted by: OBDexpress.co.uk at
07:32 AM
| No Comments
| Add Comment
Post contains 251 words, total size 5 kb.
 Posted by: OBDexpress.co.uk at
02:35 AM
| No Comments
| Add Comment
Posted by: OBDexpress.co.uk at
02:35 AM
| No Comments
| Add Comment
Post contains 457 words, total size 25 kb.
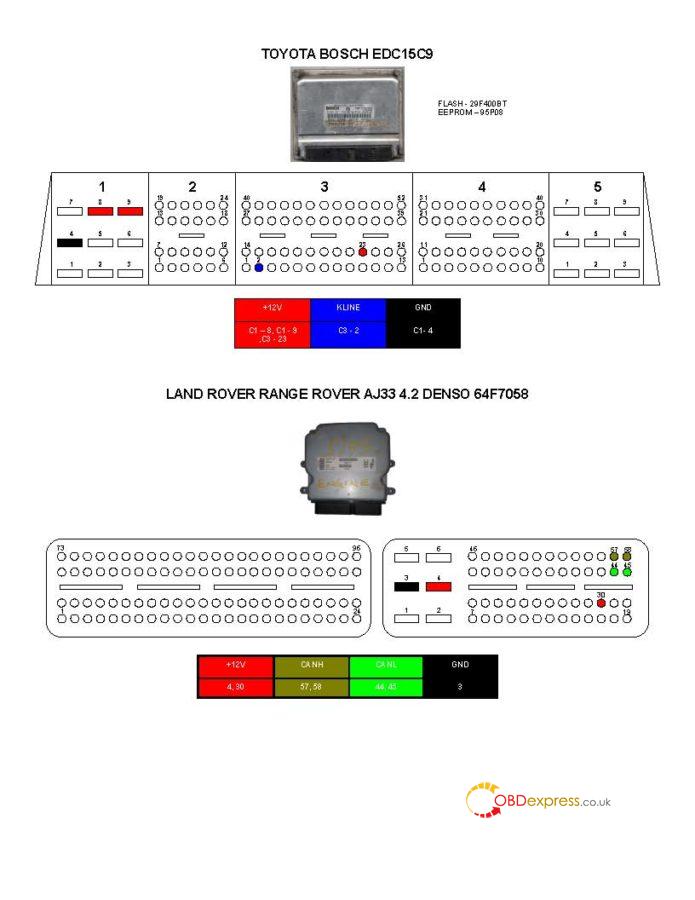
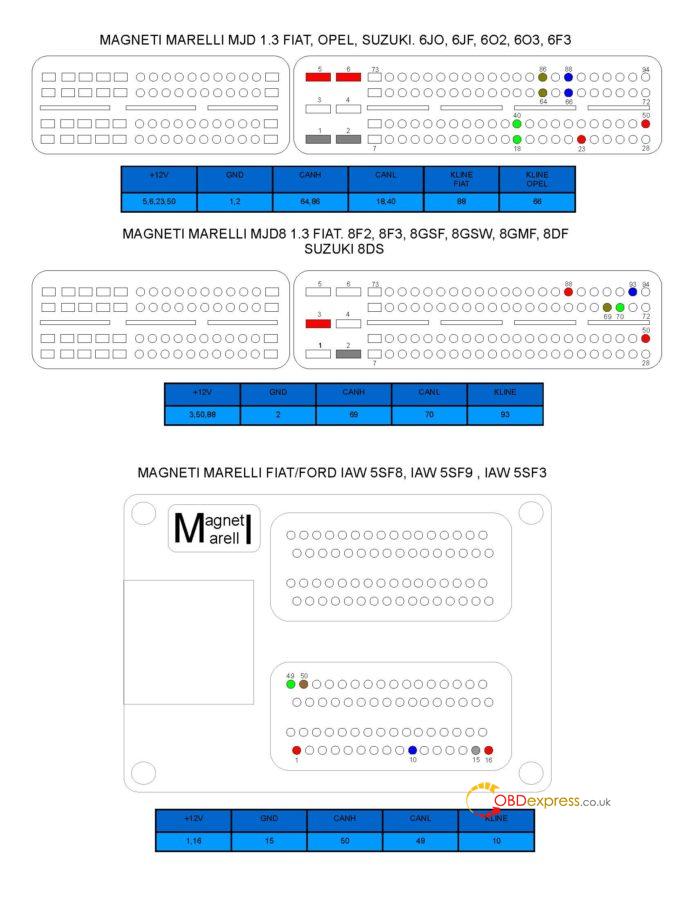
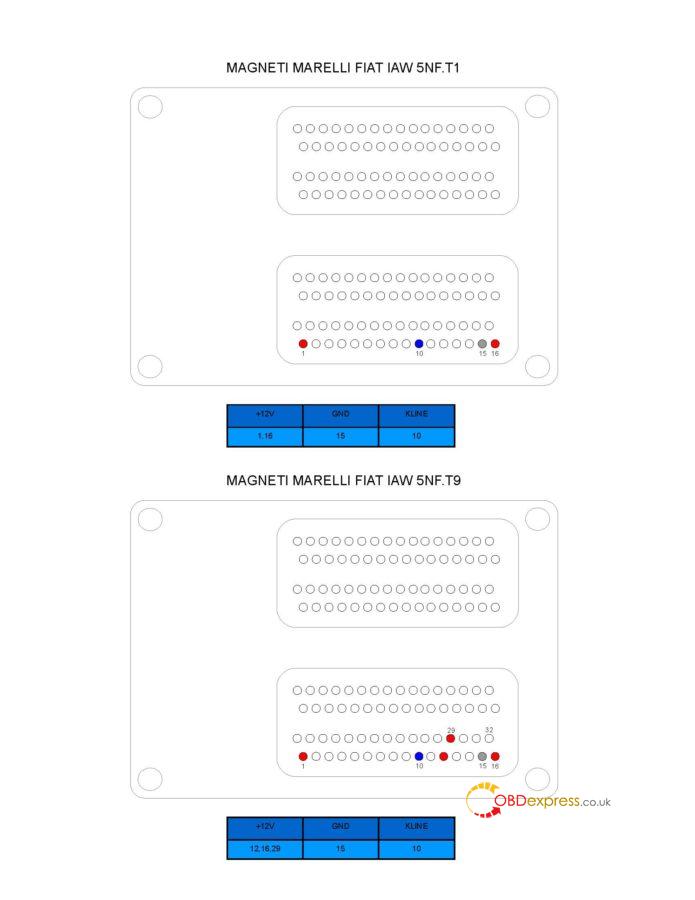
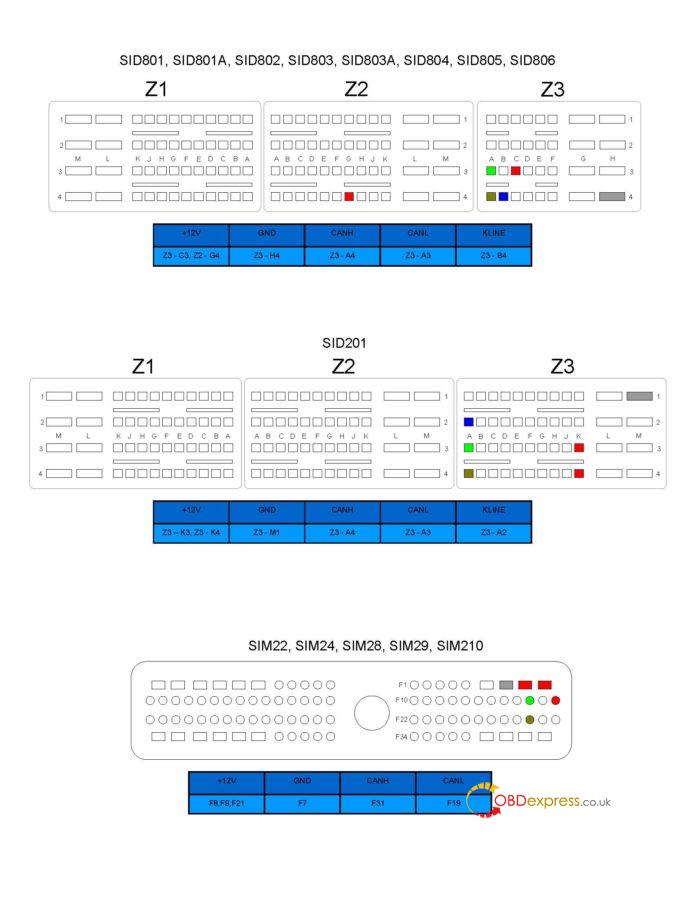
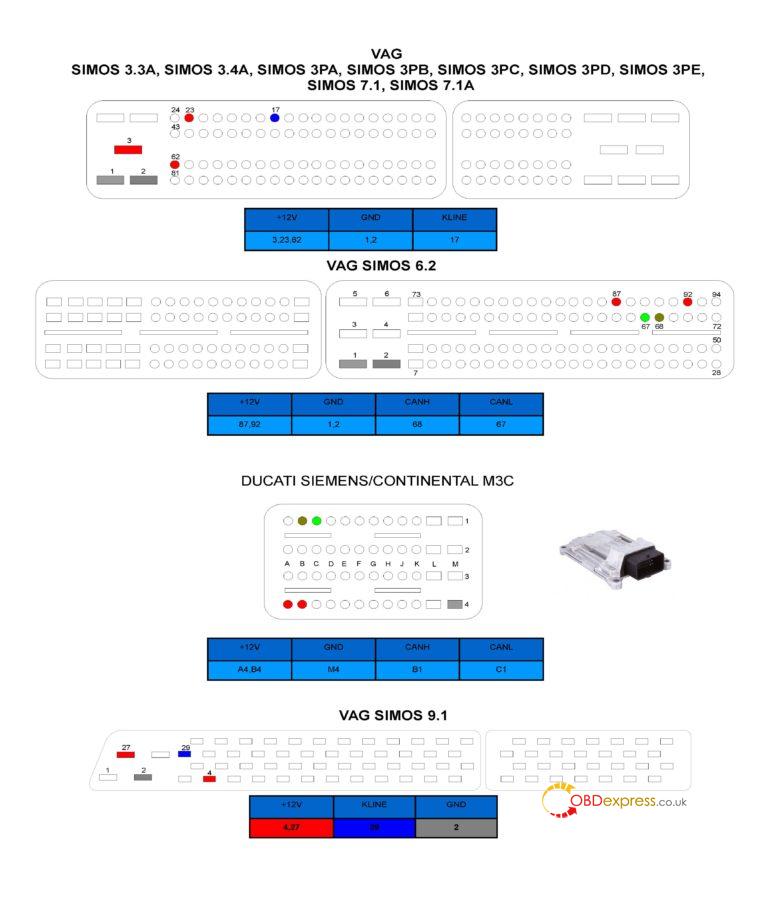
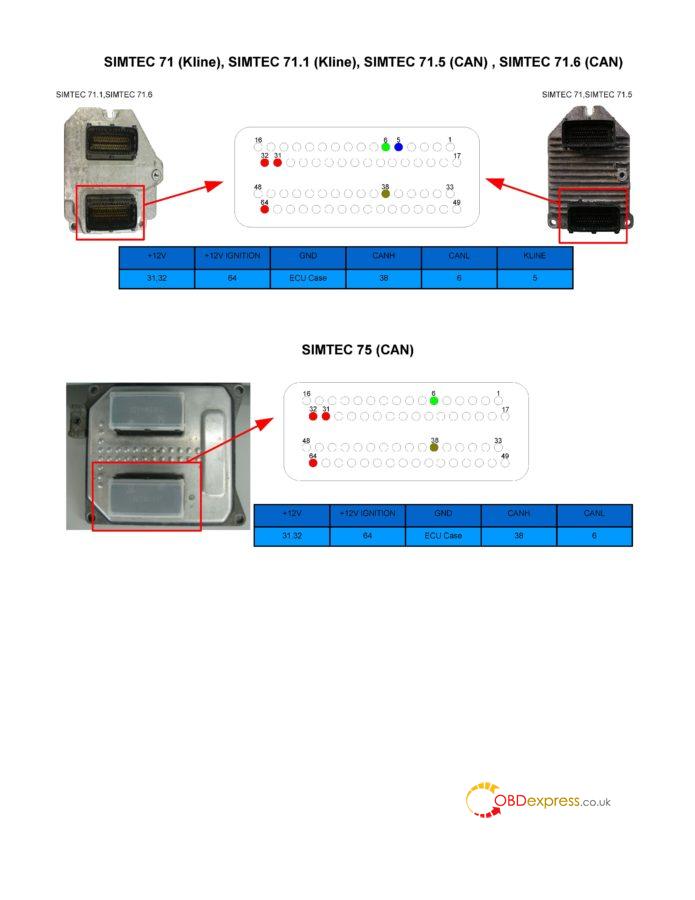
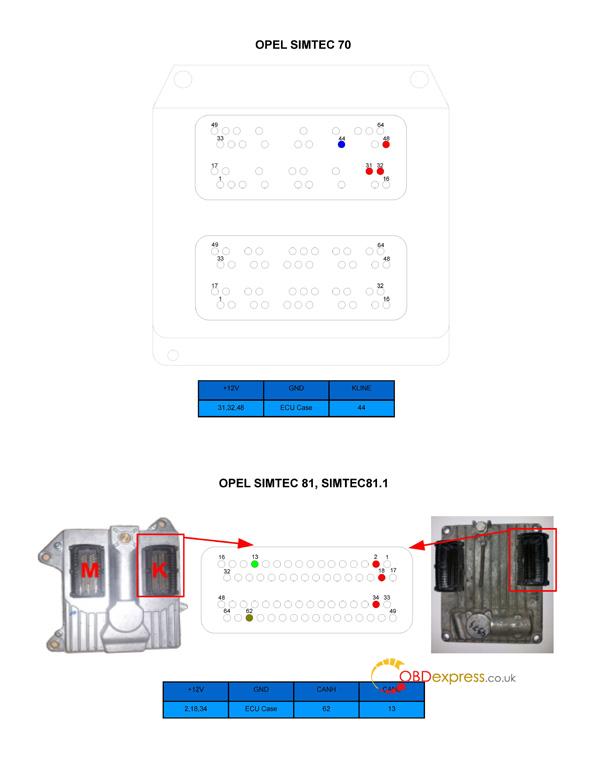
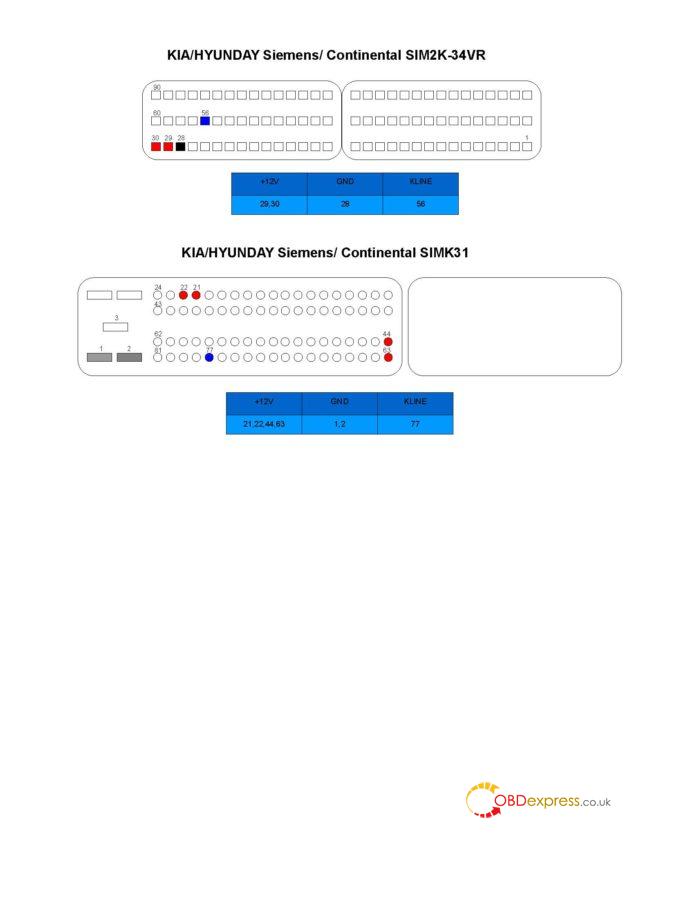
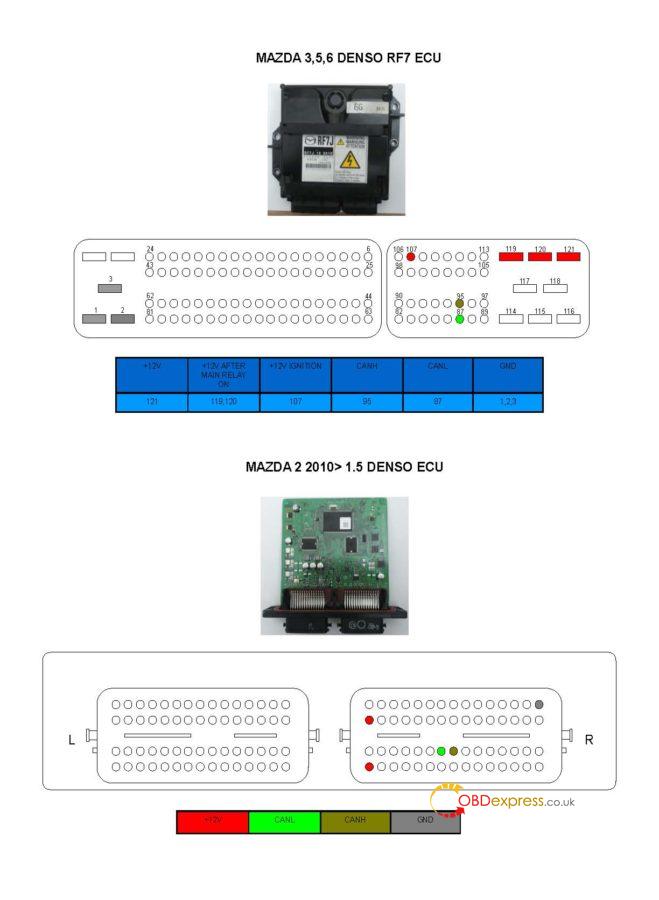
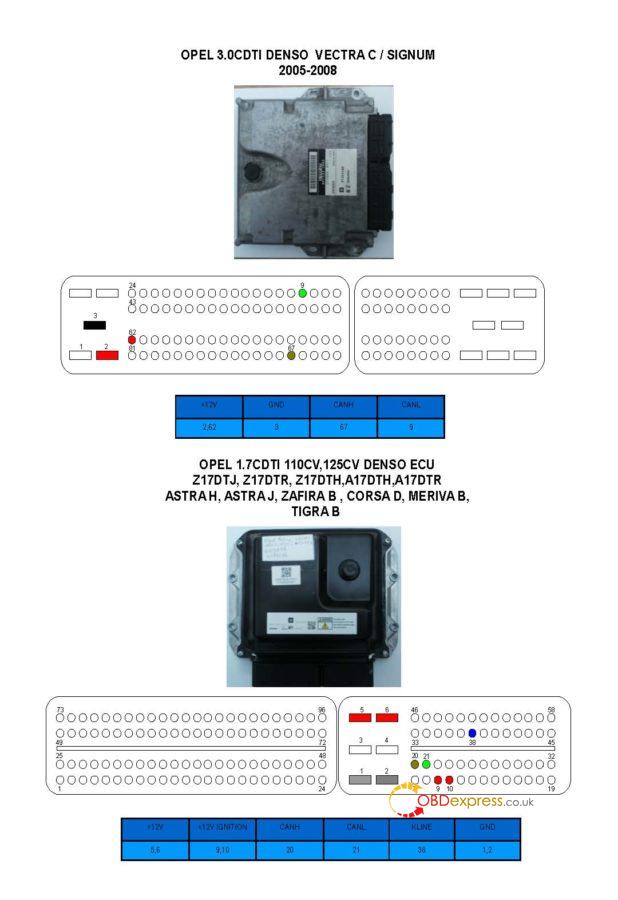
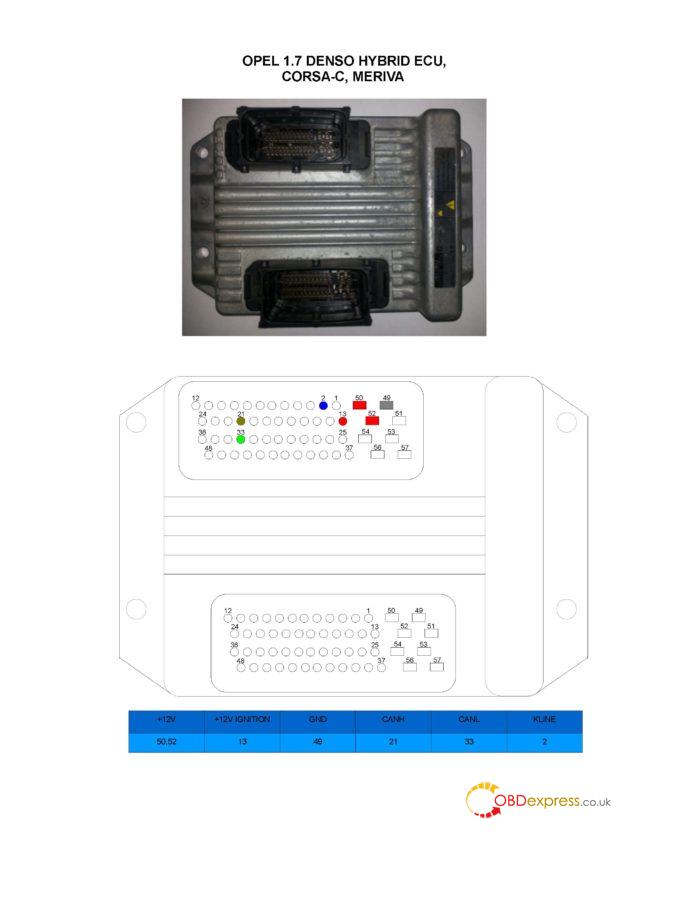
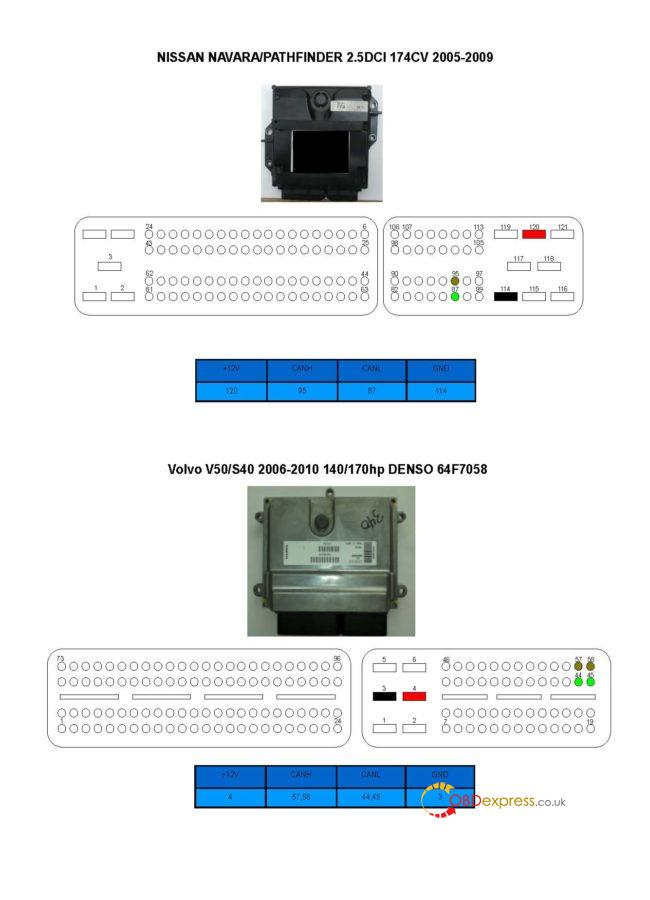
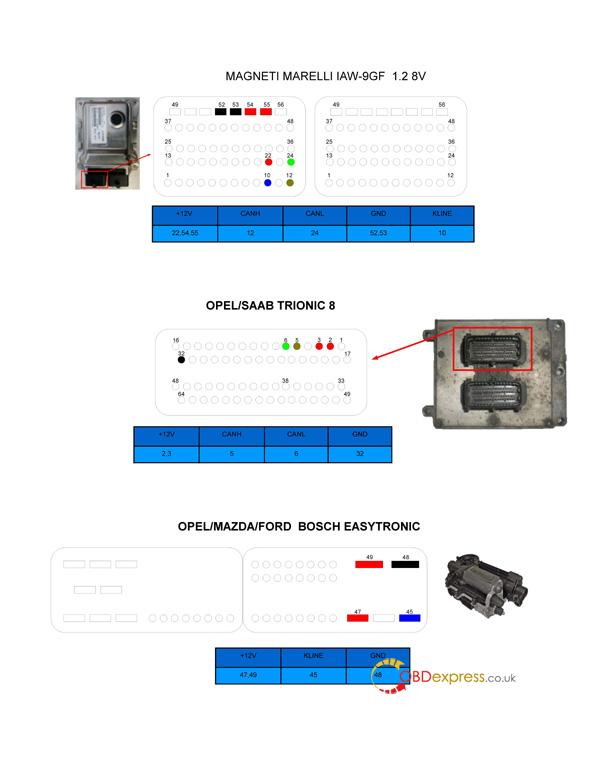
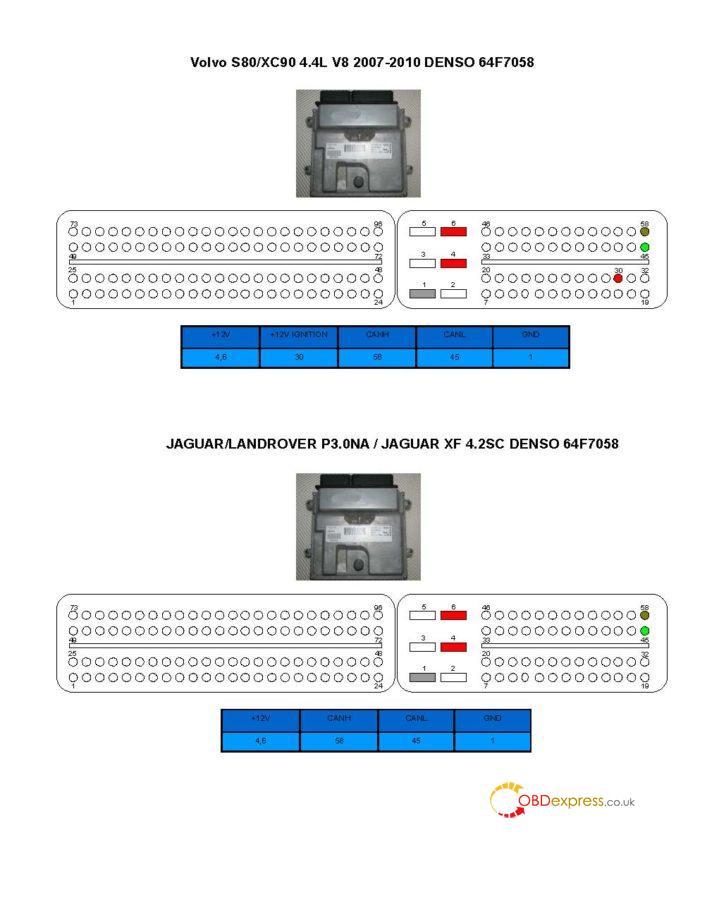
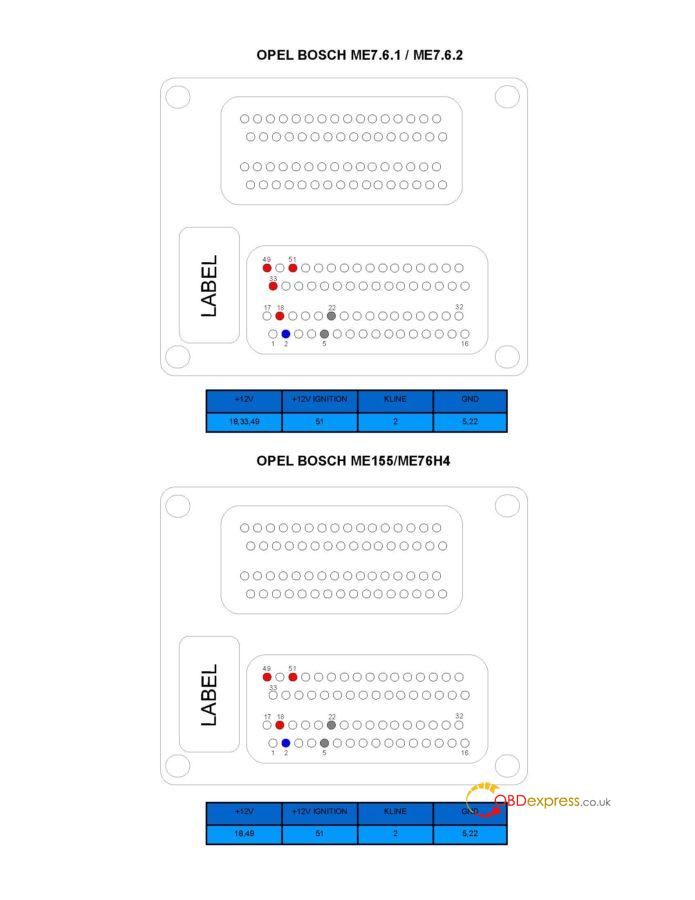
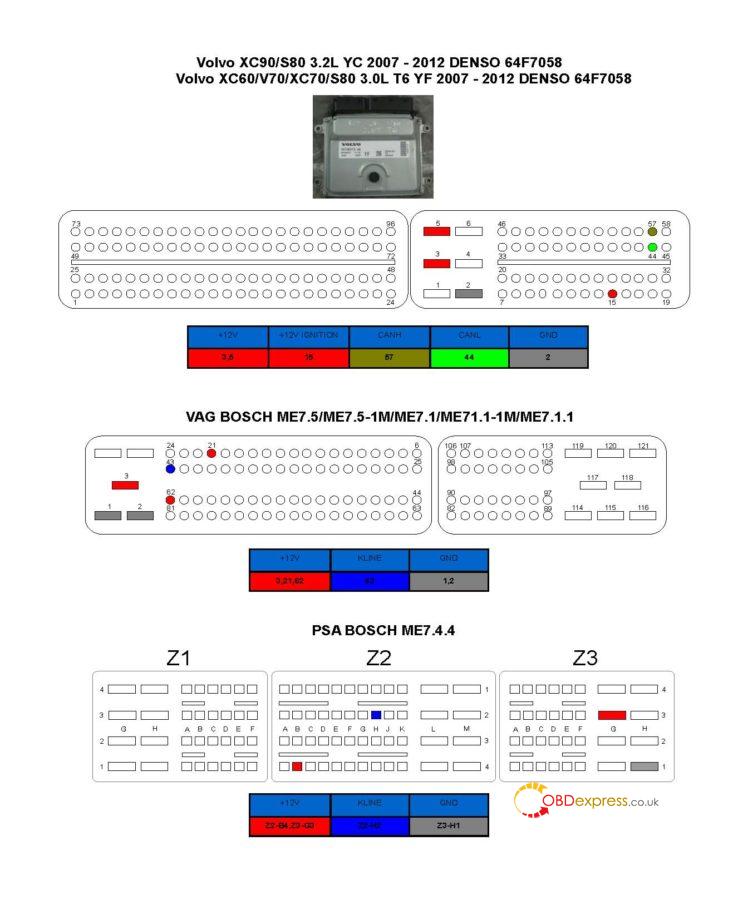
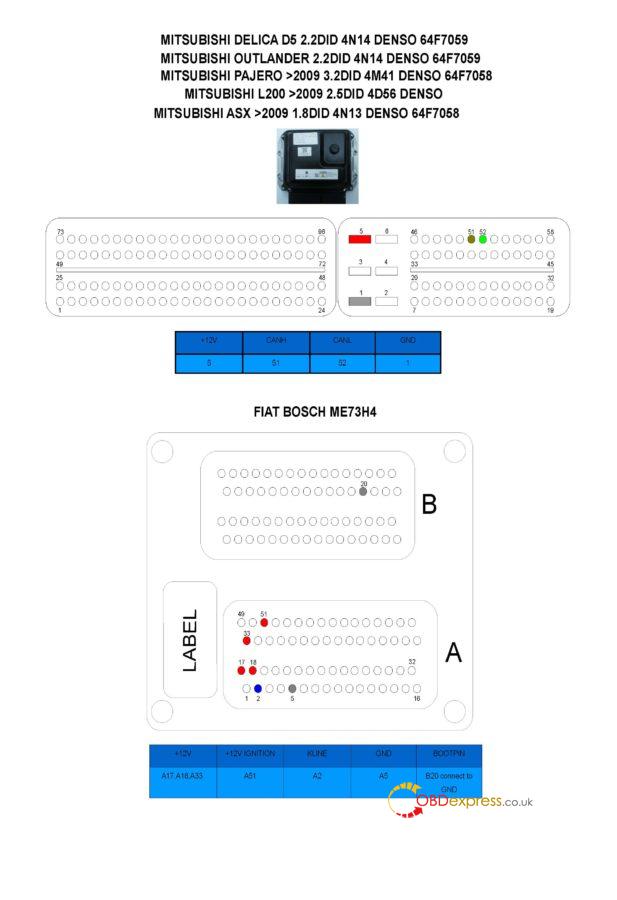
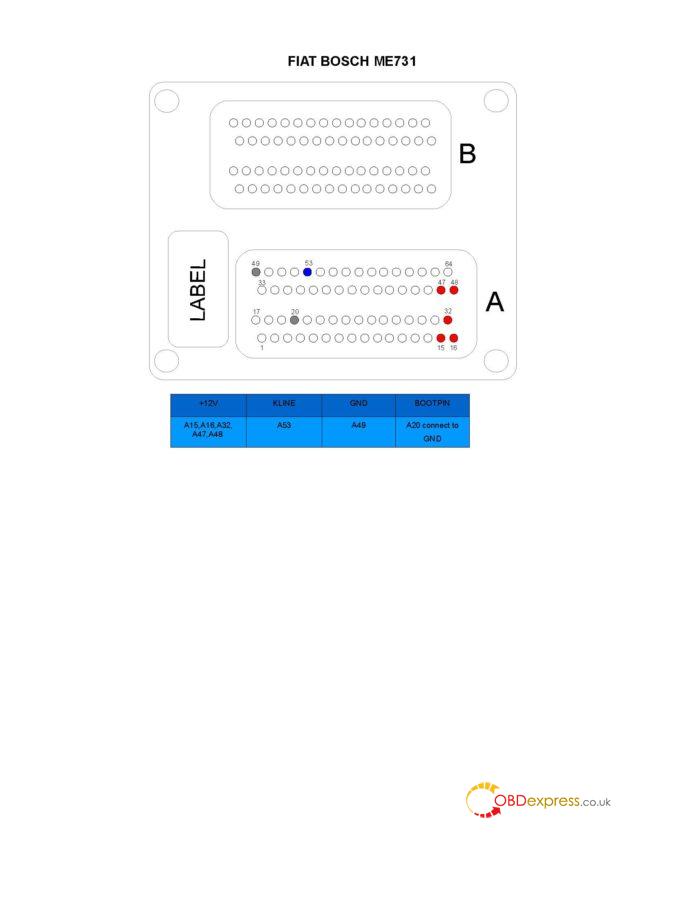
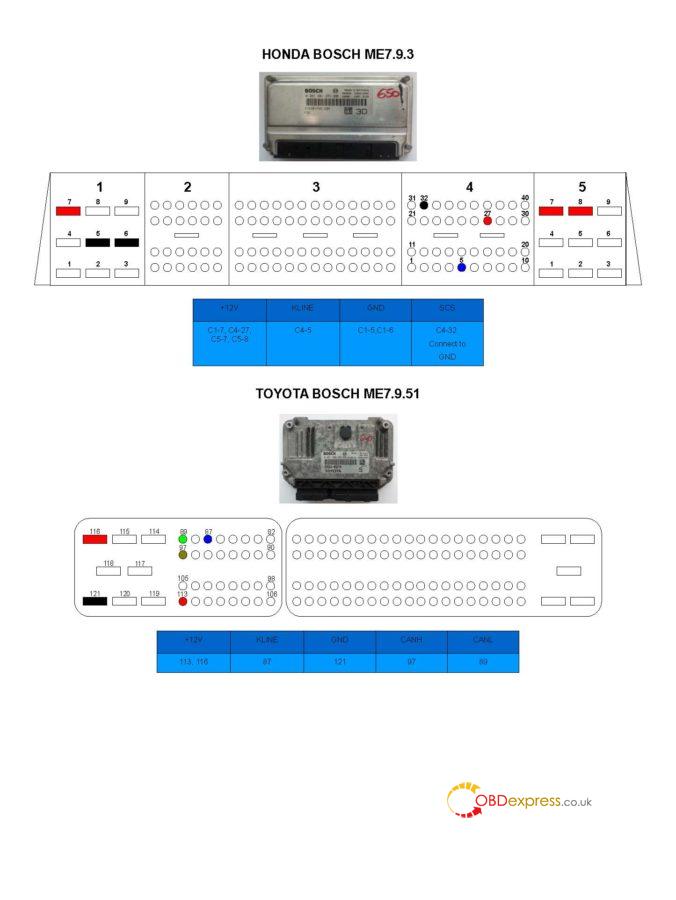
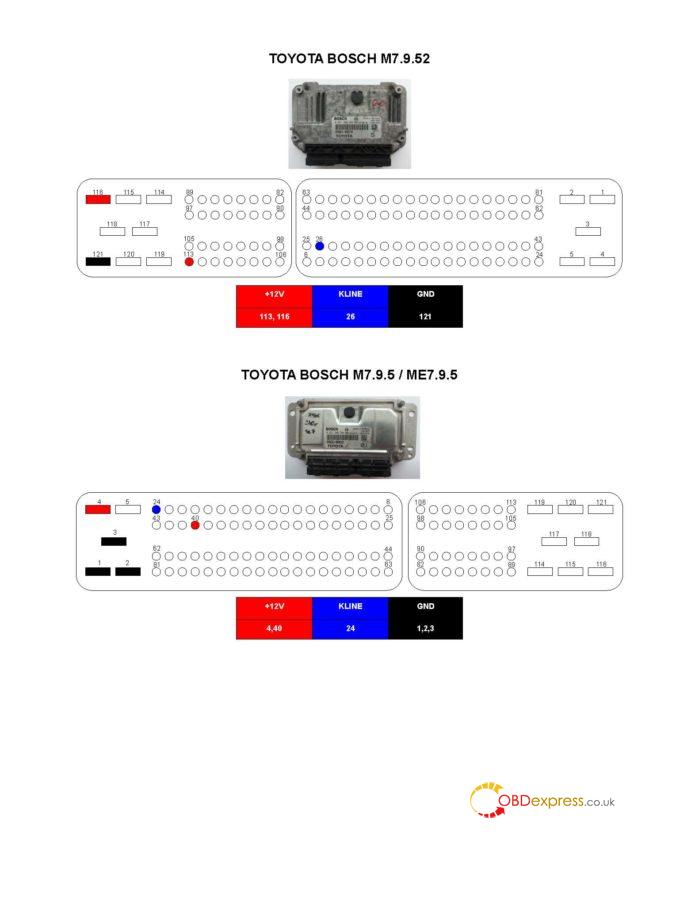
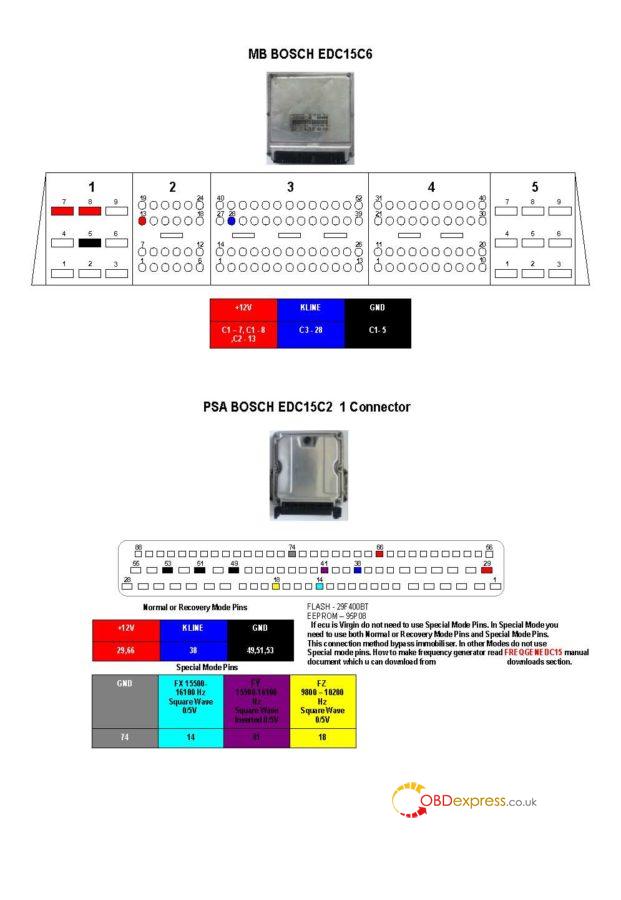
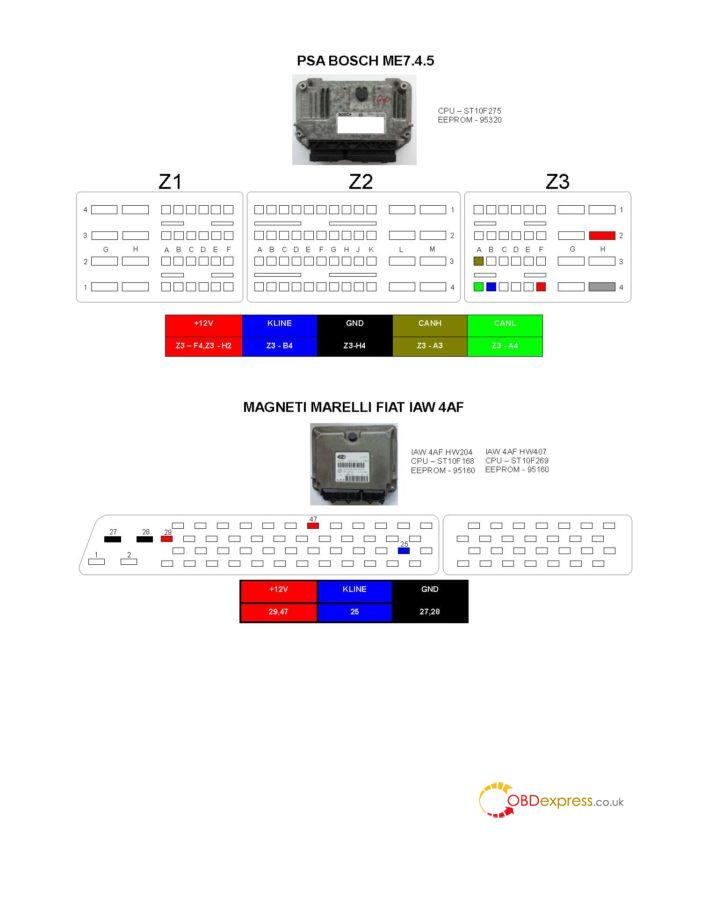
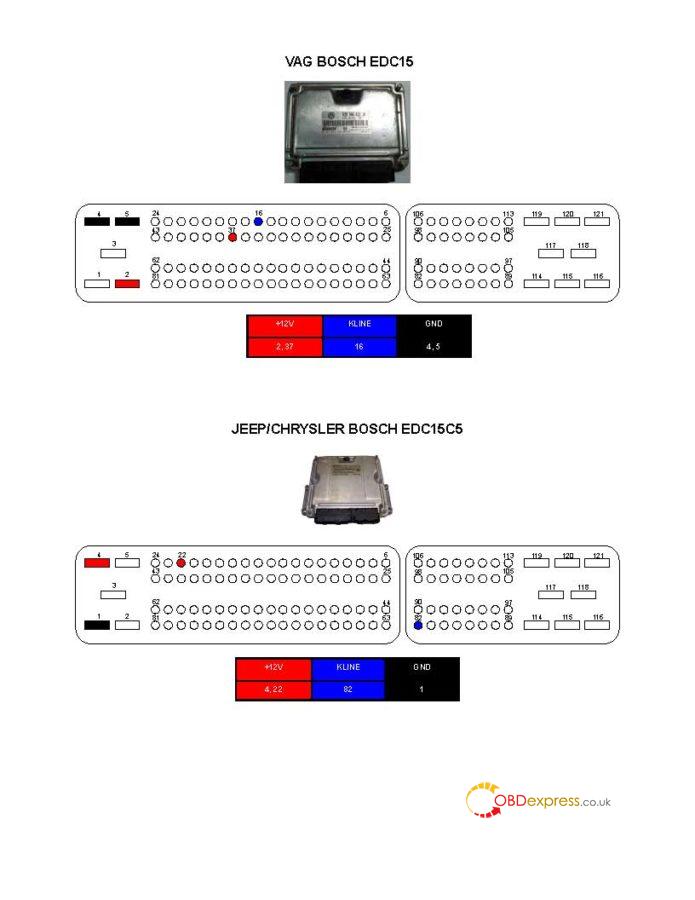
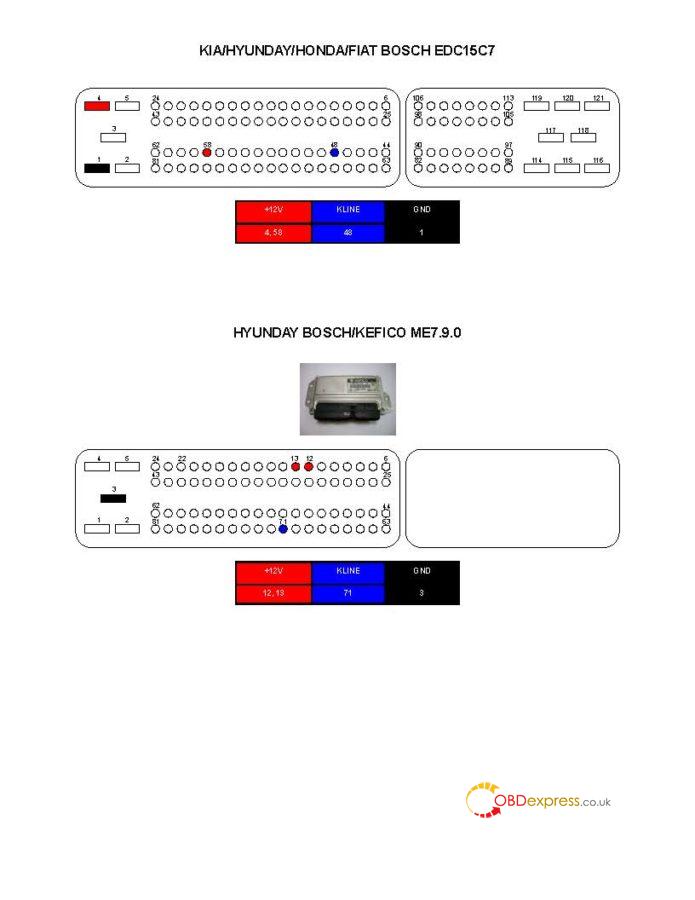
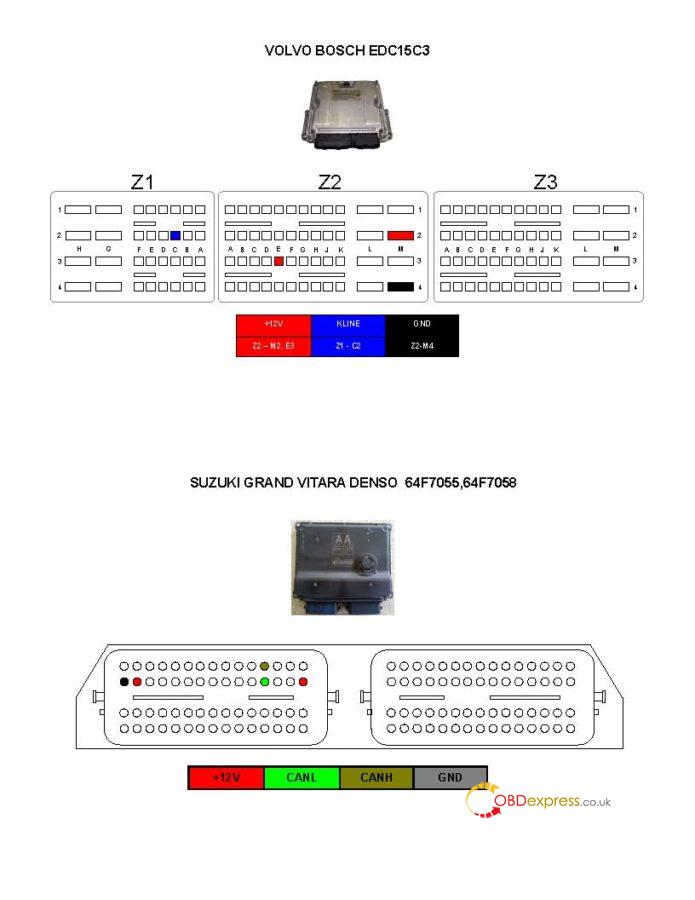
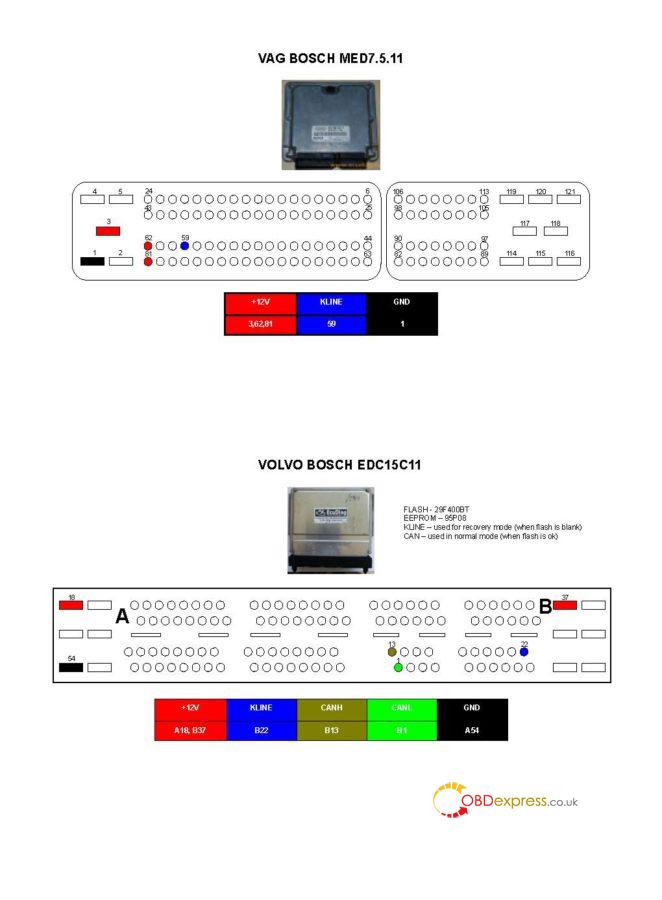
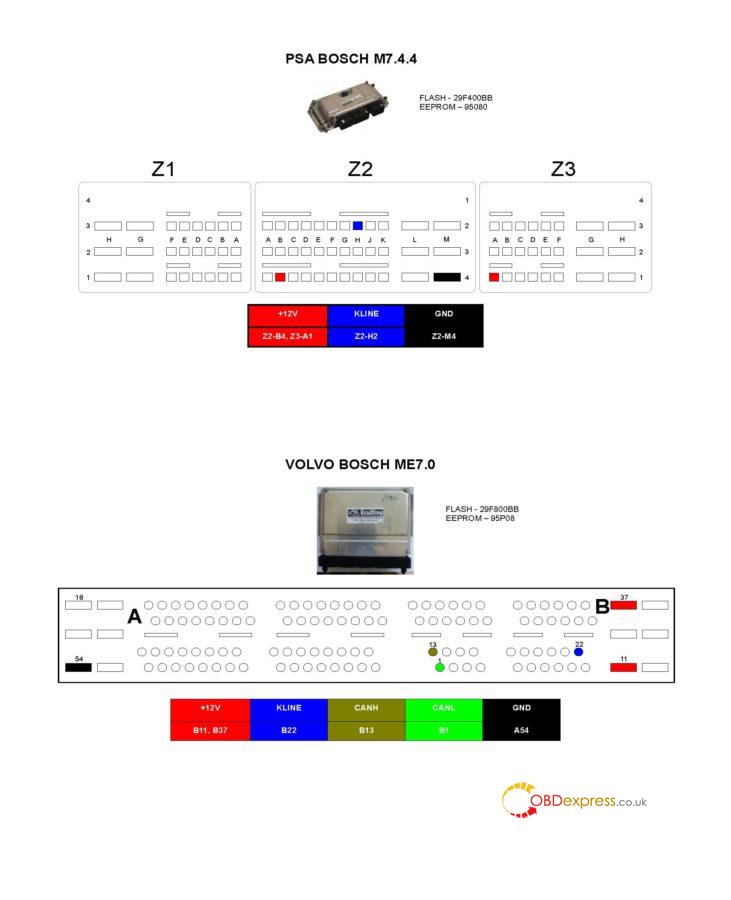
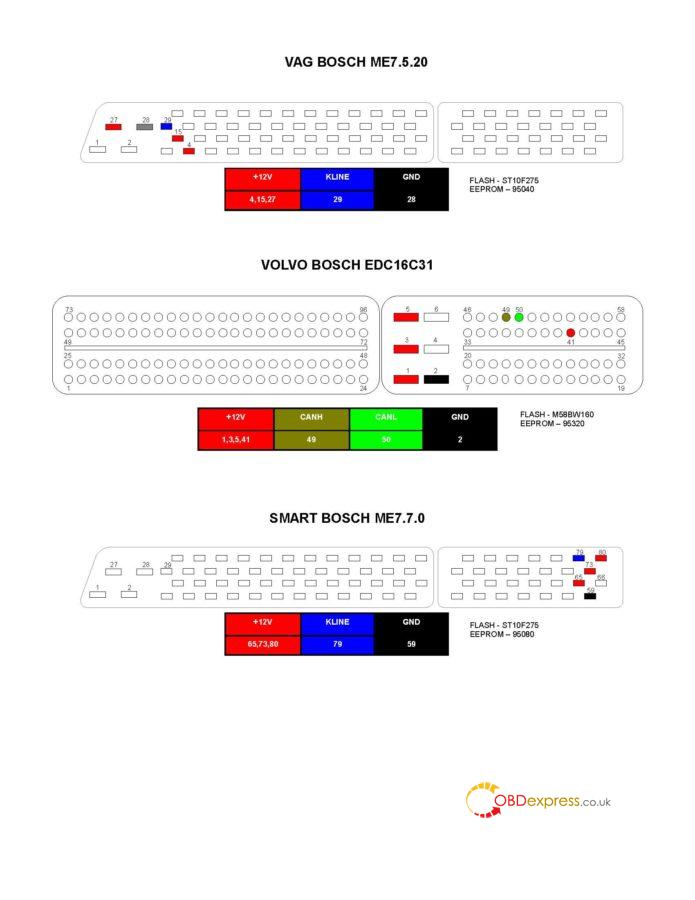
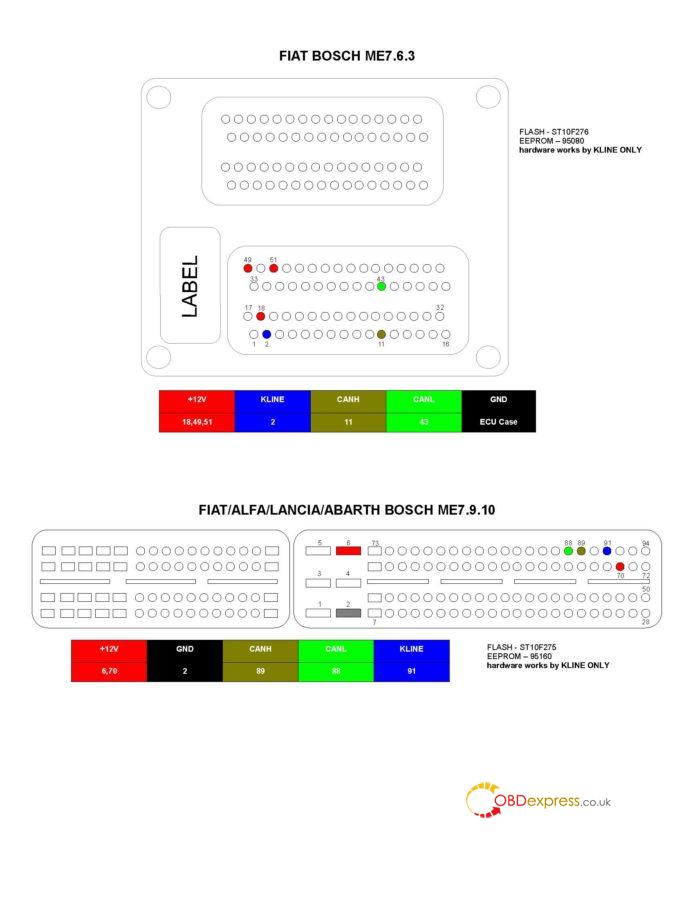
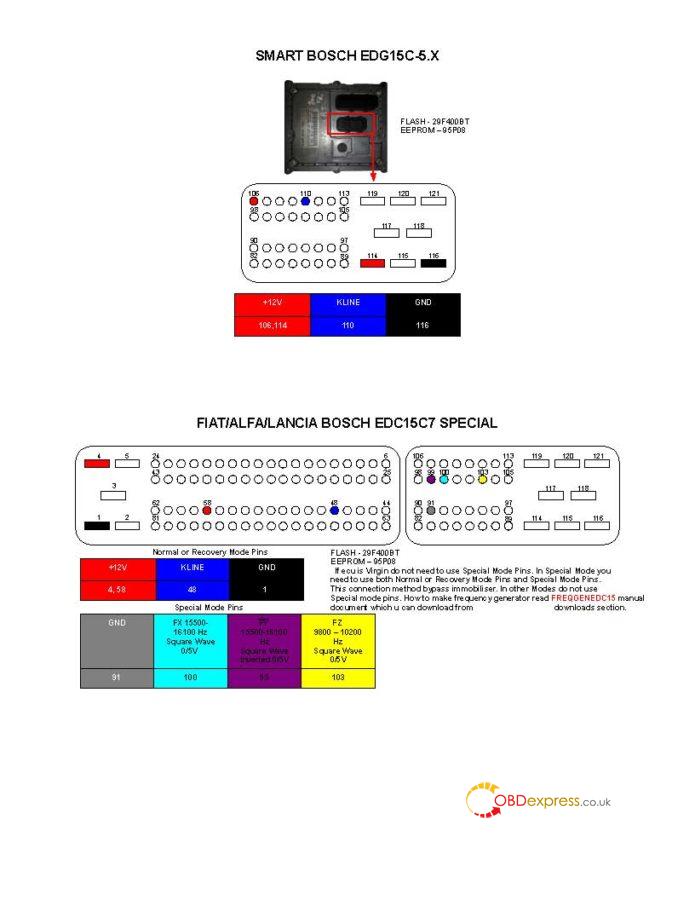
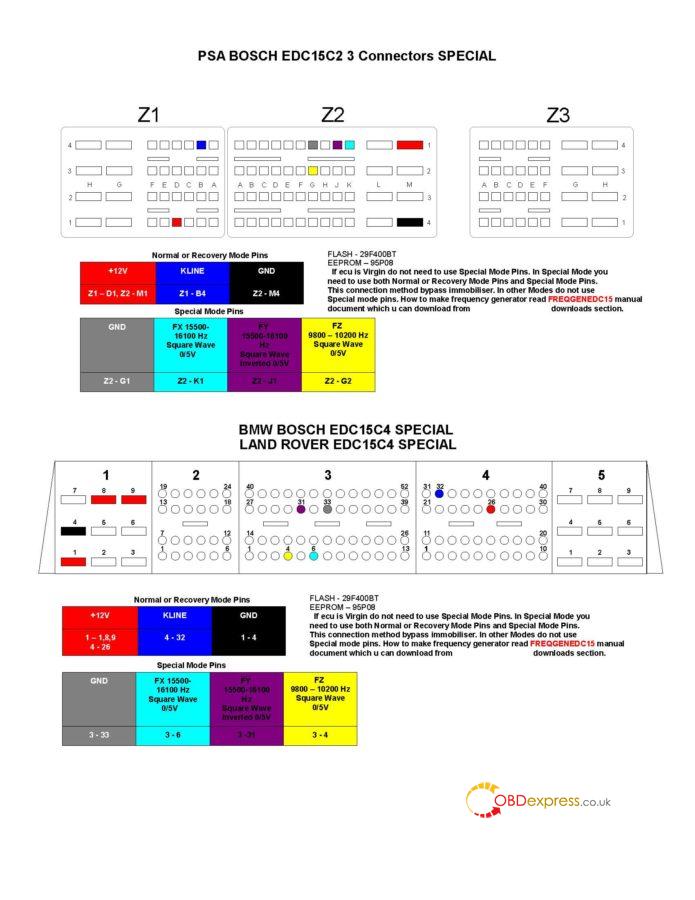
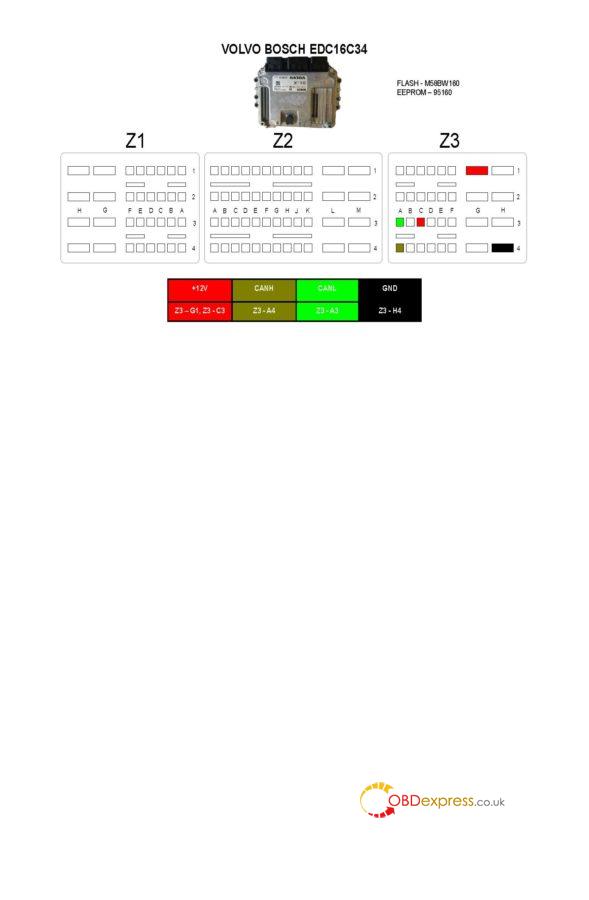
This article is available with all pinout ofMPPS V18with breakout cable.
#MAGNETI MARELLI IAW-9GF 1.2 8V
#MAGNETI MARELLI MJD 1.3 FIAT, OPEL, SUZUKI. 6JO, 6JF, 6O2, 6O3, 6F3
#MAGNETI MARELLI MJD8 1.3 FIAT. 8F2, 8F3, 8GSF, 8GSW, 8GMF, 8DF
#MAGNETI MARELLI FIAT/FORD IAW 5SF8, IAW 5SF9 , IAW 5SF3
#MAGNETI MARELLI FIAT IAW 5NF.T1
#MAGNETI MARELLI FIAT IAW 5NF.T9
#MAGNETI MARELLI FIAT IAW 4AF
#MAGNETI MARELLI FIAT IAW 59F/5AF/4AF
#MAGNETI MARELLI FIAT IAW 5SF4,IAW 5SF.XX
#SID801, SID801A, SID802, SID803, SID803A, SID804, SID805, SID806 #SID201
#SIM22, SIM24, SIM28, SIM29, SIM210
#DUCATI SIEMENS/CONTINENTAL M3C
#SIMTEC 71 (Kline), SIMTEC 71.1 (Kline), SIMTEC 71.5 (CAN) , SIMTEC 71.6 (CAN)
#SIMTEC 75 (CAN)
#OPEL SIMTEC 70
#OPEL SIMTEC 81, SIMTEC81.1
#OPEL BOSCH ME7.6.1 / ME7.6.2
#OPEL BOSCH ME155 / ME76H4
#KIA/HYUNDAY Siemens/ Continental SIM2K-34VR
#KIA/HYUNDAY Siemens/ Continental SIMK31
#MAZDA 3,5,6 DENSO RF7 ECU
#MAZDA 2 2010> 1.5 DENSO ECU
#MAZDA RX8 DENSO 64F7055
#MAZDA 3 2007 1.6 16V DENSO ECU
#OPEL 3.0CDTI DENSO VECTRA C / SIGNUM2005-2008
#OPEL 1.7CDTI 110CV,125CV DENSO ECUZ17DTJ, Z17DTR, Z17DTH,A17DTH,A17DTR #OPEL 1.7 DENSO HYBRID ECU,CORSA-C, MERIVA
#SUZUKI 1.3/1.5/1.6 DENSO 64F7055, 64F7058
#SUZUKI JIMNY 1.3 85ps DENSO 64F7055
#SUZUKI GRAND VITARA DENSO 64F7055,64F7058
#MITSUBISHI DELICA D5 2.2DID 4N14 DENSO 64F7059
#MITSUBISHI 2.5 DID 136CVL200/PAJERO-4D56/4M41
#MITSUBISHI OUTLANDER 2.2DID 4N14 DENSO 64F7059
#MITSUBISHI ASX >2009 1.8DID 4N13 DENSO 64F7058
#SUBARU FORESTER 2007 2.0D 150hp KH DENSO 64F7058 #NISSAN NAVARA/PATHFINDER 2.5DCI 174CV 2005-2009
#Volvo V50/S40 2006-2010 140/170hp 64F7058
#Volvo V70/S60/S80 140/170hp DENSO 64F7058,64F7055
#Volvo S80/XC90 4.4L V8 2007-2010 DENSO 64F7058
#Volvo XC90/S80 3.2L YC 2007 -2012 DENSO 64F7058
#Volvo XC60/V70/XC70/S80 3.0L T6 YF 2007 -2012 DENSO 64F7058 #JAGUAR/LANDROVER P3.0NA / JAGUAR XF 4.2SC DENSO 64F7058
#OPEL/SAAB TRIONIC 8
#OPEL/MAZDA/FORD BOSCH EASYTRONIC
#SIMOS 3.3A, SIMOS 3.4A, SIMOS 3PA, SIMOS 3PB, SIMOS 3PC, SIMOS 3PD, SIMOS 3PE
#VAG SIMOS 6.2
#VAG SIMOS 7.1, SIMOS 7.1A
#VAG SIMOS 9.1
#VAG BOSCH ME7.5/ME7.5-1M/ME7.1/ME71.1-1M/ME7.1.1
#VAG BOSCH ME7.5.10
#VAG BOSCH EDC15
#VAG BOSCH MED7.5.11
#VAG BOSCH ME7.5.20
#MB BOSCH EDC15C6
#FIAT BOSCH ME731 BOOT
#FIAT BOSCH ME73H4 BOOT
#FIAT BOSCH ME7.6.3
#FIAT/ALFA/LANCIA/ABARTH BOSCH ME7.9.10
#FIAT/ALFA/LANCIA BOSCH EDC15C7 SPECIAL
#HONDA BOSCH ME7.9.3
#TOYOTA BOSCH ME7.9.51
#TOYOTA BOSCH M7.9.52
#TOYOTA BOSCH M7.9.5 / ME7.9.5
#TOYOTA BOSCH EDC15C9
#PSA BOSCH M7.4.4
#PSA BOSCH ME7.4.4
#PSA BOSCH ME7.4.5
#PSA BOSCH EDC15C2 1 Connector
#PSA BOSCH EDC15C2 3 Connectors SPECIAL
#JEEP/CHRYSLER BOSCH EDC15C5
#HYUNDAY BOSCH/KEFICO ME7.9.0
#KIA/HYUNDAY/HONDA/FIAT BOSCH EDC15C7
#VOLVO BOSCH EDC15C3
#VOLVO BOSCH EDC15C11
#VOLVO BOSCH ME7.0
#VOLVO BOSCH EDC16C31
#VOLVO BOSCH EDC16C34
#SUZUKI MAGNETI MARELLI 8DS
#SMART BOSCH ME7.7.0
#SMART BOSCH EDG15C-5.X
#LAND ROVER RANGE ROVER AJ33 4.2 DENSO 64F7058
#MB BOSCH EDC15C6
#BMW BOSCH EDC15C4 SPECIAL
#LAND ROVER EDC15C4 SPECIAL
Various ECU pinout for MPPS V18 one by one:


Posted by: OBDexpress.co.uk at
02:35 AM
| No Comments
| Add Comment
Post contains 446 words, total size 29 kb.
34 queries taking 0.0584 seconds, 151 records returned.
Powered by Minx 1.1.6c-pink.

