


August 11, 2020
V2020.06 MB Star sd connect C4 C5 Xentry Xentry Diagnostics OpenShell has been tested and work no issue.
Here is a manual of it,incl: Download free,how to activa and set IP, C4 wifi settings WIN10/ WIN7
Here you are:
Xentry Diagnostics OpenShell 2020.6.4 newly update: Add GCS190 XUS SOLUTION TO FIX SCN ONLINE RDS ERRORS VER 2.0 UPTO 2020.06. The following parts offer the free download source.
XENTRY Diagnostics OpenShell 06/2020 (20.6.4) – Official Download
https://daimlerdownloads-a.akamaihd.net/e/xentryupdateservice/xd_updates/XDOS_20.6.4.zip
work with C3 or sd connect C4
Mega Link:
https://mega.nz/file/jgwGgAqb#FX0HOd3BDXBYqmSZmNDj8Yn5jOnsmaM4UtsBx_H_iuk
This XDOS 2020-06.4 can be installed in WIN 7x32x64, WIN 10×32 or WIN10x64bit (Recommended)
Compatible with:SDConnect (C4), Xentry Connect (Xentry kit 2), MB VCI (Xentry kit 3)
Xentry passthru does not support these vehicles in DAS:
– Bharat Benz
– Foton
– Fuso
– LKW
– IMO
– Unimog
– PKW using HHT
Mega link:
This XDPT 2020_6_3 can be installed inWIN7x64, WIN10x64 (Recommended)
https://mega.nz/file/CtQmkABb#0Ww9_YgNctFWcnParjWZaj5yrhWkTgtR95h38NrBwTU
XENTRY Diagnostics OpenShell 06/2020 (20.6.4) tested source
SSD:https://www.obdexpress.co.uk/wholesale/latest-mb-star-diagnosis-ssd-for-win7-win10.html
HDD:
https://www.obdexpress.co.uk/wholesale/latest-mb-star-diagnosis-hdd-for-win7-win10.html
How to Actiate 06.2020 Xentry OpenShall and Setup IP
SD Connect C4 wifi settings windows 10 & windows 7
- First of all, check if all your Wlan card support hosted network or not .
Go to ‘search window’ and type "cmd†or "commandâ€, rightâ€click ‘Command Prompt†and
choose "Run as administrator†on the menu

type "netsh wlan show drivers†and look the "hosted network supportedâ€. It has to be "Yes".
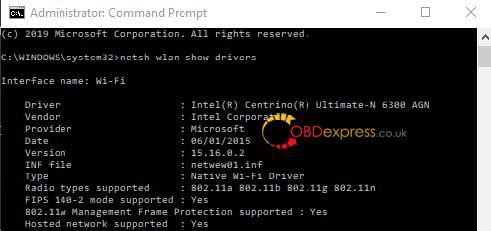
If its value is NO, it means your wifi card doesn’t support it. You can buy a WiFi dongle that its
windows 10 driver support both adâ€hoc and hosted networks.
To save an ad-hoc network and its network key on the guest
computer (thanks to Sarrukin)
Windows 10 & windows 7
Note down the SSID, security type, encryption type and the key of the adâ€hoc network.
Disconnect your connection to any wireless network and switch off/disable your wireless device. Turn
on/enable your wireless device but don’t connect to any network. (Thanks GK.)
Click on the network icon in the taskbar.
Click Open Network and Sharing Center > Manage Wireless Networks > Add.
Click "Manually create a network profileâ€. (This may look silly but we really are going to create an
infrastructure network now.)
Enter the network name (SSID), security type, encryption type (if any) and the key that you noted in
step 1.
Uncheck both checkboxes ("Start this connection automatically†and "Connect even if the network is
not broadcastingâ€.) [Note that you cannot have the connection start automatically. If you try to have
it checked, step 10 will fail. A different way to start it automatically during system boot is described
below.] Click Next > Close. Your connection must appear in the list with the icon suggesting
infrastructure (two big screens connected to a tube). Don’t worry about it.
Click Start, type in "cmd†in the search box, press Enter.
In the Command Prompt, type in "netsh wlan set profileparameter name=NetworkName
ConnectionType=IBSSâ€, exactly as shown, without quotes, except you must substitute NetworkName
with the SSID (network name) of your adâ€hoc network.
If everything went well, you’ll see that the icon has now changed to an adâ€hoc icon (three small
screens connected to each other) in the Manage Wireless Networks window.
Turn on/enable your wireless device, and try connecting to the Adâ€hoc network. You will notice that
you no longer need to enter the network key.
To automatically connect to a saved adâ€hoc network during Windows boot (can be applied to both
guest and host computers running Windows 7)
Click Start > point to All Programs > rightâ€click Startup > click Open. (You may choose Open All Users
instead if you prefer).
Rightâ€click an empty space and click New > Shortcut.
Type in "netsh wlan connect NetworkNameâ€. Once again, NetworkName must be substituted with
the SSID of your adâ€hoc network.
Click Next and enter a fancy name such as "Connect to NetworkName†or something like that.
Click Finish and you’re done. This shortcut will run when Windows starts up, giving you a very brief
flash of the black command window, followed by your computer connecting to the adâ€hoc network
if it is available. Tip: You can also pin the shortcut in your taskbar or copy it to the desktop to easily
connect to the network any time you want.
Note: You will probably need Administrator access to complete some of the steps above (in both
procedures).
Source:http://blog.obdexpress.co.uk/2020/08/10/free-download-xentry-diagnostics-openshell-2020-6/
Posted by: OBDexpress.co.uk at
01:20 AM
| Comments (6)
| Add Comment
Post contains 702 words, total size 30 kb.
Posted by: Carpentry Service Vienna VA at June 16, 2021 12:50 PM (49dSr)
Posted by: Brake Caliper Painting Services in Stone Mountain GA at June 18, 2021 07:22 AM (OQWo5)
Posted by: peter John at July 06, 2021 11:45 AM (uvOvW)
Posted by: jhon alex at July 13, 2021 06:06 AM (OQWo5)
Posted by: Nailey Scott at October 26, 2023 12:13 PM (wNUpD)
Posted by: pay someone to do your course at March 22, 2024 06:36 AM (TrawM)
37 queries taking 0.0911 seconds, 122 records returned.
Powered by Minx 1.1.6c-pink.

