February 27, 2017

How To Use LAUNCH X431 HD Module Heavy Duty Truck Diagnostic Adapter

Launch X-431 Heavy Duty HD Truck Diagnostic Adapterworks together with X431 V/V+/PRO/PRO 3/PAD II, turn your device to heavy duty scanner.

Here is a user manual for new arrived LAUNCH X431 HD Module Heavy Duty Truck Diagnostic Adapter

Incl four parts:
Part 1:Knowledge of X-431 HD Module
Part 2:How to connect OBD II vehicle
Part 3:How to connect non-OBD II vehicle
Part 4: Download and Install X-431 HD Module App
Part 5:Activate X-431 HD Module
Part 1:Knowledge of Launch X-431 HD Module
X-431 Heavy-duty Truck Module is a new generation heavy-duty truck fault diagnostic tooldeveloped by Launch Tech regarding internet application on the basis of Android OS. It communicates withX-431 PRO3/ X-431PAD IIthrough Bluetooth to achieve fault diagnosis for various car models and full systems. Advantages include wide car model coverage, powerful test function, more special functions and accurate test data, etc.
Features
1. Applicable to diesel vehicle of 12V & 24V voltage; no need for battery conversion when testing 24V trucks;
2. Supports a wide range of vehicle models covering Asian, American and European etc;
3. Powerful testing function enables you to diagnose all electronic control system;
4. International design to adapt to all diagnostic sockets.
Ports and Indicators of X-431 HD Module

how-to-use-launch-x431-hd-1how-to-use-launch-x431-hd-2how-to-use-launch-x431-hd-3
Technical Parameters
* Working voltage: 8~24V
* Working temperature: -15℃ ~ 60℃
* Storage temperature: -20℃ ~ 70℃
* Relative humidity: 10% ~ 80%
* Dimension: 110 mm * 178 mm * 50 mm
Part 2:How to connect OBD II vehicle
Follow the steps described below to proceed:
1. Locate vehicle’s DLC socket. The DLC is usually located 12 inches from the center of the instrument panel
(dash), under or around the driver’s side for most vehicles. If Data Link Connector is not located under
dashboard, a label should be there telling location. If the DLC cannot be found, refer to the vehicle’s
service manual for the location
how-to-use-launch-x431-hd-4
2. Connect one end of the main cable to the diagnostic socket, and then connect other end to the vehicle’s
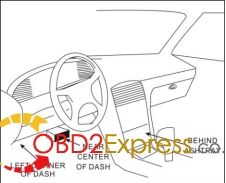
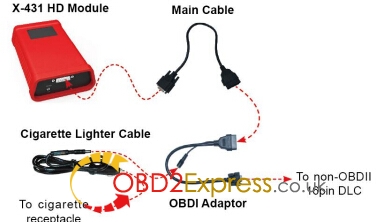
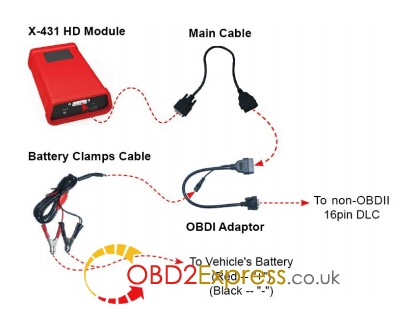
DLC (For non-16 pin DLC, you need to choose the corresponding diagnostic connector).
how-to-use-launch-x431-hd-5
Part 3:How to connect non-OBD II vehicle
Choose one of the following to connect non-OBD II vehicle:
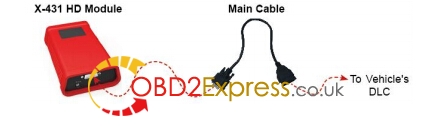
1. Via Cigarette Lighter
how-to-use-launch-x431-hd-6
2. Via Battery Clamps Cable
how-to-use-launch-x431-hd-7
Part 4: Download andInstall X-431 HDModule App
1. Visit the LAUNCH website and download the application corresponding to X-431 HD module; Note: If downloading using the diagnostic tool please make sure Wi-Fi has good or strong signals. 2. Follow the on-screen instructions to install it. Once installation is complete, an application icon will appear on the HOME screen.
Part 5:Activate X-431 HD Module
After purchasing X-431 HD module, you have to activate it before use. Follow the steps below to proceed:
1、 Launch the application, and tap to enter;
2、 Tap "Profile” from the pull-down menu, and then taphow-to-use-launch-x431-hd-8"Connector Activation”;
3、 Input the Serial Number and Verification Code, which can be found in the included password envelope. Tap "Activate”.

Posted by: OBDexpress.co.uk at 03:45 AM | No Comments | Add Comment
Post contains 512 words, total size 7 kb.

February 16, 2017

How to use VVDI Prog to read cas4 5M48H:

This post will share how toeasily read / write / save BMW CAS4 with highly secured MCU MC9S12XEP100 Masked as 5M48H inside viaXhorse Vvdi Prog programmer.


Main step guide below:

Open VVDI Prog software, select type, manufacture and model as MC9S12XEP100)

Click "Wiring Diagram"

Maximize wiring diagram: right click and select "zoom window", then pull down window.

Follow the wiring diagram to connect CAS to the VVDI Programmer.

Start to connect the cable.

The left zone is done, next is to do the right zone.

In this wiring diagram, it only need to remove one 0 ohm resistor to read out data, but one CAS ECU structure is different another one, some needs remove more electronic parts; we will show how to do in the other videos.

Next is to remove this 0 ohm resistor.

Wiring is done, 0 ohm resistor is removed

Plug adapter into VVDI Pro.

Close wiring diagram.

Select "New" – " Read"

You see it is reading data very fast.

Reading data successfully, click "Save"

Next is to check data.

Open the data, drag the mouse to check, okay, data is all read out, close it.


Attach photos of the reading procedure

How to read / write / save BMW CAS4 via Vvdi Prog programmer


How to read / write / save BMW CAS4 via Vvdi Prog programmer


How to read / write / save BMW CAS4 via Vvdi Prog programmer


How to read / write / save BMW CAS4 via Vvdi Prog programmer


How to read / write / save BMW CAS4 via Vvdi Prog programmer


How to read / write / save BMW CAS4 via Vvdi Prog programmer


How to read / write / save BMW CAS4 via Vvdi Prog programmer


How to read / write / save BMW CAS4 via Vvdi Prog programmer


How to read / write / save BMW CAS4 via Vvdi Prog programmer


Enjoy!


SOURCE:

Posted by: OBDexpress.co.uk at 03:37 AM | No Comments | Add Comment
Post contains 208 words, total size 8 kb.

<< Page 1 of 1 >>
21kb generated in CPU 0.0066, elapsed 0.0316 seconds.
31 queries taking 0.0266 seconds, 43 records returned.
Powered by Minx 1.1.6c-pink.